Leaderboard


Popular Content
Showing content with the highest reputation on 08/05/2017 in Posts
-
Hengstler coil part progress2 points
-
Brackets made Hard to get a good photo with the angles Still deciding if I want the blades to fold, I really want to use EL wire on them like my baton so may have to be fixed for this version1 point
-
Thanks magni! It would be a huge achievement for me.1 point
-
Keep up the good work! Always room for another HWT Centurion!1 point
-
Exactly what I was thinking1 point
-
I think for the premiere I may shrink wrap a few things1 point
-
A slip over end cap sounds like a good idea1 point
-
The center one is glistening lol. I'm calling advertising artwork add1 point
-
Correct1 point
-
There aren't limits really, just don't go extreme. A thread on cover strips here may be useful. Also here For really large thighs I've seen spacers glued in Once again speak with your GML as they are the ones who will be approving your costume ;).1 point
-
Thanks Tennant, It has been a while since i completed this, glad that my build is still getting a few views..1 point
-
Hey there Dan, I will have a look for you.. Have a look at the pic's on my gallery for how i did the bolt etc.. Really it was cosmetic on the outside (ejector port) and I used a marker shoved into a PVC pipe that came with TJ's completion set.. I finished both the outside and the bolt with a flat piece of plastic shaped and glued on.. http://sla73.imgur.com/all/#7 Here is a pic before I painted the barrel/ PVC pipe.. http://i.imgur.com/OQiABnG.jpg Cheers Bryn1 point
-
The originals were 12 inches from the lower edge up to the top cut , and five inches from the centre rib to each radial edge .1 point
-
Perhaps you can take a touch (less than an inch to be sure), but I personally think you look fine as it. Nothing wrong with broad, intimidating shoulders.\ On a different note, I LOVE that woman's "Don't be a BWB" tank top!1 point
-
Helmet is looking great Dan! I'll be keeping an eye on your build while I wait for my RWA kit to ship, hopefully, a lot of the questions I'll have will also be answered in your build before I even need to ask.1 point
-
Hey Darren, Andrew or myself will be with you shortly.1 point
-
Armor-bin is ready for transport - fits perfectly!1 point
-
Really a question for your GML (garrison membership liaison) some may allow it some may not. Ideally you shouldn't have that much of a gap, have you thought of replacing with larger cover strips, that would look better. Normally we try to put larger cover strips on the back of legs as they are not noticed as much by the public1 point
-
Accounts merged.1 point
-
Congrats on getting that beautiful set of armor! I can see from the photos that MTK has made numerous improvements over the years. You are off to a good start. The only thing I would say is to wear your under suit when you are fitting your pieces. Have fun!1 point
-
Looks like you are off to a great start. Good to see a fellow MTK aiming for centurion. Don't be afraid to ask questions.1 point
-
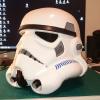
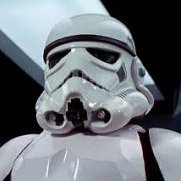
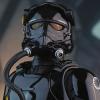
So I've been doing a little trooping and contemplating a new costume build, maybe a scout. Not sure yet but in my ever expanding need to get more Star Wars references I just got the Star Wars Costumes book which has the major costumes from the OT. It's really an amazing book. I was stunned by the incredible detail, color and texture that all the costumes have. The movies really don't capture the quality of these pieces. It's also has a bit of history on the costume makers and variations over the three movies. Here are a few images for your viewing pleasure. Below is one of the Hero helmets from ANH. Here's the Luke torso from ANH. Here's the ESB storm trooper. Note the lack of exposed screws on the ears and the painted frown. Here's the ROTJ suit. Here are the ANH vs ROTJ helmets. ANH is on the left and Looks so much better than the others. And for you Rebels out there, some sweet pictures of various helmets. The detail and weathering is incredible. Finally here's a group shot from the Detroit Maker Faire last weekend. I'm the short guy in the back row to the left of the sandy....literally can only see part of my head. This was an awesome event. I went to this event last year and it's what inspired me to do my build. So glad to be part of this great community of people. Photo by Shawn M. Scott.1 point
-
Wow, this is a nice looking build so far! Keep up the good work!1 point
-
the forearms are looking really good, can't wait to see them after you glue them.1 point
-
Hey Fredric upon further inspection we noticed your blaster does not have a charge handle. You'll need to add this before proceeding with your app. Here's a reference photo of what it should look like. Thank you1 point
-
Hey Jens, if you're concerned about excessive space you can always remove the lower cover strip and remove material from each side, or you can leave it as is and just add foam to stabilize it on your arm. On another note if you plan on shooting for Centurion in the future go ahead and remove the return edge on the wrist side, it's a requirement. Hope this helps.1 point
-
If you checkout tk1636 on YouTube he shows using the thermal det tube I believe to get the curve. Things are looking good! Sent from my iPhone using Tapatalk1 point
-
Drill the holes for the brackets in the crease of the return edge. Don't be too particular as the original brackets were placed in the creases or even on the face of the armour if the return edge had been trimmed too much.1 point
-
1 point
-
Ok finally got my photographer off his xbox! Regards Marc1 point
-
On the last leg of the lid build now. Ive installed the mic and padding ( along with a custom cog ) so all that's left to do is trim down the bolts and fit the chin strap. Im quite happy with how its come out and how the interior looks. Just waiting for the wireless transmittter to turn up now. For those interested, here is a pic of the computer nuts I used to mount the lenses along with how I did it Along with the modelling clay. Its a really simple job, but hard to put into words. I will try my best to explain ! 1. I removed the face plate as this gave me more room to work, but I guess it can still be done without doing this. 2. I mounted the nuts (with the bolts already screwed into them to avoid any putty getting into the nuts) into a small amount of modelling putty and rolled them into small cylinders. 3. Once dry I removed the screws from the nuts and marked out where the were going to go in the lid, test fit them and then sanded down the bottoms until the lay flush with the eyes. 4. Once dry, then it was time to install. I mounted the sockets by using ca glue and then addad more clay to stick the socket to the lid and improve the look. 5. I then offered up each lense and marked the position of the top outside post. I then punched the hole for the first screw, fitted the lense and then tightened it up when I was happy of its position. Doing this secured the lense whilst I marked the other holes. 6. I then removed the lenses, painted the new mounts white. Once dry I took off the protective film and installed the lenses again. Sent from my SM-T210 using Tapatalk1 point