Sgt Steve Posted October 6, 2009 Report Posted October 6, 2009 I hope you get to see this before you paint. I say if the leg' part's are ready to go the do Not paint the other part's. Have the lower blaster pack and knee plate painted first then fix them on. You may get paint build up in the corner's for one, and may get small paint crack's around the edge's. from wear. But it's up to you, and what work's for you as you build. I if I can paint part's first then fix them together. My .02 cent's. (remember Test Fit all part's befor any painting or glueing. Test fit the blaster pack before paint. The knee plate is better to work with but still test fit) Quote
naatsirhc[TK] Posted October 6, 2009 Author Report Posted October 6, 2009 Thanks for the input guys! I have a lot of work to do today to get ready for paint, it looks like another long night ahead. I had my wife take some pics today while I did a test fit, so I know where I still need to Dremmel. My daughter is so excited to have a stormtrooper daddy, she is a princess at heart but has a soft spot for the empire. I apologize for the blur in the photos, I was not at the helm. I took one shot of some armor pieces, I think I did alright with the assembly. It has been a nice learning experience for me. Please keep the comments and suggestions coming as I near the end. I still have to decide how to hold everything together. There are so many great build threads that cover this I am having trouble making up my mind. I will probably end up borrowing a bit from my favorite threads and maybe doing something new, as well. I had better get back to it. Thanks again Quote
Sgt JB Posted October 6, 2009 Report Posted October 6, 2009 Really comming along nice, the leg strips you were so worried about really came out nice!! Good job!!! Quote
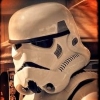
naatsirhc[TK] Posted October 9, 2009 Author Report Posted October 9, 2009 Thanks Eric, I'm trying! I was able to get some supplies and advice from a local IE detachment menber, Tim. He was very gracious to let me use his belt sander. He also hooked me up with my undersuit, strap material,foam pieces and the paint for my det tube. I am most grateful! I have been scrambling trying to get my armor finished for paint. I have to wet sand everything today and deliver to the painter tommorrow. I am happy with the paint, but I am having it shot with clear to add to the longevity of my bucket and armor. Here are two shots of my lid before clear coat A look at my gloves,leg snap belt and suspenders Making snaps using a countersink to bow the tab, when rivetted My det tube Sanded edges of tube to allow for caps to fit assembled tube before paint gluing snaps Quote
naatsirhc[TK] Posted October 9, 2009 Author Report Posted October 9, 2009 I bought some suspenders that had metal clasps with plastic grips to hold up the ab plate and kidney butt plates. I used 1/8 inch rivets to attach my snaps suspender snaps The mechanism cutting off the plastic grip removed plastic grip 3 part construction open the hole to 1/8 1/8 rivet Suspender snap I will try to get some more pics up later, my rig and armor shots before paint. Quote
NAZGÛL Posted October 9, 2009 Report Posted October 9, 2009 Good idea! Build is looking good. Cute kid. Looks like youre the idol! Quote
Agent RayBans Posted October 9, 2009 Report Posted October 9, 2009 That paintjob looks superb! Great idea with modifying the suspenders like that, wish I thought of that before I made my own from scratch. Quote
SuperTrooper Posted October 10, 2009 Report Posted October 10, 2009 Your making great progress. Quote
dougefresh Posted October 10, 2009 Report Posted October 10, 2009 Coming along REALLY nicely, Christaan. You're doing a fantastic job! Great idea with the suspenders as well! Dang, we have some clever guys in our crew! Quote
FIVE[501st] Posted October 10, 2009 Report Posted October 10, 2009 Great build thread man! If I ever do another clean TK I will be looking back on some of these ideas... really good stuff! Quote
naatsirhc[TK] Posted October 11, 2009 Author Report Posted October 11, 2009 *Good idea! Build is looking good. Cute kid. Looks like youre the idol! Thanks Matti, she's my little princess who plays dress up but also likes Starwars and Batman. *That paintjob looks superb! Great idea with modifying the suspenders like that, wish I thought of that before I made my own from scratch. Arafinwe, thank you for liking my suspender mod. I am glad the paintjob looks good in the pics! *Your making great progress. Thanks Terrell,because of you I will have a TK id soon. Thank you for taking the time to answer my questions and making this build possible! *Coming along REALLY nicely, Christaan. You're doing a fantastic job! Great idea with the suspenders as well! Dang, we have some clever guys in our crew! Thank you Doug for the kind words and support! *Great build thread man! If I ever do another clean TK I will be looking back on some of these ideas... really good stuff! No'l, I am glad you have found my build useful. I decided to do a detailed build thread to reaffirm great ideas from other builds that helped me and to provide some new ways to do things. The more we do this the easier we make it for new troopers to achieve their goals. We don't all think the same, some of us are stuck in the box and some are outside or some both. There is no instruction manual for an ATA build, so I think it is one of the more challenging builds. Hopefully my build thread is beneficial for the next guy/gal! Quote
naatsirhc[TK] Posted October 11, 2009 Author Report Posted October 11, 2009 I have a few shots of my armor drying, after wet sanding with 320 and 600 grit wet/dry sandpaper. I should have my bucket back Monday, I dropped off all the parts of my armor to the painter today. If everything goes right I will be ready for my 501st submission at weeks end. TK# =FISD merchandise! Then I will try for EIB! Quote
Agent RayBans Posted October 11, 2009 Report Posted October 11, 2009 Something tells me you wont have a hard time getting EIB status. Good luck! Quote
naatsirhc[TK] Posted October 11, 2009 Author Report Posted October 11, 2009 *Something tells me you wont have a hard time getting EIB status. Good luck! Thanks Hayes! Much appreciated I have assembled my det tube, the base that clips on your belt. I will share step by step, I think mine sits close to where it should. Please let me know if it looks off. This is nothing new, but a lot a guys have been asking about the table cloth clips, so here is my version of it. My tube painted Making the bend- used pliers to squeeze flat and straighten Marked and drilled holes in clips and tube Clips side view, ready for install Quote
naatsirhc[TK] Posted October 11, 2009 Author Report Posted October 11, 2009 The install 1/8 rivets and washers( rivet length up to 1/4 ) Place both rivets inclip and tube Rivet first hole w/ washer,leave second rivet in place Rivet second hole, use rivet gun to hold back clip and hold washer with other hand Installed clips Using pliers with both hands, bend right side down Bend side view Place on belt and mark excess, then cut with sheers and dremmel ends front and back view Quote
Sgt JB Posted October 11, 2009 Report Posted October 11, 2009 excellent job on the detonator christaan, Make sure you make the ends rounded where you trimmed the clips. Otherwise they'll scratch up you kidney plate everytime you put it on or take it off. Quote
naatsirhc[TK] Posted October 12, 2009 Author Report Posted October 12, 2009 *excellent job on the detonator christaan, Make sure you make the ends rounded where you trimmed the clips. Otherwise they'll scratch up you kidney plate everytime you put it on or take it off. Good advice, Eric! Thanks, the ends are no longer sharp but I plan to wet sand them and add some painters tape to the armor side to aid in preventing armor scuffing. *Looking great! Thanks again Matti I have painted my hovis with a satin finish Question: Is the vocoder and hovis supposed to be satin or glossy? I have read of both, I can always repaint. I purchased the Hummbrol paints that Billy so kindly mapped out in his thread, in addition I picked up a satin black and a silver that I used on my blaster. Am I correct that the inside is completely silver and outside all black? I would like to get these finished, so I am ready to install when i get my bucket back from the painter. Please let me know! Thanks Quote
naatsirhc[TK] Posted October 14, 2009 Author Report Posted October 14, 2009 I had my hovi question answered by Firebladejedi, so I have pressed on and finished them. Thank you Mark for taking the time to respond to my inquiry. I first painted the insides, I used testors #1180. I bent the screens around the edges slightly to allow me to pop them in. I have not glued them yet, but they fit well. Now, I must wait on my painter. He is family and doing this for free, so I can't really rush the issue. The other set back is the rain and cold weather we are experiencing. I pray that my armor will be done by the end of the weekend, so I can submit for my TK ID. Hopefully, I will have my bucket to finish in the next day or so. Quote
naatsirhc[TK] Posted October 17, 2009 Author Report Posted October 17, 2009 I picked up my bucket and most of my armor from the painter last night. I decided not to have them clear coated, I am happy with the shine and will polish out everything with some auto body polish he gave me. I am in the process of masking out the teeth and vocoder for paint. I hope to get the bucket finished tonight. I will pick up the remaining pieces of armor tommorrow, then hope to suit up and make adjustments. I have installed the decals except the tube stripes, so far. I ended up with some air bubbles, but none of the screen helmets were perfect anyway so I think they look alright. Here are the shots Decals are 4510, only the best for my bucket! Thanks Mike hope to have more progress shots later Quote
NAZGÛL Posted October 17, 2009 Report Posted October 17, 2009 Thats looking sweet! The teeth came out very nice. Good to see how well the decals fits and look on the helmet. Im right behind you and will paint today. Quote
naatsirhc[TK] Posted October 17, 2009 Author Report Posted October 17, 2009 *Thats looking sweet! The teeth came out very nice. Good to see how well the decals fits and look on the helmet. Im right behind you and will paint today. Thanks Matti, I look forward to seeing your pics. I am not used to these Humbrol paints, so I am still working thru my paint job. *still looking great Thank you Ben for your encouragement. I am glad that you have found this thread useful! I installed the tube stripes and have done a first round with the Humbrol paints. I started out taping of the frown and the vocoder. I used the hole punch method( from another thread, thank you for the idea) to tape out the vocoder. I highly recommend that if you have painting skills, do not tape just paint. I had some real problems with the tape method. Here is a pick of what the Tape looked like before paint. I painted last night and this humbrol paint(which I am not used to) and it still is not 100% dry. So, I will finish my paint job tonight. I also have to swing by an auto parts store to get some black pin stripe for the ears( 4510 technique, from video tutorial ). We are having my daughter's 5th birthday party today, I will have to wait till tonight to push forward. Here is my progress so far. Note: still needs work! A little tip for those who don't know, if you get paint where you don't want it. If you have a decent amount of coats on your bucket, just use 2000 grit wet dry and carefully sand away the paint that got away from you. Then polish out. Quote
naatsirhc[TK] Posted October 20, 2009 Author Report Posted October 20, 2009 I had some difficulty with the humbrol paint. I am used to testors( models and such when I was younger ), but went with what was suggested. I don't know what happened, but when i painted the grey on the ears it had a reaction and did not dry all the way in sections. I scraped it off and sanded a bit and then re-painted. At this point I decided to not worry about perfection, because the screen helmets were not. Here are the ears scraped down. I repainted the grey and used black pin stripe(4510 build) from the local Pepboys to finish the ears. Then painted the stripes, I chose 3 on each side. Installed the lenses and mesh Please let me know if I did something wrong! I am picking up the rest of my armor from the painter tonight and will stay up getting things finished. I hope to definately take shots of my armor and get them submitted tommorrow. Quote

Recommended Posts
Join the conversation
You can post now and register later. If you have an account, sign in now to post with your account.