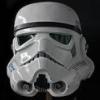
AJCG Posted June 27, 2009 Report Share Posted June 27, 2009 Hi guys, I just got this ROTJ helmet . I'm looking forward to start to work on it very soon. These are my first pictures, I will try to post pictures of my progress from time to time. I hope you like it. Cheers A Quote Link to comment Share on other sites More sharing options...
cojake Posted June 27, 2009 Report Share Posted June 27, 2009 Very nice helmet. Looks kinda similar to mine Quote Link to comment Share on other sites More sharing options...
firebladejedi[TK] Posted June 27, 2009 Report Share Posted June 27, 2009 Nice lid, i need a rotj to add to my collection I look forward to seeing your progress.. Quote Link to comment Share on other sites More sharing options...
JoeR Posted June 27, 2009 Report Share Posted June 27, 2009 That is very sexy! I love Jedi helmets. It is interesting how different it is to my moulds, this one is much more ANH/ESB as oppposed to mine which is much more lop sided. Joe Quote Link to comment Share on other sites More sharing options...
BFA Posted June 27, 2009 Report Share Posted June 27, 2009 Very nice , I love seeing all these different variations on helmets . Looking forward to seeing it all stickered up and finished ! Quote Link to comment Share on other sites More sharing options...
cobra[TK] Posted June 27, 2009 Report Share Posted June 27, 2009 Wow the detail is really good, it's going to look nice once it's finished Rick Quote Link to comment Share on other sites More sharing options...
AJCG Posted June 28, 2009 Author Report Share Posted June 28, 2009 Thanks guys , I'm glad you like it. I will start to work on it very soon, but first I might photoshop some of these images to help me to pre-visualize the final product. I have in mind to do a screen used version... slightly weathered. I will post pictures soon. Hey Joe, you are right, this one is a bit different than yours, to be honest I like all different variations. BTW Joe does yours come with ANH/ESB hovi mix? Thanks for looking A Quote Link to comment Share on other sites More sharing options...
Ghost Posted June 28, 2009 Report Share Posted June 28, 2009 Looking forward to seeing you progress this Armando!!! Nice lid! Quote Link to comment Share on other sites More sharing options...
AJCG Posted June 29, 2009 Author Report Share Posted June 29, 2009 Looking forward to seeing you progress this Armando!!! Nice lid! Thanks Scott , I hope don't disappoint anybody Ok guys, this is the firs photoshoped image, this one is with ESb decals and ANH\ESB tips, I'm actually working in a weathered version. Cheers A Quote Link to comment Share on other sites More sharing options...
JoeR Posted June 29, 2009 Report Share Posted June 29, 2009 If you are going for a background helmet look do square ended frowns, otherwise you need a round edged frown. Joe Quote Link to comment Share on other sites More sharing options...
TK-4510[TK] Posted June 30, 2009 Report Share Posted June 30, 2009 May I see a pic of the rear traps from straight on? Are these helmets resin? I have seen resin and now what appears to be ABS. Quote Link to comment Share on other sites More sharing options...
Amish Trooper Posted June 30, 2009 Report Share Posted June 30, 2009 May I see a pic of the rear traps from straight on? Are these helmets resin? I have seen resin and now what appears to be ABS. from the fourth picture under the tube you can see what looks like a little webbing so I would guess it is abs. What gauge? Quote Link to comment Share on other sites More sharing options...
AJCG Posted June 30, 2009 Author Report Share Posted June 30, 2009 May I see a pic of the rear traps from straight on? Are these helmets resin? I have seen resin and now what appears to be ABS. It is not resin, it is made of is ABS. I will try to take picture tonight. Cheers A Quote Link to comment Share on other sites More sharing options...
Darth_Finger Posted July 1, 2009 Report Share Posted July 1, 2009 That looks spot on. Cant wait to see this finished Quote Link to comment Share on other sites More sharing options...
Verne Posted July 4, 2009 Report Share Posted July 4, 2009 Another beauty is coming. You made an awesome work on your ESB helmet...so this ROTJ will be incredible too. Quote Link to comment Share on other sites More sharing options...
Amish Trooper Posted July 8, 2009 Report Share Posted July 8, 2009 Is this a TE? I ask because I wonder how tight it is. Can you wear this with glasses on Quote Link to comment Share on other sites More sharing options...
AJCG Posted July 19, 2009 Author Report Share Posted July 19, 2009 Is this a TE? I ask because I wonder how tight it is. Can you wear this with glasses on Yes it is a TE. It is as tight as an AP I would say. BTW I'll take tomorrow pictures of the interior and the back. I completly forgot it So far I have painted the frown and the vocorder and started with the earcaps. It is work in progress. I'm not very happy with gloss since I used black coal satin from Humbrol but the results are glosier than I expected. I'll wait couple days to see how the paint cures Cheers A Quote Link to comment Share on other sites More sharing options...
firebladejedi[TK] Posted July 19, 2009 Report Share Posted July 19, 2009 It does look rather shinny, that black... Looks nice though, maybe you could use a little glass wool to take off the sheene or are you thinking of redoing with satin or something? Quote Link to comment Share on other sites More sharing options...
AJCG Posted July 19, 2009 Author Report Share Posted July 19, 2009 I'll wait to see how the paint cures, but I just noticed that the ROTJ baground helmets are rather shinny than matte(heros and background helmets). In the menatime more pics of my progress...enjoy it Cheers A Quote Link to comment Share on other sites More sharing options...
JoeR Posted July 20, 2009 Report Share Posted July 20, 2009 That is looking amazing. The gloss is perfect and not too shiny at all IMO. You could just thicken the frown by a mm or two around the edges and lengthen it slighly so it goes nearer the corners. Just add some of Keith's Hovi Mic Tips. Then again regarding the gloss here is the helmet that Matt got his casts from which interestingly has a rounded off frown and the background style ears and a hard hat liner and chin straps. It has the more matt/satin frown. It seems to me that the background and hero moulds (ANH/ESB shape and the slimmer/wonky shape) were mixed up. Excuse the slightly OT. More pics please by the way. Also how do you paint the ears, they look very neat? Joe Quote Link to comment Share on other sites More sharing options...
AJCG Posted July 21, 2009 Author Report Share Posted July 21, 2009 Great stuff Joe!! Thanks so much for sharing all of this with us . I think my second helmet will be a hero like the one you posted in the last picture. I will improve the frown the way you say, you are right, mine is a little bit short on the sides and the edge slightly small I want to use the super accurate hovimix that Keith used in his TM hero trooper but he mentioned tome those are not offered for sale , so I'm afraid I have to used and alternative route unless he changes his mind. I'm glad you like the ears and thanks for your kind words, basically I stroke them with black paint using a flat brush # 3 or 4, then when it dries I fill them up the interior with humbrol #5 creating a thing black out ring. Most of the time I try to hold my breath so my pulse is not shaky Cheers A PD: more pics coming soon. Quote Link to comment Share on other sites More sharing options...
AJCG Posted July 22, 2009 Author Report Share Posted July 22, 2009 As I promised... more pics, decals added, earcaps painted. Need to add the tips, foam liner and neck trim. Opps and touch up slight ly the frown(to be more accurate). I hope you you like it as much as I like so far. Cheers A Quote Link to comment Share on other sites More sharing options...
Verne Posted July 22, 2009 Report Share Posted July 22, 2009 Splendid! You have done a great work. Quote Link to comment Share on other sites More sharing options...
TK-2126_MD[TK] Posted July 22, 2009 Report Share Posted July 22, 2009 Looking great!!!! Quote Link to comment Share on other sites More sharing options...
ThayNerd[TK] Posted July 22, 2009 Report Share Posted July 22, 2009 That turned out really well Armando. Quote Link to comment Share on other sites More sharing options...

Recommended Posts
Join the conversation
You can post now and register later. If you have an account, sign in now to post with your account.