Sawanator[TK] Posted October 15, 2022 Author Report Posted October 15, 2022 Ya, I was afraid of that. Crap. Guess we are ordering new abs and kidney plates. Quote
gmrhodes13[Staff] Posted October 15, 2022 Report Posted October 15, 2022 3 minutes ago, Sawanator said: Ya, I was afraid of that. Crap. Guess we are ordering new abs and kidney plates. You could fill the hole/s with ABS paste, have a look at Gerald's fix for moving his Han snap, also how to make ABS paste 1 Quote
Sawanator[TK] Posted October 15, 2022 Author Report Posted October 15, 2022 Ya, we could try that first I guess. Is it possible to remove the split rivets? Quote
gmrhodes13[Staff] Posted October 15, 2022 Report Posted October 15, 2022 8 minutes ago, Sawanator said: Ya, we could try that first I guess. Is it possible to remove the split rivets? It is but it's 50/50 the posts may snap I should also add you should be ok for basic approval as they are but will get mentioned at higher levels Quote
Sawanator[TK] Posted October 15, 2022 Author Report Posted October 15, 2022 33 minutes ago, gmrhodes13 said: It is but it's 50/50 the posts may snap I should also add you should be ok for basic approval as they are but will get mentioned at higher levels Thanks. I may apply for basic when I'm done and then fix it before I apply for Centurion. I'm sure there will be other fixes for sure. Still struggling with huge gaps between my shoulder bells and chest. Just the way I'm made. My shoulder bridges are gluing right now, then I will post some pics. 1 Quote
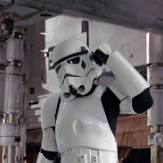
Sawanator[TK] Posted October 31, 2022 Author Report Posted October 31, 2022 So I'll start this by saying this is a test run. I have lot's of issues to fix, but I was really happy to just get it to the point where I could wear it. Things I know I have to do: Fix rivet (they are the wrong spacing). Already practice patching a crack, so feeling better about this fix Fix my knee ammo belt (it's just on temporarily, but is upside down...it's a long story). a replacement is on it's way. Figure out how to adjust my should bells being so far away. The seems ok from the back, but haven't figured out how to close the gap at the front. Small gap between kidney and butt plate (easily fixed) One leg was sitting lower than the other Need to pull in my kidney and abs plate a bit better The last thing is my helmet, When I wear it without armor, it's fine, but with everything on, it doesn't come down far enough. Feels like it's hitting my chest armor and pushing it up. I was able to correct it a bit by shoving a small rag at the back of my head, which tips the helmet down a bit. You'll see it looks like I stand a little knock-kneed, which throws off the angle of my legs. Need to practice standing straighter. Also, I find my thighs rotate a bit, could someone help me with the orientation? How should those thighs be sitting? Anyway, please comment away. I know I have lot's of fixes coming, and I want to get it right. Thanks. Quote
Chemi[Staff] Posted October 31, 2022 Report Posted October 31, 2022 Hi Matt. The armor looks better than you think.... Yes, it has small details to fix, but overall, it looks great. Apart from what you mentioned, I would add a couple of minor details, thinking mostly about the upper levels. -The left forearm is slightly rotated, and the right forearm could be lowered a little to match the left one. Very easy -You could raise the belt a little, and keep an eye on the drop box placement. The top of the ABS ammo belt should sit at or just above the bottom of the central and vertical abdomen button panels. Drop boxes are vertically aligned with the end of the ammo belt with minimal gap between belt and box. -The TD could be lowered a little more. It looks like the clips were not in place. Also, you could turn it a bit to the front, as for basic, the CRL states the following: The white control panel raised ribbed pad faces the rear, with the controls/round washer style detail closest to the right end cap. Reference image These are small details that are easy to fix. As I said, the armor looks great...Congratulations! 1 Quote
Sawanator[TK] Posted November 1, 2022 Author Report Posted November 1, 2022 This is great, feedback. Thanks. I wore it for about 2 hours today. These are my take aways: -i need to fix straps for sure. My biceps and shoulders were too saggy -need padding in the forearms, bicep and thighs to prevent rotating. -my chest is pushing my helmet up, and I really can't see. Is this normal? -the cod piece really digs into my thighs at the back before it curves in. Are there any fixes for this? Other than that, it wasn't bad at all. No other biting armor anyway. Quote
gmrhodes13[Staff] Posted November 1, 2022 Report Posted November 1, 2022 Looks like your chest could come down more, tighten elastic between chest and ab. You can see in this image the chest strap is higher than the backplate Quote
Sly11[Admin] Posted November 4, 2022 Report Posted November 4, 2022 You have come a long way over the last year and looking pretty darn good. Jump on those suggestions the guys have given you and you will in a great position for approval. Not that I can clearly tell from your photos, but if the Cod is troubling you, you can reduce the return edge further to give just a tiny amount more wiggle room. Same can be said for your chest plate as it curves down from the shoulder to under the arm. Quote
Nairy[Staff] Posted November 9, 2022 Report Posted November 9, 2022 (edited) If I'm reading Chemi's comment right, those are mainly dressing issues! You got this! Edited November 9, 2022 by Nairy Quote
Sawanator[TK] Posted March 23, 2023 Author Report Posted March 23, 2023 Alright. Back at it we go. We drilled out our rivets and patched them up. We are still playing with buffing them down so it looks right. I'll post some pictures in a bit. The main thing I want to focus on today is boots. I've posted before that I have rather large feet and don't fit the standard trooper boots. I tried Crowprops, but it just didn't work out for me (James' were fine). Anyway, I'm at the point of sources new boots and found some Chelsea boots that I want to have painted. I'm thinking if just using these for trooping as I'm sure they aren't up to snuf, but I wasn't sure how all the rules around that worked. Please let me know if these boots would pass for general trooping? I have a pair to wear for when I submit, I just can't wear them that long. Quote
gmrhodes13[Staff] Posted March 23, 2023 Report Posted March 23, 2023 10 minutes ago, Sawanator said: The main thing I want to focus on today is boots. I've posted before that I have rather large feet and don't fit the standard trooper boots. I tried Crowprops, but it just didn't work out for me (James' were fine). Anyway, I'm at the point of sources new boots and found some Chelsea boots that I want to have painted. I'm thinking if just using these for trooping as I'm sure they aren't up to snuf, but I wasn't sure how all the rules around that worked. Please let me know if these boots would pass for general trooping? I have a pair to wear for when I submit, I just can't wear them that long. Rules are check with your GML and also your GCO, they ultimately approve or deny costume pieces as well as either allow or deny the use of non CRL items to be used at events, some garrisons are tougher than others, some can be less strict. Comparison, extra piece on the rear Quote
Sawanator[TK] Posted March 24, 2023 Author Report Posted March 24, 2023 2 hours ago, gmrhodes13 said: Rules are check with your GML and also your GCO, they ultimately approve or deny costume pieces as well as either allow or deny the use of non CRL items to be used at events, some garrisons are tougher than others, some can be less strict. Comparison, extra piece on the rear Ya, I was worried about that. Sucks being so close and can't find footwear that works. 1 Quote
FN1313[TK] Posted March 24, 2023 Report Posted March 24, 2023 Ya, I was worried about that. Sucks being so close and can't find footwear that works.Have you tried KeepTrooping formerly imperial boots?Sent from my iPad using Tapatalk Quote
Sawanator[TK] Posted March 24, 2023 Author Report Posted March 24, 2023 1 hour ago, FN1313 said: Have you tried KeepTrooping formerly imperial boots? Sent from my iPad using Tapatalk No. I didn't hear about that. When I last checked ImperialBoots, they didn't carry my size (14 or 13 Wide). Thanks for letting me know about KeepTrooping, though. I'll check their sizes in their next wave. 1 Quote
FN1313[TK] Posted March 24, 2023 Report Posted March 24, 2023 I’ve used them for every kit but my scout which I made from scratch. But yeah hopefully they have a sizeSent from my iPhone using Tapatalk Quote
Sawanator[TK] Posted July 21, 2023 Author Report Posted July 21, 2023 Back from hiatus. Made several tweaks and added internal padding to try to keep things in place and prevent the armour from rotating on me. One thing I noticed here is that I now have an overlap on "wings" of my AM black plate (bottom corners). I've ready other posts about this being an issue. I never bothered to fix these because it didn't used to over lap. Should I try suiting up again and seeing if if was just the way I was wearing it, or should I clip the wings on the bottom? v 1 Quote
TKSpartan[Staff] Posted July 21, 2023 Report Posted July 21, 2023 13 hours ago, Sawanator said: One thing I noticed here is that I now have an overlap on "wings" of my AM black plate (bottom corners). I've ready other posts about this being an issue. I never bothered to fix these because it didn't used to over lap. Should I try suiting up again and seeing if if was just the way I was wearing it, or should I clip the wings on the bottom? Hi Matt, Overall you look great. It seems to me that you could try suiting up again an raise a little the back plate (AM kit have the back plate corners a little lower than other kits) . The plan B would be to apply some heat to bend them (hot water bath or heat gun). If you check your photos from October 30 -2022 , you will see that the back plate is sitting flush. 1 Quote
Chemi[Staff] Posted July 21, 2023 Report Posted July 21, 2023 Hi Matt. If you don't mind, I would add that in addition to what I mentioned in a previous post, ("unroll" the TD a little bit so that, as the CRL indicates "The white control panel raised ribbed pad faces the rear, with the controls/round washer style detail closest to the right end cap"), you can also trim the clips a bit, since they stick out from under the belt. Reference Image A minor dressing issue here... It looks like the undersuit is a little bunched up. Really, really, really nice job so far, Matt!!! Almost there!!! 2 Quote
gmrhodes13[Staff] Posted July 21, 2023 Report Posted July 21, 2023 Nice work, almost at the finish line. You may want to either paint or use electrical tape in black on your side section between the ab and kidney as it's seen from the side. Also watch the placement of your drop boxes especially for higher level clearance A few teaks and you should be good to go Quote
Sawanator[TK] Posted July 22, 2023 Author Report Posted July 22, 2023 On 7/21/2023 at 12:49 PM, Chemi said: Hi Matt. If you don't mind, I would add that in addition to what I mentioned in a previous post, ("unroll" the TD a little bit so that, as the CRL indicates "The white control panel raised ribbed pad faces the rear, with the controls/round washer style detail closest to the right end cap"), you can also trim the clips a bit, since they stick out from under the belt. Reference Image A minor dressing issue here... It looks like the undersuit is a little bunched up. Really, really, really nice job so far, Matt!!! Almost there!!! Thanks for the tips. Any idea how to cut the bottom of those clips? Quote
Sawanator[TK] Posted July 22, 2023 Author Report Posted July 22, 2023 19 hours ago, gmrhodes13 said: Nice work, almost at the finish line. You may want to either paint or use electrical tape in black on your side section between the ab and kidney as it's seen from the side. Also watch the placement of your drop boxes especially for higher level clearance A few teaks and you should be good to go Thanks for the tips. Just curious, how should the drop boxes line up? I thought the right edge of the drop box had to line up with the right edge of the last ammo slot on the belt +when looking at the left side). Or is it just that it's not straight? I think my leg was slightly bent which make it look not lined up. Quote
gmrhodes13[Staff] Posted July 22, 2023 Report Posted July 22, 2023 3 hours ago, Sawanator said: Thanks for the tips. Just curious, how should the drop boxes line up? I thought the right edge of the drop box had to line up with the right edge of the last ammo slot on the belt +when looking at the left side). Or is it just that it's not straight? I think my leg was slightly bent which make it look not lined up. Drop box should line up with the end of the plastic belt. Quote
Sawanator[TK] Posted July 23, 2023 Author Report Posted July 23, 2023 7 hours ago, gmrhodes13 said: Drop box should line up with the end of the plastic belt. Thanks for clarifying. I did follow the steps, but I'll double check mine. hopefully the misalignment was just a fluke. Will confirm after I get back from vacation. Quote

Recommended Posts
Join the conversation
You can post now and register later. If you have an account, sign in now to post with your account.