Code3345[TK] Posted June 2, 2021 Report Posted June 2, 2021 Name: Cody Butler TK ID: 11705 Forum Name: Code3345 Legion Profile: https://www.501st.com/members/displaymemberdetails.php?userID=27266 Garrison/Squadron: Garrison Tyranus/Sienar Fleet Squad Armor: RS Helmet: RS Boots: Imperial Boots Hight/Weight: 6"/165 lbs. Quote
Chemi[Staff] Posted June 2, 2021 Report Posted June 2, 2021 Hi Cody. Thank you for your EIB app. One of us will be with you shortly. 1 Quote
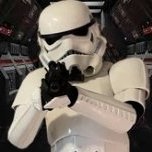
TKSpartan[Staff] Posted June 2, 2021 Report Posted June 2, 2021 Hi Cody, great to see your EIB app. Meanwhile one of us is assigned to your review , we need you add some additional photos as follows: 1- An additional photo of your TD showing the screws, something like the example below.: 2-Close photo of the lower section of the cod and butt plate to see the rivets as per the crl states for L2: A split (bifurcated) or single cap rivet is present on the lower tab (cod area) of the abdomen armor. Two male snaps are present on the lower center tab of the Posterior Armor. 3-Close photo of your thigh ammo belt (inside and outside) to see the rivets type and position : CRL: Thigh ammo belt is attached to thigh with a solid head rivet, painted white, in the upper corner and fastened to the lower thigh ridge 4-Close photo of your Sniper Knee right and left side . 5- And finally photo of your boots. Thanks Trooper !! If needed, you can check the photo checklist Here. Quote
Code3345[TK] Posted June 3, 2021 Author Report Posted June 3, 2021 Here you go guys, I figured I missed a few. I appreciate the help!! 1 Quote
Code3345[TK] Posted June 4, 2021 Author Report Posted June 4, 2021 Just a few updated pics. I noticed my sniper knee plate/thermal detonator weren't cooperating the other day for my original pics. 2 Quote
Chemi[Staff] Posted June 7, 2021 Report Posted June 7, 2021 Hello Cody and thanks for your patience!!! Before we can move you along we need an easy fix... -Frown is painted gray and does not leave the teeth area It appears that your frown paint needs a little cleanup. Using an acetone-free remover on a toothpick could be a good solution for the teeth. You're almost there Cody!!! 1 Quote
Chemi[Staff] Posted June 10, 2021 Report Posted June 10, 2021 Hi Cody, and thank you for your EIB application! CRL and EIB Application Requirements: All required photos have been submitted, and on behalf of the entire D.O. staff we are pleased to welcome you to the rank of Expert Infantry. Congratulations! Other-Armor Fit/Assembly; In this area we review observations made by your fellow troopers and the DO team. Some observations may lead to suggestions to improve the overall look of your armour. Note that we consider both text (CRL) and pictures (screen caps/reference images) when reviewing submissions. -The brow trim is too low. We are suggesting to rise it up a bit. Your brow trim is sitting lower than ideal for a Stunt TK, and looks more like those worn by Hero TKs. Raising it a bit would give you a much more screen accurate appearance Stunt reference images Hero reference images -Also, the brow trim, should be a bit shorter, (do it little by little so as not to cut too much). Reference images -Looking to the right side of Ab section, Ab plate is overlapping the kidney armor. (Adjusting the strapping may solve this issue). Reference images -We suggest you to lower your fore arms so the gaps are a little more even between the wrist and hand plate and the bicep and top of fore arms. -The TD must be centered. If not positioned correctly, the thermal detonator can explode !!! Reference images -Some new paint on the ab/kidney rivets is an easy fix and should take you about 5 minutes. Reference image -Moving down to the belt, we suggest you cut all those hanging threads. The armor will shine more with that haircut. Reference images -We think this rivets are too close to the corner of the ammo belt (too big too). This is not affecting you for level 3 but for a more screen accuracy we notice and let you know it for future adjustments. Reference images Centurion Requirements; In this section we prepare you for Centurion. Because Centurion photos show more detail than EIB, items pertaining to Centurion might be seen there and not here and additional photos may be required. We try to point out all that we can from what we see, but the final accuracy is the responsibility of the trooper. -All the recess area should be painted, in both sides of the helmet. Reference images -We have a challenging issue here, but we have confidence that you can do it!. The tube stripes are too far away from the cheek. As per the CRL, the tube stripes should be "approximately a pencil width" from the cheek. As seen below, yours are bit too far away. Reference images -The plastic shoulder straps need to be held down in the back via a white elastic band to the white fabric that connects/bridges the chest and back piece. Reference images -For Centurion level, the tops of the shoulder bells need to be a lot closer to the shoulder bridges. This is a fairly easy fix by shortening the straps that hold the shoulder bell on. Reference Images -The top of the ABS ammo belt should sit at or just above the bottom of the central and vertical abdomen button panels. Add a piece of Velcro to the belt and AB plate to keep it in place(Easy fix ). Reference images -The buttons on the canvas belt are too close to the edge, and the corners of the plastic ammo belt shall be trimmed at a 45 degree angle that meets the outer edge of the cloth belt. Reference images -Drop boxes are vertically aligned with the end of the ammo belt with minimal gap between belt and box.(see reference images in the previous point). -The belt should be turned a little to the left. Reference images -For L3, the gaps at the bottom of the thighs should be filled or backed with a small square of ABS. Reference images -The Hengslter counter on the blaster is a bit far back compared to screen-used examples. Reference images And that's it, trooper. Congratulations!!! You have a great armor, and we have complete faith that you can address the above issues. After that, I look forward to seeing your submission for Centurion!!! And remember, we are here to help! 2 Quote
TKSpartan[Staff] Posted June 10, 2021 Report Posted June 10, 2021 Congratulations Cody , Welcome to EIB Ranks !! just a few more adjustment and see you in CENTURION 2 Quote
Code3345[TK] Posted June 10, 2021 Author Report Posted June 10, 2021 Thanks guys! Appreciate your help!! 1 Quote
gmrhodes13[Staff] Posted June 10, 2021 Report Posted June 10, 2021 Congratulations and welcome to the EI ranks trooper 1 Quote
giskard8[Staff] Posted June 11, 2021 Report Posted June 11, 2021 Congratulations Cody, Welcome to EIB. 1 Quote
justjoseph63[Staff] Posted June 11, 2021 Report Posted June 11, 2021 Welcome to Expert Infantry, Cody! You have a few issues, brother, but nothing that we can't help you take care of. Always feel free to ask us for any assistance you need... we are here for ya' and we hope to see you submission for Centurion soon! 1 Quote

Recommended Posts
Join the conversation
You can post now and register later. If you have an account, sign in now to post with your account.