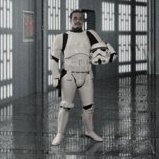
AlpineCorpus Posted October 29, 2020 Report Posted October 29, 2020 Hello all! Today was Big Brown Box day, and not even the setting sun could stop me from taking my approval photos (and admittedly having a little too much fun walking around the house kitted up). As with others, I hope the more experienced here will be able to spot any flaws that need addressing and I will work on them ASAP. Name: Ian ObjioFuture garrison: Carolina GarrisonArmor manufacturer: RS PropmastersHelmet manufacturer: RS Propmasters Belt, neck seal, boot and blaster manufacturer: RS PropmastersInterior strapping: RS Propmasters strapping and some self-installed snaps and elastic for alterations.Height: 5' 11" Weight: 206 lbsTK Type: ESB Stunt After reviewing the photos, I noticed the right thigh drooping a bit. I had previously shortened the straps, and I guess I measured wrong. One more thing to be fixed! 1 1 Quote
Sly11[Admin] Posted October 29, 2020 Report Posted October 29, 2020 Hey man, you are looking pretty awesome. Only things that stand out but will depend on your GML for basic are the shoulder bells. They have quite a gap at the top between the shoulder bridges. i can also see they are pulling the elastic out from under the bridges. In reality there should be little to no gap, so you can try a few things. Remove all the return edge at the base of the bells to get them flexible and sitting as close as possible the the biceps. Then shorten the top elastic straps to bring the tops in closer to the bridges. This is a higher level requirement so if you can make those adjustments it will put you in good stead for higher approvals. Also make sure the outer edge of your drop boxes are aligned with the ends of the plastic ammo belt, another requirement for higher levels and more screen accurate Quote
justjoseph63[Staff] Posted October 29, 2020 Report Posted October 29, 2020 Looking GREAT, Ian! In addition to what Andrew mentioned I have a few more suggestions if I may.. Your bucket seems to be riding pretty high and could sit lower, so I am thinking you have padding on the top of the inside. Note that padding is not required at any level, and removing it or reducing the thickness will solve that issue. It may also help you to see better! I added a pad on the top in my first bucket and found that it was causing this and I was constantly tilting my helmet forward just to able to see. I removed it, and BINGO... the eye openings actually sat at my eye level! ESB reference images It looks like the rivet(s) on your thigh ammo pack could use another coat of white paint or two. Easy fix! Not that it will affect Basic approval, but if you are feeling ambitious I would suggest bringing your right ear forward about half an inch. Ideally, the top of the center should line up with the rear line of the trap above it. As seen in the reference images below, there was a minimal gap between the front of the round part and the trap in front of it. ESB reference images 1 Quote
TKSpartan[Staff] Posted October 29, 2020 Report Posted October 29, 2020 Looking Great Ian, congratulations and good luck with your approval!! Quote
AlpineCorpus Posted October 29, 2020 Author Report Posted October 29, 2020 Looking GREAT, Ian! In addition to what Andrew mentioned I have a few more suggestions if I may.. Your bucket seems to be riding pretty high and could sit lower, so I am thinking you have padding on the top of the inside. Note that padding is not required at any level, and removing it or reducing the thickness will solve that issue. It may also help you to see better! I added a pad on the top in my first bucket and found that it was causing this and I was constantly tilting my helmet forward just to able to see. I removed it, and BINGO... the eye openings actually sat at my eye level! ESB reference images It looks like the rivet(s) on your thigh ammo pack could use another coat of white paint or two. Easy fix! Not that it will affect Basic approval, but if you are feeling ambitious I would suggest bringing your right ear forward about half an inch. Ideally, the top of the center should line up with the rear line of the trap above it. As seen in the reference images below, there was a minimal gap between the front of the round part and the trap in front of it. ESB reference images Surprisingly, moving the ear was an easy fix! Next, painting the rivets on the thigh. My dremel is charging for removing the return edge on the shoulder bells.I considered removing the original padding from the bucket, however I found that it caused it to rattle around my head even when using the strap inside. Guess we can’t all have perfectly shaped heads. Any recommendations for internal padding that has worked for others? 1 Quote
MaskedVengeance[Staff] Posted October 29, 2020 Report Posted October 29, 2020 Looking great! Follow the suggestions of the Andrew and Joseph and you’ll be all set! If helmet stability on your head without padding is a concern, you could try removing it and instead add padding around the sides NEAR the top of your head. That way you can get a snug fit on your head without adding the extra height. If your existing padding is of the foam star shape basically you’d want to pad around where the tips of the star points are. Sent via Imperial Tapatalk Comms 1 Quote
justjoseph63[Staff] Posted October 29, 2020 Report Posted October 29, 2020 Looks MUCH better, Ian! Caleb hit the nail on the head re: padding. I had the same issue with it jangling around... when I turned my head, the helmet stayed straight, lol. I cut a piece of 1 inch thick foam to 3 x16 inches, wrapped it in black cloth and used Velcro to hold it in place. It sits right below the domed part in a horse-shoe shape and keeps the bucket nice and snug! I would advise that whatever type of padding you use, make it removable. We sweat, pure and simple, and the smell can build up over time... ugh. Being able to remove/wash them will serve you well. Quote
gmrhodes13[Staff] Posted October 29, 2020 Report Posted October 29, 2020 Definitely add some velcro to any padding, just had a 35 deg C troop and my padding was soaked, nothing worse that putting on a sweaty helmet and feel the squish of the foam Looking good Quote

Recommended Posts
Join the conversation
You can post now and register later. If you have an account, sign in now to post with your account.