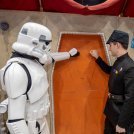
TK3373[TK] Posted September 13, 2020 Report Posted September 13, 2020 Name: Scott Morrow TKID: TK-3373 Forum Name: TK3373 Armour: RS Props Helmet: RS Props Blaster: Hasbro (Modded Doopy-doos) Boots: TK Boots Hand Plates: ATA Holster: RS Props 1. ___ Front (Arms flat by side) 2. ___ Back (Arms flat by side) 3. ___ Left side (Arms raised) 4. ___ Right side (Arms raised) 5. ___ Left side detail (arms raised showing ab/kidney connection clearly) 6. ___ Right side detail (arms raised showing ab/kidney connection clearly) 7. ___ Action shot 8. ___ Abdomen button plates (close-up) 9. ___ Cod and posterior plate connections showing rivet/snaps (exterior) 10. ___ Interior strapping 11. ___ Wrist openings (close-up) 12. ___ Front 13. ___ Left side 14. ___ Right side 15. ___ Rear 16. ___ Back-lit shot showing lens color 17. ___ Close-up of Hovi tip 18. ___ Neck seal 19. ___ TD (Thermal Detonator) front and rear showing screw type 20. ___ Holster attachment 21. ___ ABS/canvas belt (rear) 22. ___ Boots (showing tops and sides) 23. ___ Rubber gloves 24. ___ Left side 25. ___ Right side 26. ___ Rear showing D-ring 27 ___ Sniper Knee Plate Left Side 28. ___ Sniper Knee Plate Right Side 29. ___ Ammo Belt Left Side 30. ___ Ammo Belt Right Side Many thanks Scott TK3373 Quote
Sly11[Admin] Posted September 13, 2020 Report Posted September 13, 2020 Hi Scott, very nice set of armour you have there. Just one little thing you will need to change and then submit new images for. The snaps on the butt place and the split cay viret on the cod, look like they are painted white. Could be the lighting I'm not sure. These need to be unpainted as per the CRL for EI which means you would need to remove any paint from them. Cod A split (bifurcated) or single cap rivet is present on the lower tab (cod area) of the abdomen armor. Rivet does not need to be functional. Rivet on must be brass or silver in color, approximately 5/16" (8mm) in diameter and is not painted. Posterior Two male snaps are present on the lower center tab of the Posterior Armor. Snaps do not need to be functional. Snaps are silver in color with the bottom of the snap facing outward and are not painted. Quote
gmrhodes13[Staff] Posted September 13, 2020 Report Posted September 13, 2020 Nice work trooper, a couple of suggestions: Andrew already mentioned your cod and butt plate rivet/snaps Your drop boxes don't appear to be aligned with the ends of the belt Butt plate is flaring out on your left side at the rear. Shoulder straps could me event to sit in the middle of the backplate areas Appears your shoulder bells are a different lengths in the back image Left thigh is just hitting your butt plate Right back shin appears to be slightly more overlapped than needed Belt is also a little high in the back Side ab/kidney rivets are a little off line and quite a way from the end of the ab There is a dirty section on your belt Also there is normally a small amount of belt after the button cover on the end. Han snap is a little far from the edge of the ab plate Sniper plate should follow the angle of the shin top ridge. You also appear to have a crack you may want to glue/fill before it gets any worse Thigh ammo strip rivet is normally a little further away (and lower) from the end ESB blaster should not have counter attached and have correct style scope: You may also want to check on the CRL for mods for Hasbro blasters No ammo counter shall be present. Correct style scope. Could not see the straps on your handplates: If rubber gloves are worn the hand plates are affixed via an elastic strap over the palm. Detonator end caps do not look straight compared to control panel and gap is a little small There are just a couple of areas that the decals don't quite fill on the helmet Ideally the fall of the tube stripes should be forward back///////front, you also have a dented section under the back right ear Could you also add some other images. Inside thigh ammo strip rivet connectors Close up of your side ab/kidney rivets (no belt covering) As I say these are just suggestions, DO's have the final say on your application. Good luck 1 Quote
TK3373[TK] Posted September 14, 2020 Author Report Posted September 14, 2020 Hi there, Thanks for the replies. Here's the handplates. The cod and butt snaps are an easy fix, I will just need to remove the paint. The blaster was modded to the specs of the CRL. This was an older ANH kit that I got from a fellow member which I converted to ESB. I was certain that the decals for the helmet were the correct ones. However it does seem like a lot of work to get it up to standard. Cheers Scott 3373 Quote
TKSpartan[Staff] Posted September 21, 2020 Report Posted September 21, 2020 Hi Scott and thank you for your EIB app. I'll be with you shortly. Quote
TKSpartan[Staff] Posted September 23, 2020 Report Posted September 23, 2020 Hi Scott , Great ESB looking armor. !! and we are here to help you to achieve the best accuracy you can be. In order to continue your review, there are a couple of photos and previous adjustment that we need you to add. 1- Close photo of the Chest to Back connection (under the bridges) to see the Fabris/Elastic connection as the crl states for L2 Chest and back shall be connected with a white fabric or preferably elastic strap at the shoulders something like this 2- Photo of your AB to Kidney left side connection like this 3- Close photo of the inside of the thigh ammo rivets both sides. CRL L2: The rivets used shall be single cap, double cap or split rivets. No pop rivets allowed. like this both sides Previous Adjustment Needed : Please , update photos when finished the following adjustment : 1- CRL L2 Clips shall be attached with slotted type, flat or dome top style screws, and be black (two per clip). Your TD screws appear to be "Philips type" and you will need to replace then for the Slotted. "Screw driver to work mate!! " Reference Images 2- As Andrew pointed before: CRL L2 Cod A split (bifurcated) or single cap rivet is present on the lower tab (cod area) of the abdomen armor. Rivet does not need to be functional. Rivet on must be brass or silver in color, approximately 5/16" (8mm) in diameter and is not painted. CRL L2 Posterior Two male snaps are present on the lower center tab of the Posterior Armor. Snaps do not need to be functional. Snaps are silver in color with the bottom of the snap facing outward and are not painted. "The snaps on the butt place and the split cay rivet on the cod, look like they are painted white. Could be the lighting I'm not sure. These need to be unpainted as per the CRL for EI which means you would need to remove any paint from them." Reference Images We are sure this is an easy fix for you mate, a couple of minute with some paint remover (non Acetone) and you're ready. Cheers, I'll be ready when you are ready Trooper !! Quote
justjoseph63[Staff] Posted March 15, 2021 Report Posted March 15, 2021 This is now considered an inactive thread. Please contact any member of the D.O. staff to continue the review process. Quote

Recommended Posts
Join the conversation
You can post now and register later. If you have an account, sign in now to post with your account.