Amish Trooper Posted May 27, 2008 Report Share Posted May 27, 2008 I will be writing up a review of Runnriottts with pics here shortly. Quote Link to comment Share on other sites More sharing options...
riveting Posted May 27, 2008 Report Share Posted May 27, 2008 I was going to order some Weber's "S" shaped rubber gasket #RG102. I've read in other threads that this is very accurate looking trim. I'v read that it's very acurate also but I was unsure , about the acute curve around the vo-coder area & if the rubber would give! Interested to find out how it turn's out Quote Link to comment Share on other sites More sharing options...
wannabetrooper Posted May 28, 2008 Author Report Share Posted May 28, 2008 Alright, here it is painted... I'm going to let it sit till Sunday, that's my next available day to start painting in the details. I hope to get the ears I ordered by then or at least by next week. I still need to order the brow and neck trim too. I need to get on the ball with that I was also planing on buffing the helmet once the paint cured to bring out the shine even more. Quote Link to comment Share on other sites More sharing options...
mark Posted May 28, 2008 Report Share Posted May 28, 2008 Wow, that's looking amazing! Congrats...that bucket is going to be beautiful! Quote Link to comment Share on other sites More sharing options...
Double Dee Posted May 28, 2008 Report Share Posted May 28, 2008 Looks good. You used the Krylon Gloss White? Do you have FX armour? If so, can you put the two together and see what the colour match is like. I'm thinking that the Satin WHite might be a better match. Painting mine this weekend once I figure out which paint to use. DD. Quote Link to comment Share on other sites More sharing options...
Nootch Posted May 28, 2008 Report Share Posted May 28, 2008 I was also planing on buffing the helmet Heh Looking nice. Quote Link to comment Share on other sites More sharing options...
elkamino Posted May 28, 2008 Report Share Posted May 28, 2008 That is really coming out nice. Quote Link to comment Share on other sites More sharing options...
lor[TK] Posted May 28, 2008 Report Share Posted May 28, 2008 all I have to say is poodoo... I didn't want to have to do that much work to my CE... but after seeing what the helmet can look like how can I not? -lor Quote Link to comment Share on other sites More sharing options...
Mobus[TK] Posted May 28, 2008 Report Share Posted May 28, 2008 Many people slam the CE's in their stock form, but they turn out awesome with some work. It's like the ugly duckling turning into the swan. I just need to put in the mouth screen, trap/tear stickers and I can call mine done. Mine was a full repaint, ear chop, accurate sized frown holes, new lenses, new tube stripes, re-purposed house door trim for brow trim. Black car door trim for the neck trim. Re-cycled original hovis. Quote Link to comment Share on other sites More sharing options...
wannabetrooper Posted May 28, 2008 Author Report Share Posted May 28, 2008 Looks good. You used the Krylon Gloss White? Do you have FX armour? If so, can you put the two together and see what the colour match is like. I'm thinking that the Satin WHite might be a better match. Painting mine this weekend once I figure out which paint to use. DD. I used Rust-Oleum High Performance Enamel Gloss White like Mike used to paint his TE2 helmet. I don't own any armor at this time just this helmet. One day I hope to. Mobus, yours turned out excellent. Quote Link to comment Share on other sites More sharing options...
Mobus[TK] Posted May 28, 2008 Report Share Posted May 28, 2008 I used Rust-Oleum High Performance Enamel Gloss White like Mike used to paint his TE2 helmet. I don't own any armor at this time just this helmet. One day I hope to. Mobus, yours turned out excellent. Thanks. I'm trying to keep up with the quality work everyone on here is doing with them. Just for reference I used Krylon fusion gloss white on mine, and the gray is Testors 1138. The black on the vocoder is just Testors gloss black (the number escapes me at the moment). The Fusion had a tiny bit of orange peel, but I wet sanded it with 1500 grit and then used polishing compound with a buffer and got a mirror shine out of it. I think as long as we all put on a couple good coats, no matter how they look it can all buff out in the end. I'd just like to remind everyone to stay away from waxing new paint for 30 days. Polishing and buffing compounds are one thing, but the distillates in wax can actually harm new paint that is still curing/hardening. Quote Link to comment Share on other sites More sharing options...
wannabetrooper Posted May 28, 2008 Author Report Share Posted May 28, 2008 Yeah, I know that I will end up polishing mine because there are some dry spots here and there that I'm not happy with. But I'm sure I'll get it to shine really good. I'm even considering a top clear coat. Any specific brands anyone can recommend for polishing paint? Quote Link to comment Share on other sites More sharing options...
Billhag Posted May 29, 2008 Report Share Posted May 29, 2008 Luis It sure is looking GOOD! Can't wait too it all finished and ready for action. Quote Link to comment Share on other sites More sharing options...
Onigiri[TK] Posted May 29, 2008 Report Share Posted May 29, 2008 Nicely done...what ear mod did you do? I see you kept the original ears. Many people slam the CE's in their stock form, but they turn out awesome with some work. It's like the ugly duckling turning into the swan. I just need to put in the mouth screen, trap/tear stickers and I can call mine done. Mine was a full repaint, ear chop, accurate sized frown holes, new lenses, new tube stripes, re-purposed house door trim for brow trim. Black car door trim for the neck trim. Re-cycled original hovis. Quote Link to comment Share on other sites More sharing options...
Mobus[TK] Posted May 29, 2008 Report Share Posted May 29, 2008 I used riveting's howto on thinning the ears, the pictures in there helped alot. http://forum.whitearmor.net/index.php?showtopic=3176 Quote Link to comment Share on other sites More sharing options...
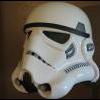
wannabetrooper Posted June 2, 2008 Author Report Share Posted June 2, 2008 OK, so I had the helmet painted and I was not happy with it It didn't come out like the ones I've seen here on other threads all smooth and super shinny. So when the paint dried I sanded it then sprayed some Rust-Oleum Crystal Clear on it, then when that dried I hit it with some Turtle Wax Rubbing Compound. NOW it looks good. I wish I didn't have to go through the extra steps, but I'm much happier with it now. I'll start painting details tomorrow. Neck and brow trims have been ordered. Still haven't received the ears yet. I've never ordered anything from overseas before so I should give it a little more time I guess. Its been 18 days since I made payment. So here is what the helmet looks like now... Quote Link to comment Share on other sites More sharing options...
TK-4510[TK] Posted June 2, 2008 Report Share Posted June 2, 2008 Nice!!!! Quote Link to comment Share on other sites More sharing options...
Onigiri[TK] Posted June 2, 2008 Report Share Posted June 2, 2008 Yep, waiting on my ears too.... Quote Link to comment Share on other sites More sharing options...
TK-4510[TK] Posted June 2, 2008 Report Share Posted June 2, 2008 where are you getting ears??? Quote Link to comment Share on other sites More sharing options...
wannabetrooper Posted June 2, 2008 Author Report Share Posted June 2, 2008 I'm getting mine from someone here. I don't know if it's cool for me to say who he is, so I'd better not for now. Can't wait to get them, I know they will make the helmet look good. Quote Link to comment Share on other sites More sharing options...
wannabetrooper Posted June 3, 2008 Author Report Share Posted June 3, 2008 Painted the frown today. I will start on the rest tomorrow. Quote Link to comment Share on other sites More sharing options...
Onigiri[TK] Posted June 3, 2008 Report Share Posted June 3, 2008 Lookin good and Im right behind you but Im going for an ANH hero on my first. Couple of hopefully helpfull hints I can add from doing this. 1. The screwing together of the front and back to flatten the sides: the top screw has to be rather high as in right under the outline of where the earpiece goes or it wont flatten out. Look at the pics here to determine location. I went too low the first time and didnt get that nice flattened side. 2. I didnt wait for my white putty and used bondo glazing putty. WAIT FOR THE SQUADRON PUTTY It dries MUCH faster, is easier to sand and because its white does not show like the red. Ive gone back with the white and am MUCH happier. 3. If you pay carefull attention to your filing on teh frown you can get that screen used look. Add some height to the center tooth..aside from teh ears the thing that really makes an MR look like an MR is the frown which is too low and rounded in the center. As I make more mistakes I will post them Quote Link to comment Share on other sites More sharing options...
Onigiri[TK] Posted June 3, 2008 Report Share Posted June 3, 2008 Luis Did you permantently attach the cap and putty it? It looks like there is no gap but you didnt mention whether or not you filled in the gap between cap and helmet on the back. Ive been holding off on that only because Im concerned about attaching the brow trim afterwards as theres not much room and I dont want to accidentally break puttied seams trying to get the brow trim on. OK, so I had the helmet painted and I was not happy with it It didn't come out like the ones I've seen here on other threads all smooth and super shinny. So when the paint dried I sanded it then sprayed some Rust-Oleum Crystal Clear on it, then when that dried I hit it with some Turtle Wax Rubbing Compound. NOW it looks good. I wish I didn't have to go through the extra steps, but I'm much happier with it now. I'll start painting details tomorrow. Neck and brow trims have been ordered. Still haven't received the ears yet. I've never ordered anything from overseas before so I should give it a little more time I guess. Its been 18 days since I made payment. So here is what the helmet looks like now... Quote Link to comment Share on other sites More sharing options...
wannabetrooper Posted June 3, 2008 Author Report Share Posted June 3, 2008 LuisDid you permantently attach the cap and putty it? It looks like there is no gap but you didnt mention whether or not you filled in the gap between cap and helmet on the back. Ive been holding off on that only because Im concerned about attaching the brow trim afterwards as theres not much room and I dont want to accidentally break puttied seams trying to get the brow trim on. Yes I did. I thought about that same thing too as far as the brow trim goes. I will probably have to modify the trim itself, but I haven't received it yet. As soon as I do I will post pics and let you know what I did. Quote Link to comment Share on other sites More sharing options...
wannabetrooper Posted June 3, 2008 Author Report Share Posted June 3, 2008 OK, I painted more of the details today. I think I'll wait to do the small lines in the tear drops and back till tomorrow. I was going to put the tube stripe decals on, but I better wait to get the ears in position first. Quote Link to comment Share on other sites More sharing options...

Recommended Posts
Join the conversation
You can post now and register later. If you have an account, sign in now to post with your account.