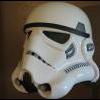
wannabetrooper Posted May 21, 2008 Author Report Share Posted May 21, 2008 Here it is as promised. Painted the inside black and primed the outside. I was going to wait till tomorrow to do the primer, but I couldn't wait. I let the black paint dry for a couple of hours then taped it up from the inside to spray the primer. This is the first coat... Waited about a minute between coats. This is the fourth coat... Here is the helmet ready for the shinny paint. Don't know if I'll do it tomorrow or give the primer a day or two. But the weather was perfect today, both the black paint and primer dried pretty quickly. Quote Link to comment Share on other sites More sharing options...
Darth Voorhees[501st] Posted May 21, 2008 Report Share Posted May 21, 2008 This is comin out awesome! cant wait to see further progress! Quote Link to comment Share on other sites More sharing options...
FIVE[501st] Posted May 21, 2008 Report Share Posted May 21, 2008 Oooooooo... I LIKE that!!!!! Quote Link to comment Share on other sites More sharing options...
psych0ticmisfit Posted May 21, 2008 Report Share Posted May 21, 2008 looking great there ! i hope mine turns out nice as yours. so how do the ears look since you filled the seams of the caps? Quote Link to comment Share on other sites More sharing options...
Onigiri[TK] Posted May 21, 2008 Report Share Posted May 21, 2008 OK, I think Ive figured out whats missing on the CE...its teh frown...the center 'tooth' to be specific. I think when I do mine Im going to do everything I have seen here so far but in addition I am going to give the center tooth a little HEIGHT by adding a veneer/false front to give it a little more height....I think its too short and rounded at teh apex and I think that may make a world of difference. Thoughts? Quote Link to comment Share on other sites More sharing options...
wannabetrooper Posted May 21, 2008 Author Report Share Posted May 21, 2008 looking great there ! i hope mine turns out nice as yours. so how do the ears look since you filled the seams of the caps? I ordered some other ears because I didn't want to use the ones it came with. I can't wait to get them, they should make a big difference. I agree about the frown. That's why I made the openings bigger. The teeth seemed to sit too far in the frown. I tried to make it look as if they were more raised. I think you have a good idea. Quote Link to comment Share on other sites More sharing options...
The_Trooper Posted May 21, 2008 Report Share Posted May 21, 2008 Great pics and what a great overhaul, i cant wait to see it completed Quote Link to comment Share on other sites More sharing options...
mark Posted May 22, 2008 Report Share Posted May 22, 2008 Great pics and what a great overhaul, i cant wait to see it completed Hey everyone...I know many of you have ordered my tube stripes for the CE... Many have asked if I was going to have the decals for the rest of the bucket, and I am close to getting them on ebay. I had to trace each decal, scan, digitize, clean, etc. I should have the decals ready by next week, however, these will be somewhat expensive because I have to outsource them to another shop. I will keep everyone updated too. By the way, excellent paint job! It look fantastic. My apologies for trying to hijack this thread! -M Quote Link to comment Share on other sites More sharing options...
wannabetrooper Posted May 22, 2008 Author Report Share Posted May 22, 2008 Hey everyone...I know many of you have ordered my tube stripes for the CE... Many have asked if I was going to have the decals for the rest of the bucket, and I am close to getting them on ebay. I had to trace each decal, scan, digitize, clean, etc. I should have the decals ready by next week, however, these will be somewhat expensive because I have to outsource them to another shop. I will keep everyone updated too. By the way, excellent paint job! It look fantastic. My apologies for trying to hijack this thread! -M That's cool! I ordered some of your stripes for my helmet too. They look great. Quote Link to comment Share on other sites More sharing options...
elkamino Posted May 22, 2008 Report Share Posted May 22, 2008 Nice work Luis. Really looks awesome Quote Link to comment Share on other sites More sharing options...
Naglium[TK] Posted May 23, 2008 Report Share Posted May 23, 2008 omg this is awesome!!! got my mr ce today, and i'll be following your steps this weekend.. i'm locking myself in my workshop!! Quote Link to comment Share on other sites More sharing options...
wannabetrooper Posted May 23, 2008 Author Report Share Posted May 23, 2008 Thanks guys. I hope to paint it within the next few days, but that depends on the weather. I'll post pics if I do. Quote Link to comment Share on other sites More sharing options...
Onigiri[TK] Posted May 23, 2008 Report Share Posted May 23, 2008 OK, IM confused....it seems like somethings missing. Got teh helmet apart and I removed that inside tab from teh rear helmet but I CANT get my front and back to sit flush at the ears like you did. Please help me...argghhhhh 6. Next I removed the tabs just above the ear on the back half and these on the front, plus some other parts: This was so I could close the big gap between the two halves after removing the ears: I was hoping to use ears from one of the helmet kits, but I can't find anyone who will sell them to me. I might have to use the ones it came with 7. Filled in the areas with some MMD putty. Will sand smooth tomorrow: After that it should be ready for priming then painting. Quote Link to comment Share on other sites More sharing options...
wannabetrooper Posted May 23, 2008 Author Report Share Posted May 23, 2008 OK, IM confused....it seems like somethings missing. Got teh helmet apart and I removed that inside tab from teh rear helmet but I CANT get my front and back to sit flush at the ears like you did. Please help me...argghhhhh I also removed the bottom tab that's right above the ears on the back half. There are two on the back and one on the front. And I also made an opening on the front half as shown in the photo so that the lip from the front could be pushed in. Did this to both sides. You could try to grind down that edge, but I didn't think there was enough material. I'm sorry I left that out That's all I did, then once I put the small nut and bolts they tighten it all together. Basically I kept test fitting the halves and looked to see where something was making contact with something else and determined if I needed to cut or grind it away. I really hope this helps. Quote Link to comment Share on other sites More sharing options...
Runnriottt Posted May 25, 2008 Report Share Posted May 25, 2008 Great thread, I am excited to stt the end result as well. Started in on my MRCE, tossed the ears, brow trim, lenses and hovies. Ordered new ears from John, bought some brow trim and got on that dude in Japan making lenses... I will use some stickers and tubestripes I have from another build. Stompers Hovies should round out the build. I am finaly going to build a Sandy lid for the heck of it. Looking for the Movealong High Brow look. Started hacking and got the ears flush. Puttying up this weekend. Can you hear that? Its the sound of a thousand dremel tools spooled up and slicing into their MRCE's... This thread screams Sticky! Quote Link to comment Share on other sites More sharing options...
Onigiri[TK] Posted May 25, 2008 Report Share Posted May 25, 2008 No doubt no doubt.... My brow trim didnt survive removal so will have to order some. cut out the spot for teh lip and will bolt the halves together tomorrow. Going to give the chin seam one more taste of bondo as its not quite as smooth as Id like. Opened up the frown and gave the center tooth a little more height...frown looks much better. Great thread, I am excited to stt the end result as well. Started in on my MRCE, tossed the ears, brow trim, lenses and hovies. Ordered new ears from John, bought some brow trim and got on that dude in Japan making lenses... I will use some stickers and tubestripes I have from another build. Stompers Hovies should round out the build. I am finaly going to build a Sandy lid for the heck of it. Looking for the Movealong High Brow look. Started hacking and got the ears flush. Puttying up this weekend. Can you hear that? Its the sound of a thousand dremel tools spooled up and slicing into their MRCE's... This thread screams Sticky! Quote Link to comment Share on other sites More sharing options...
wannabetrooper Posted May 25, 2008 Author Report Share Posted May 25, 2008 Thanks everyone. My brow trim didn't come off without a little damage either. Waiting on replacement ears, have other lenses, and I plan on ordering new brow and neck trim soon. If tomorrows weather is good I'll paint it. Let it sit for a week, then start all the hand painting. Quote Link to comment Share on other sites More sharing options...
mark Posted May 25, 2008 Report Share Posted May 25, 2008 Thanks everyone. My brow trim didn't come off without a little damage either. Waiting on replacement ears, have other lenses, and I plan on ordering new brow and neck trim soon. If tomorrows weather is good I'll paint it. Let it sit for a week, then start all the hand painting. Has anyone tried just applying some window tint to the inside of the stock lenses? Quote Link to comment Share on other sites More sharing options...
riveting Posted May 25, 2008 Report Share Posted May 25, 2008 Has anyone tried just applying some window tint to the inside of the stock lenses? Mine had to be completly removed & replaced, it was like looking through a soap dish Don't know if anyone else had a similar experience? also interested to find out which style of neck trim have you opted to use? Quote Link to comment Share on other sites More sharing options...
wannabetrooper Posted May 26, 2008 Author Report Share Posted May 26, 2008 Mine had to be completly removed & replaced, it was like looking through a soap dish Don't know if anyone else had a similar experience? also interested to find out which style of neck trim have you opted to use? I was going to order some Weber's "S" shaped rubber gasket #RG102. I've read in other threads that this is very accurate looking trim. Quote Link to comment Share on other sites More sharing options...
Mobus[TK] Posted May 26, 2008 Report Share Posted May 26, 2008 Mine had to be completly removed & replaced, it was like looking through a soap dish Don't know if anyone else had a similar experience? also interested to find out which style of neck trim have you opted to use? The stock lenses on mine gave a distorted view too, almost like bubble lenses even though they were flat. That was my primary reason for changing them out instead of just tinting them. Quote Link to comment Share on other sites More sharing options...
Runnriottt Posted May 26, 2008 Report Share Posted May 26, 2008 I think the color is awful. Might be screen, but IMO way to thin and flimsy. They had to be changed. Quote Link to comment Share on other sites More sharing options...
Onigiri[TK] Posted May 26, 2008 Report Share Posted May 26, 2008 my new ears are on the way! Quote Link to comment Share on other sites More sharing options...
TK257[501st] Posted May 26, 2008 Report Share Posted May 26, 2008 I tried the window tint applied to clear acetate...didn't like it. I finally got a replacement welders face shield from Farm and Fleet. It cuts easily, and is plenty dark, but not too dark to see out of...at least in well lit areas. Night troops might be interesting. Quote Link to comment Share on other sites More sharing options...
wannabetrooper Posted May 27, 2008 Author Report Share Posted May 27, 2008 Got my replacements on ebay. Much better that the ones it came with. Quote Link to comment Share on other sites More sharing options...

Recommended Posts
Join the conversation
You can post now and register later. If you have an account, sign in now to post with your account.