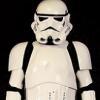
Veeds[TK] Posted March 15, 2015 Report Share Posted March 15, 2015 (edited) Armor maker - Tk Armor Helmet Maker - Tk Armor Blaster Type - DVH Height - 6'3" Weight - 210 Boot Maker - Tk Boots Hand Plates - Tk Armor Electronics - Aker Comm Neck Seal - Darman Holster Maker - Darman Canvas Belt- Trooperbay The side photos were taken today at a troop with my Vader backpack. Front arms at side Back arms at side Left arms raised Right arms raised Right and Left side detail AB Detail Action shot Cod and Butt detail Interior strapping Helmet detail Hovi Detail Lens detail Blaster left and right. Neck Seal Thermal Detail Edited March 15, 2015 by Veeds Quote Link to comment Share on other sites More sharing options...
Dark PWF[Staff] Posted March 15, 2015 Report Share Posted March 15, 2015 Great looking build, Sean! The thing that stands out to me is the belt. It is worn a little bit high, and the top and bottom edges could be trimmed down a little bit more. Good luck!! Quote Link to comment Share on other sites More sharing options...
toybiz[TK] Posted March 16, 2015 Report Share Posted March 16, 2015 (edited) Hi Sean and congratulations on receiving your TK ID and working your way to EIB! I'm sure Steve will provide his input here soon, but please keep in mind that we all want each other to look our best and don't consider any recommendations as criticism. We all put in hours and hours of hard work into our armor and should be proud of what we done. Good luck and don't feel that any recommendations are meant to discourage you but to look your best and represent the world's preferred Star Wars costuming group! Edited March 16, 2015 by toybiz 4 Quote Link to comment Share on other sites More sharing options...
Snaps[TK] Posted March 16, 2015 Report Share Posted March 16, 2015 Nothing I can add. Nice job...good luck! Quote Link to comment Share on other sites More sharing options...
Sly11[Admin] Posted March 16, 2015 Report Share Posted March 16, 2015 Good luck with your application. Quote Link to comment Share on other sites More sharing options...
Tusken RTT Posted March 16, 2015 Report Share Posted March 16, 2015 Good luck, great job! Is the the left shin opening to the outside? I can't tell for sure in the pic. Quote Link to comment Share on other sites More sharing options...
ukswrath[Staff] Posted March 16, 2015 Report Share Posted March 16, 2015 Hey Sean, nice looking armor sir Like Adam mentioned we're here help you make you armor look its best. There's a few things I can see that may need to be addressed to get you there but let's wait for Steve our Deployment Officer to chime in and give you the official word. Best of luck sir Quote Link to comment Share on other sites More sharing options...
Veeds[TK] Posted March 16, 2015 Author Report Share Posted March 16, 2015 Thanks guys. I think the left shin opens facing out. I'll have to look when I get home. Quote Link to comment Share on other sites More sharing options...
Templar726[TK] Posted March 16, 2015 Report Share Posted March 16, 2015 (edited) Veeds, Looking good sir. Good luck with your app and I like the Vader piggyback rider! Edited March 16, 2015 by Templar726 Quote Link to comment Share on other sites More sharing options...
ukswrath[Staff] Posted March 16, 2015 Report Share Posted March 16, 2015 (edited) Veeds, Looking good sir. Good luck with your app and I like the Vader piggyback rider! Is that what that is? Thanks for clearing that up Edited March 16, 2015 by ukswrath Quote Link to comment Share on other sites More sharing options...
Veeds[TK] Posted March 16, 2015 Author Report Share Posted March 16, 2015 Yeah it's a Vader backpack. I found it at a store on sale and the kids love it. They don't notice it until I have passed and they look back at me and The Boss is looking back at them. 2 Quote Link to comment Share on other sites More sharing options...
Veeds[TK] Posted March 16, 2015 Author Report Share Posted March 16, 2015 Also, I looked and the left shin was facing outwards. I flipped it around and is now opening to the inside. I'll post a corrected picture of it later on. 1 Quote Link to comment Share on other sites More sharing options...
Veeds[TK] Posted March 16, 2015 Author Report Share Posted March 16, 2015 The repaired left shin Quote Link to comment Share on other sites More sharing options...
gazmosis[501st] Posted March 17, 2015 Report Share Posted March 17, 2015 Hey there, Mike or Sean? Please don't be offended as Sean shows here and Michael shows on your Legion profile. I'll call you Sean for it is what you have listed here. Anyway, Thank you for your EIB application! As I see it, you have a really nice base build. There is a lot to cover here, so let's get to it! First, I think it's important to clarify that TK Armor is the old NE armor that was offered my AM a while ago. They no longer sell these molds here, but they can be purchased through Facebook. CRL and EIB Application Requirements: All required submission photos have been posted. Although your armor now has the elements required for EIB, Scott's keen eye noted the opening of your left shin was facing outward. This should have been addressed on your approval for it's a basic Legion requirement. You have indeed fixed this which is greatly appreciated. I would like it if you took and posted a picture wearing the shins and showing the proper opening direction. So after all that, I would like to congratulate and welcome you to Expert infantry!! Other-Armor Fit/Assembly: In this section, I will summarize observations by your fellow troopers and myself. These suggestions are supplied as direction to improve the overall look of your armor. Unless specifically stated, these suggestions will not affect any application. First is the position of your waist belt. It is highly recommended that your belt is positioned directly against or slightly overlapping the bottom edge of your button plates. Moving the attachment snaps is an easy adjustment and will go a long way to improving this look. Next I want to discuss the fit of your thighs. When building thighs, many people forget that there is a conical shape to your thigh. (much wider at the top compared to around your knee) The thighs should be built accordingly. You have a great deal of extra room at the bottom of your thighs. I marked in red my approximation of where your thighs are under your armor. If it is possible to carefully separate this seam, you could have a helper squeeze the bottom together overlapping the two halves until comfortable. Mark a common line between the two halves that is centered on the back of your thigh and you have your new seam on your new custom fit thigh. Also in that pic I point out some very removable return edge you have left on your shin tops. If left on, this can really eat into the side of your legs if you are animated and move around a lot. Return edge at the shin tops is fine, but it should be minimal. !/4 inch is good there. This might also allow a similar resizing of your shins. I would also trim down the rear cover strip on the bottom of your calf closure. This is a snag waiting to happen. Tri it just above the lower edge of the shin itself. Centurion Suggestions: Because Centurion requires a great deal of additional photos, not everything can be seen here. We hope all troopers some day strive for Centurion. These suggestions will help to better achieve that goal if you would like that. If applying for Centurion, Please re-take any photo that shows your Vader backpack. It's not on the accepted "accessories" list. Let's start at the top. The helmet details within the tears and trapezoids were decals as you have. The paint around the rank bars in the rounded section of the ear should mimic the decals. The outline of the rank area needs to be evened out some to better resemble the decal outlines. This can be done by dampening a brush with mineral spirits and massaging the un even edges away until you have an even outline. Next, your shoulder bridges have an excess of material outside of the ribbed area. This should only be a couple of millimeters as seen here: Your Thermal Detonator will need some updating as well. The metal belt clips should be made from 1-1 1/8 inch X 1/16 aluminum strip. As long as they are close to 1 inch, they are fine. I suppose 3/4 inch as you have it is close, but they should be made from the material I mentioned earlier. Available at any Lowes. While you are there, you can pick up some new screws to attach them. The screws should be low profile, pan head screws about 1/4 inch in diameter. The hex nut head screws on your "TD" are a ittle big.. When done, your "TD" should resemble this: The gap between your drop boxes and belt is a little excessive and could be eliminated all together. While we areon the subject of your belt, the outer corners need to be trimmed at a sharp 45 degree angle not just rounded off. The vertical edge between the angled corners should be approximately the same size as the width of your cloth belt. Some hardware needs to be attached though not necessarily made to be functional. The Male snap on the upper, right corner of your ab. The six rivets on your left side seam between the ab and kidney. And a split rivet installed on the cod area of the ab.You can also see the double, inward facing male snaps installed on the butt plate. Are the ones on your armor snaps?? The gap between the top of your shoulder bells and the ribbed shoulder bridges should be minimal at best. It's an important feature to make sure that if you are using the handplates with the elastic band that they are worn with the rubber chemical gloves. The seam cover strips on your arms look very wide to me. These are supposed to be thinner than the ones used on the legs measuring right around 5/8 inch or 15 MM. Lastly, there should be no return edge on the wrist opening end of the forearms. This includes the square indent ridge. This list may seem overwhelming, but just take it slow and one step at a time. The reference pics are here. Ask question and you will get there if that is what you want. Congrats on your EIB again!! Quote Link to comment Share on other sites More sharing options...
Sly11[Admin] Posted March 17, 2015 Report Share Posted March 17, 2015 Welcome to EIB rank Quote Link to comment Share on other sites More sharing options...
Dark PWF[Staff] Posted March 17, 2015 Report Share Posted March 17, 2015 Congratulations, Sean!! Welcome to EIB!!! Quote Link to comment Share on other sites More sharing options...
Veeds[TK] Posted March 17, 2015 Author Report Share Posted March 17, 2015 (edited) Thank You for the recommendations. I will try to apply them in the near future. I was under the impression that (TK armor) was a updated version of NE, Thanks for the clarification. It is my great pleasure to join the EIB family. I noticed that my EIB tag states ANH, It should be ESB. Thank you again Sean Edited March 17, 2015 by Veeds Quote Link to comment Share on other sites More sharing options...
ukswrath[Staff] Posted March 17, 2015 Report Share Posted March 17, 2015 Congrats Sean, welcome to the ranks sir Quote Link to comment Share on other sites More sharing options...
gmrhodes13[Staff] Posted March 17, 2015 Report Share Posted March 17, 2015 Congrats and welcome to the ranks trooper Quote Link to comment Share on other sites More sharing options...
Tusken RTT Posted March 17, 2015 Report Share Posted March 17, 2015 Congrats! Quote Link to comment Share on other sites More sharing options...
Veeds[TK] Posted March 17, 2015 Author Report Share Posted March 17, 2015 TK-77477 (EIB) reporting for duty, SIr. Quote Link to comment Share on other sites More sharing options...
ukswrath[Staff] Posted March 17, 2015 Report Share Posted March 17, 2015 Quote Link to comment Share on other sites More sharing options...
gazmosis[501st] Posted March 17, 2015 Report Share Posted March 17, 2015 Thank You for the recommendations. I will try to apply them in the near future. I was under the impression that (TK armor) was a updated version of NE, Thanks for the clarification. It is my great pleasure to join the EIB family. I noticed that my EIB tag states ANH, It should be ESB. Thank you again Sean Updated your Cohort. My bad...most applications are ANH so it's keystroke habit. Anyway, Their 2.0 line of armor they have available through here is the suit they have been updating. Quote Link to comment Share on other sites More sharing options...
Squeaky[TK] Posted March 17, 2015 Report Share Posted March 17, 2015 welcome to EIB status Sean Quote Link to comment Share on other sites More sharing options...
Veeds[TK] Posted March 17, 2015 Author Report Share Posted March 17, 2015 Thanks, I know that the majority of the troopers are ANH, that's why I chose ESB. Trying to bolster the middle child's ranks.. Quote Link to comment Share on other sites More sharing options...

Recommended Posts
Join the conversation
You can post now and register later. If you have an account, sign in now to post with your account.