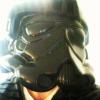
lindkvast Posted April 3, 2014 Report Share Posted April 3, 2014 (edited) Hello folks! Me and my friend (newly registered Willy a.k.a whiskeybravo) got our Troopermaster ANH Hero kits a week ago, and here we will give you all the details of our project. Please give us your feedback and tips so that we'll get something really nice in the end! Here are some pictures! Obligatory Swedish IKEA pen for tracing where to cut. Seriously sharp knife, plastic! Did some test cuts to the arm before getting into the real deal. I started out with the right calf. The lower part The upper part, where I think I might've made the edge a little bit too thin. Here we have the right bicep. Willys thighs And finally, trying stuff on! We just got started on this, but we're really looking forward to finishing it up, and having a blast as we go! Two questions that came up was: Do you usually trim it to a "finished" state before testing it on, or do you leave as much plastic as possible on there and then take it down until it fits? Also, how do you cut this up yourselves? We just use sharp knives now, but is someone out there doing it in some other way maybe? It's not easy! Edited April 8, 2014 by lindkvast Quote Link to comment Share on other sites More sharing options...
Cantina Security[501st] Posted April 3, 2014 Report Share Posted April 3, 2014 (edited) Cool, looking good, you got this. Slow and steady, the hard part is over, getting started. I like to pencil in the trim lines then score with a straight blade or trim with curved scissors. Leaving a nice even return edge. Use a dremel with a sanding drum to even out your edges. Good luck. Edited April 3, 2014 by Cantina Security Quote Link to comment Share on other sites More sharing options...
gmrhodes13[Staff] Posted April 3, 2014 Report Share Posted April 3, 2014 Looking good, you can just make out the cutting lines, could take a little more from the top of the calves. I love my dremel it's amazing what you can do with one, the drum sander attachment works great too. Good luck with the build Quote Link to comment Share on other sites More sharing options...
troopermaster Posted April 3, 2014 Report Share Posted April 3, 2014 Curved lexan scissors are great for cutting the 1.5mm ABS. I use them for most of the cuts but I also use heavy duty scissors for the long, straight cuts since they are easier and quicker You can leave as much or as little return edges on the parts. You only need a large return for the strapping brackets and everywhere else is up to you Take your time and keep asking questions along the way. But most importantly, have fun and enjoy the build Quote Link to comment Share on other sites More sharing options...
CRISTONAMO Posted April 4, 2014 Report Share Posted April 4, 2014 Awesome, two Hero's at once! Good luck with the build remember measure twice cut once! Quote Link to comment Share on other sites More sharing options...
lindkvast Posted April 9, 2014 Author Report Share Posted April 9, 2014 Good evening! I just came home from a 3 hour session of cutting plastic. We slowly start to get a hang of it now, too bad we're almost done cutting! Here are some images. First off, the stuff I've cut myself: (According to photobucket, this one is rotated and not upside down, as it might be here. No idea why, sorry for that). And then, Willys stuff! He's a bit faster with the blade. (Also oddly rotated by photobucket :/) So things are coming along quite nicely. Not that much left, one more session of cutting probably. Then we will move on to strapping and everything else. Finally, we will do the helmets, we don't have the confidence for that just yet ;-) Quote Link to comment Share on other sites More sharing options...
lindkvast Posted April 9, 2014 Author Report Share Posted April 9, 2014 And thanks for the advice and kind words so far! Quote Link to comment Share on other sites More sharing options...
LeMaxim[TK] Posted April 9, 2014 Report Share Posted April 9, 2014 Nice work! Keep it up! Quote Link to comment Share on other sites More sharing options...
Locitus[Admin] Posted April 9, 2014 Report Share Posted April 9, 2014 +1 on the lexan scissors. You can get them on "hobbex" if you don't want to buy online. Quote Link to comment Share on other sites More sharing options...
lindkvast Posted May 5, 2014 Author Report Share Posted May 5, 2014 OK, so after trying scissors, my verdict is that they of course get you better edges than the knife, but it's a bit more tricky to get the cuts right angle-wise since the plastic varies in its thickness (and therefor hardness). So no real favourite yet. How did you all cut the helmets by the way? Is there a dremel tool that works well or just knife that too? Soon it's strapping-time! Quote Link to comment Share on other sites More sharing options...
The5thHorseman[TK] Posted May 5, 2014 Report Share Posted May 5, 2014 I personnaly used my x-acto knife for the helmet, as for all my build. Quote Link to comment Share on other sites More sharing options...
I'm Batman[501st] Posted May 5, 2014 Report Share Posted May 5, 2014 I used the Dremel cutting disc for most of my cuts. Just like a mini angle grinder. Quote Link to comment Share on other sites More sharing options...
lindkvast Posted May 5, 2014 Author Report Share Posted May 5, 2014 I used the Dremel cutting disc for most of my cuts. Just like a mini angle grinder. Yeah but the plastic melts when dremeling. So I've only used it for rough cuts so far, then going in with a fairly similar knife as Germain mentioned. Gives me quite a bit of nicks in the edges unfortunately, but I guess that's okay. Will probably grind it all down a bit later on. Quote Link to comment Share on other sites More sharing options...
Cantina Security[501st] Posted May 5, 2014 Report Share Posted May 5, 2014 I like to cut out most of the material with a dremel then use some small hobby files to get the details in the teethe and corners. Files are nice, just be careful. Good luck. Quote Link to comment Share on other sites More sharing options...
whiskeybravo Posted August 25, 2014 Report Share Posted August 25, 2014 We have come along way in our build but ran into some questions. I will search this forum for answers but I might as well but up my questions in our thread. Can someone tell me how to glue the green glass pieces inside the helmet. i was thinking of building up a better area for glue with some plastic padding. What is the best practice here? About the bigger rivets that will be visible..What tools and techniques are you using? cheers! Quote Link to comment Share on other sites More sharing options...
The5thHorseman[TK] Posted August 25, 2014 Report Share Posted August 25, 2014 People usually use the ears screws which go through helmet to fasten the lenses inside it. Accurate and efficient: I can't figure what your talking about the "bigger rivets" though... Quote Link to comment Share on other sites More sharing options...
lindkvast Posted August 25, 2014 Author Report Share Posted August 25, 2014 People usually use the ears screws which go through helmet to fasten the lenses inside it. Accurate and efficient: I can't figure what your talking about the "bigger rivets" though... But we're doing TM, it is two separate thick plastic lenses. It doesn't look like that. Quote Link to comment Share on other sites More sharing options...
troopermaster Posted August 25, 2014 Report Share Posted August 25, 2014 You have hero helmets with separate bubble lenses. You need to glue small squares of ABS in each corner of the eye sockets to build up a base to stick the lenses to. I have found this method to be more than adequate in the past Quote Link to comment Share on other sites More sharing options...
lindkvast Posted August 26, 2014 Author Report Share Posted August 26, 2014 Another thing, we got four long pop rivets, are they for the front plastic piece of the belt? We only need three, but that's where they seem to make the most sense. Quote Link to comment Share on other sites More sharing options...
Locitus[Admin] Posted August 26, 2014 Report Share Posted August 26, 2014 Another thing, we got four long pop rivets, are they for the front plastic piece of the belt? We only need three, but that's where they seem to make the most sense. Helmet assembly I would guess. There are two pop rivets on each side of the helmet, holding the face, cap and back together. The belt was held on to the canvas with three cap rivets. Quote Link to comment Share on other sites More sharing options...
troopermaster Posted August 27, 2014 Report Share Posted August 27, 2014 The four rivets are for helmet assembly - two on each side. Quote Link to comment Share on other sites More sharing options...
whiskeybravo Posted August 27, 2014 Report Share Posted August 27, 2014 Thanks ! Just found a store in town that sells cap rivet tools How do you guys bend those metal bars so perfect for the oxygen pack on the back of the belt. Quote Link to comment Share on other sites More sharing options...
troopermaster Posted August 27, 2014 Report Share Posted August 27, 2014 Simply roll one end around the plastic tube and then mark of 75mm on the other end and bend it over a screwdriver shaft to get a nice bend. Drill your holes for the screws after you have bent the brackets or they will kink when you bend them Quote Link to comment Share on other sites More sharing options...
lindkvast Posted October 4, 2014 Author Report Share Posted October 4, 2014 New question: the thigh straps attached to the top front of the thigh armor...where does it attach on the rest? Quote Link to comment Share on other sites More sharing options...
The5thHorseman[TK] Posted October 4, 2014 Report Share Posted October 4, 2014 They hang from a belt you have around your waist, which is hidden behind the abdominal and kydney plates. You can have a glimpse at it on this sceencap (and also on a picture of Luke resting on his side between shots but i can't find it back): Quote Link to comment Share on other sites More sharing options...

Recommended Posts
Join the conversation
You can post now and register later. If you have an account, sign in now to post with your account.