SlooperTrooper Posted March 25, 2014 Report Share Posted March 25, 2014 (edited) Hey All! So finally getting around to starting my build thread... Big brown box arrives!!! Of course I was too excited to stop and take a picture so just tore it open and unpacked! Crap! Where do all these pieces go??? My daughter accused me of trying to build two suits. She called dibs on the second... .... FYI I am probably going to make a mess out of all of this so feel free to scream when I screw up. Easier to fix it now Sent from my iPhone using Tapatalk Edited March 25, 2014 by SlooperTrooper Quote Link to comment Share on other sites More sharing options...
Cantina Security[501st] Posted March 25, 2014 Report Share Posted March 25, 2014 That's good looking armor right there. Good luck... Quote Link to comment Share on other sites More sharing options...
gmrhodes13[Staff] Posted March 25, 2014 Report Share Posted March 25, 2014 Ahhh another big brown box, don't worry there are those around to help you when you need it, remember measure twice and cut once Quote Link to comment Share on other sites More sharing options...
gazmosis[501st] Posted March 25, 2014 Report Share Posted March 25, 2014 The ocean of plastic in which to swim! Quote Link to comment Share on other sites More sharing options...
SlooperTrooper Posted March 25, 2014 Author Report Share Posted March 25, 2014 (edited) So very strange... went to upload more progress and found out my Tapatalk app will no longer let me upload any images (File too Big Error). I wonder how those first two made it through. Let's see if these image links work from imgur... Bobby the cat is skeptical!!! HOLY CAT HE IS HUGE!!! RUN FOR YOUR LIVES!!! ... I'm off to find some message board image tutorials now (ugh). Edited March 25, 2014 by SlooperTrooper Quote Link to comment Share on other sites More sharing options...
Cantina Security[501st] Posted March 25, 2014 Report Share Posted March 25, 2014 Bobby The Cat Looks Pissed...lol Quote Link to comment Share on other sites More sharing options...
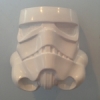
SlooperTrooper Posted March 25, 2014 Author Report Share Posted March 25, 2014 (edited) He really is an angry cat (he bites)... well at least I got the images to work again. Ok, so after much hesitation I finally started to make some cuts. Big thanks to Pandatrooper for his fantastic tutorials, without which I would still be sitting here wringing my hands and fretting about screwing up. I started with the bucket, where else! After some consideration I am going to lower the brow, both for looks and to give a little more space in the neck opening for my fat head to fit through. Oh, and then I blew the drive coupling on my 20 year old Dremel. Two weeks for a replacement part seems a little nuts, but for $0.98 I can't complain too much. Hopfully the Doopy converstion kit for my Hasbro e-11 will come soon. Edited March 25, 2014 by SlooperTrooper Quote Link to comment Share on other sites More sharing options...
Cantina Security[501st] Posted March 25, 2014 Report Share Posted March 25, 2014 Cool, nice photos, huge...lol, thats good. Good luck buddy. Quote Link to comment Share on other sites More sharing options...
TK bondservnt[501st] Posted March 25, 2014 Report Share Posted March 25, 2014 (edited) Nice kit! Lowering the bro is not the only way to make a helmet larger... actually just drilling out the holes on the lid you get a perfect setting... so follow those exactly! Make sure you don't drill out the ears larger than the holes, don't countersink em. otherwise your screws will pull though and damage the plastic. just keep the ears with about 1/16" extra plastic at the center rear of the cap, and keep the back thicker than the trim lines. The fronts of the ears should curve towards the cheek near the cap front center. To make the helmet larger at the bottom you can cut the front of the bottom of the helmet in the center and stop near the front place near the ears. remember that you must Twist the helmet on the side and twist to the center when you place it on your head. if you'd like detailed photos for ear fitting, and eye cutting I can provide those. if you want, you can use flat tin snips to cut out the lines... I use flat large snips... not bullnose. email me bondservnt@aol.com for more details. Edited March 25, 2014 by TK Bondservnt 2392 Quote Link to comment Share on other sites More sharing options...
SlooperTrooper Posted April 14, 2014 Author Report Share Posted April 14, 2014 So back in business and tearing through the full trim. Helmet is almost done, pics soon... Now for my first major question. Is there a diagram that shows which edges of which pieces have return edges and how large they are? The trim lines on the AP kit seem to vary quite a bit and I don't want to hack too much off! For instance the top of the kidney plate has a natural 1/4 - 1/2" return edge, while the bottom has none (since it is a single pull attached to the butt which needs to be cut). Sent from my iPhone using Tapatalk Quote Link to comment Share on other sites More sharing options...
SlooperTrooper Posted April 14, 2014 Author Report Share Posted April 14, 2014 So finished my ears. Think it's a passable job for my first lid. Thanks to everyone for all the tips and advice. All that said, not really happy with the gaps. Going to try a little ABS paste to fill and sand. Hopefully that will do the trick... Also knocked out my neck gasket and belt. Thanks to my awesomesauce daughter and her wizardly sewing machine skills! The belt is standard canvas duck, but I used headliner/headboard material for the gasket since it had the foam backing. More to come, but still need advice on return edges to finish my trim... Sent from my iPhone using Tapatalk Quote Link to comment Share on other sites More sharing options...
SlooperTrooper Posted April 16, 2014 Author Report Share Posted April 16, 2014 Ok, so went crazy and made my first ABS paste. Used two tablespoons of Acetone with two tablespoons of Dremel shavings, and another tablespoon of 1/8" square trim bits. Left it for 30 minutes in a glass shot glass and stirred every 5 minutes with a wooden clay tool. Came out GREAT! Nice a thick with some chunks that could be worked well into the seams... So... The results were very scary, and it was late so I went to bed. Today, after 3 hours of hand sanding (Futurama, South Park, Tosh.0) I got it up to a 600 grit and am very pleased! My Home Depot only carries up to 800 grit, anyone know my best bet for 1200+ before I hit the Novus? West Marine? Sent from my iPhone using Tapatalk Quote Link to comment Share on other sites More sharing options...
SlooperTrooper Posted April 16, 2014 Author Report Share Posted April 16, 2014 Oh right, forgot the ear seam pics!!! Sent from my iPhone using Tapatalk Quote Link to comment Share on other sites More sharing options...
maxsteele[TK] Posted April 16, 2014 Report Share Posted April 16, 2014 You'll want to bring the frown paint down to a point on each end: Quote Link to comment Share on other sites More sharing options...
SlooperTrooper Posted April 16, 2014 Author Report Share Posted April 16, 2014 Thanks max!(max?). Should I pull the point all the way down to to cheek tubes? Sent from my iPhone using Tapatalk Quote Link to comment Share on other sites More sharing options...
maxsteele[TK] Posted April 16, 2014 Report Share Posted April 16, 2014 (edited) I believe that comes in to preference on how you want the frown to look. As you can see from all those screen-used helmets, the frown had different lengths at the ends. The common point is that all of them come to a point on each end. Here's how far I went with mine: It's a little hard to see at this angle, but both ends come down to a point. It looks like I stopped just before reaching the cheek. Edited April 16, 2014 by maxsteele Quote Link to comment Share on other sites More sharing options...
walt[501st] Posted April 21, 2014 Report Share Posted April 21, 2014 Well done so far! Quote Link to comment Share on other sites More sharing options...
walt[501st] Posted April 21, 2014 Report Share Posted April 21, 2014 Oh return edges..some but not a lot...hows that?!....forearms have none at the wrist.some people have some at the rear biseps have some the bells have it on the bottoms, chest and back you can take off at the neck area cod.at the top as much as you feel to and the bottoms of the shins have none..the rest is going to depend on your fit and movement...lol of lack of...you shall see!:-) Quote Link to comment Share on other sites More sharing options...
SlooperTrooper Posted April 21, 2014 Author Report Share Posted April 21, 2014 WALT!!! Congrats on the twin boys (again)! Seriously, I think I need to see some suits face to face before I mutilate this set... PS: hoppy Easter Sent from my iPhone using Tapatalk Quote Link to comment Share on other sites More sharing options...
walt[501st] Posted April 21, 2014 Report Share Posted April 21, 2014 Bring it down anytime 1 Quote Link to comment Share on other sites More sharing options...
SlooperTrooper Posted October 6, 2015 Author Report Share Posted October 6, 2015 (edited) Hah, found it! For those who were not aware, I spent the last year and a half falling in love, getting married, and starting a new life with four step kids. That said, it is now.... TIME TO FINISH MY AP BUILD!!!! I am taking over the family room as the trooper workshop and using the next two weeks full-time to finish this set (and paint the deck)! Now let's get started! (again) Sent from my iPad using Tapatalk Edited October 7, 2015 by SlooperTrooper 1 Quote Link to comment Share on other sites More sharing options...
Sentry71[TK] Posted October 8, 2015 Report Share Posted October 8, 2015 Congrats, and wishing you much success on the build (and the deck). Will be following this thread to see how your AP comes out! Quote Link to comment Share on other sites More sharing options...
Airborne Trooper[501st] Posted October 8, 2015 Report Share Posted October 8, 2015 Takes a strong man to take all that in with open arms. Good for you! Looking forward to seeing your progress. Quote Link to comment Share on other sites More sharing options...
SlooperTrooper Posted October 9, 2015 Author Report Share Posted October 9, 2015 (edited) Thanks Airborne, though exactly why I need a little more armor now Took over the family room. Wifey is not entirely impressed but helping as much as she can while she plays solitaire... After unpacking the big brown box for the second time I got straight to work on final trims and snap plates. Seems I have more courage these days to tear right into a pile of abs with snips... Bells are done! Used 2-part Epoxy (5minute quick dry) on the snap plates and e-6000 on the elastic. Interesting Note: ordered more e-6000 on Amazon today. Seems there are now two grades, automotive and craft. Bought the automotive because it is a buck cheaper and that seems to be what my other tube is. Setup a shin strip to dry overnight (oh woe is the cure time on e-6000, another 7 days just to get the front joins done)! Never enough magnets!!! Using the butt join and cover strip method for potential EIB certification later. Probably should have ordered more magnets when I asked Amazon for the e-6000... Right shin will need some sanding after it dries, maybe I should have started with the left to cover my sloppy joins with the sniper plate. Time for a beer! (Who am I kidding I've been drinking since noon.) Sent from my iPad using Tapatalk Edited October 9, 2015 by SlooperTrooper Quote Link to comment Share on other sites More sharing options...
Airborne Trooper[501st] Posted October 9, 2015 Report Share Posted October 9, 2015 7 days? I let it sit overnight. It only goes longer than that if my wife has other plans for me and I can't get to it. My kitchen looks the same as your family room Quote Link to comment Share on other sites More sharing options...

Recommended Posts
Join the conversation
You can post now and register later. If you have an account, sign in now to post with your account.