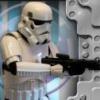
SandFlea[TK] Posted January 30, 2011 Report Share Posted January 30, 2011 I am Respectfully submiting for EIB. Darren Haverstock 501st and FISD name: TK-7435 Star Garrison, Central Texas Squad Armor= ANH Stunt Armor master (AM) Helmet= KW ANH 2.5 Blaster= E-11 Hyperfirm Height = 5'8" Weight = 180lbs Boots = TKBoots Electronics= ROM/FX Classic Hope the Pictures work and thanks to those who helped me upload these. Quote Link to comment Share on other sites More sharing options...
davej[TK] Posted January 30, 2011 Report Share Posted January 30, 2011 Hi Darren, shiny looking build Couple of things I've noticed. 1) Your drop boxes are attached with black elastic. They need to be done with white. 2) Your helmet frown is painted a bit big. The paint should not touch the "lips". Yours is painted in more of an ROTJ style. 3) I'm sure your Ab buttons will be painted in the correct colours, but I can't really tell from the photo, it is a bit dark. Maybe a new photo? Mate, almost there Quote Link to comment Share on other sites More sharing options...
Turrican Posted January 30, 2011 Report Share Posted January 30, 2011 (edited) EIB Requirements - ANH IMPORTANT: FX helmets are NOT considered acceptable for Expert Infantryman qualification ( Isn't AM a copy of a FX ??? ) Edited January 30, 2011 by Turrican Quote Link to comment Share on other sites More sharing options...
Locitus[Admin] Posted January 30, 2011 Report Share Posted January 30, 2011 EIB Requirements - ANH IMPORTANT: FX helmets are NOT considered acceptable for Expert Infantryman qualification ( Isn't AM a copy of a FX ??? ) Helmet= KW ANH 2.5 He says it's not a AM/FX helmet, but it does look a little odd indeed. With the ab plate buttons painted and some other small tweaks this armour will look pretty good though, I think. Quote Link to comment Share on other sites More sharing options...
Rich330[TK] Posted January 30, 2011 Report Share Posted January 30, 2011 I've no idea what the KW helmet is but it seems Mike sells decals especially for it: http://members.cox.net/appstronaut/kw_anh.html Looks like an FX face plate with a smaller, more rounded dome. Quote Link to comment Share on other sites More sharing options...
davej[TK] Posted January 30, 2011 Report Share Posted January 30, 2011 I've no idea what the KW helmet is but it seems Mike sells decals especially for it: http://members.cox.net/appstronaut/kw_anh.html Looks like an FX face plate with a smaller, more rounded dome. Looks to be one piece. Fibreglass or resin? Unusual looking bucket. Quote Link to comment Share on other sites More sharing options...
SW1 Posted January 30, 2011 Report Share Posted January 30, 2011 Hi Darren, A couple of things i noticed on the helmet there are no black outline around the ear bumps plus the the tube stripes dont look right , imo .you say your going for stunt EIB i only say this because you have the four snaps that hold the holster which is correct for hero but not for stunt , nothing a few tweeks wont sort out for stunt EIB mate Quote Link to comment Share on other sites More sharing options...
dashrazor Posted January 30, 2011 Report Share Posted January 30, 2011 looking good just a few small fixes for an easy pass 1: Ab plate: must match the correct color pattern (3 blue + 6 gray). 2: drop boxes: straps need to be white 3: holster: two fasteners to attach to belt fixes that will improve the look of the helmet* black trim around ear bumps, frown should be a bit thinner, raise the brow trim in the front a hair here is a pic of a finished KW helmet ( on the right) note the differences in the frown and brow trim) Quote Link to comment Share on other sites More sharing options...
SandFlea[TK] Posted January 30, 2011 Author Report Share Posted January 30, 2011 OK Noted, I air brushed the tube stripes and all other parts of the bucket...not as talented as I would have hpred for. going decals for tube stripes now. getting white straps for drop boxes...will retake pic after I fix snaps for holster and straps for drop boxes. Better pic of buttons This is a big old FX/AM bucket next to KW....BIG size difference Here are non air brushed decals for tube striping on other bucket...will this work? Will paint lines around ears...fix tube stripes move and moving eye brow...I put it upside down...now I see this. Few more tweaks and I will retake pic....will have flexiable hand guards in next round too. Forgot to put them on in these pics. Thanks guys and I'll get these fixes done. Quote Link to comment Share on other sites More sharing options...
dashrazor Posted January 30, 2011 Report Share Posted January 30, 2011 i wouldn't worry too much about the tube stripes.. they look ok to me Quote Link to comment Share on other sites More sharing options...
Quebectrooper Posted January 30, 2011 Report Share Posted January 30, 2011 Nice Darren. Did you trim the top of the thighs cause to me they look small for AM. You should trim the plastic belt like this: http://media.photobucket.com/image/stormtrooper%20belt/Firebladejedi/teekaybelt005.jpg - raise the back plate a little . - trim the forearm overlap corners. (This only if you're looking for more accuracy beside that it looks good.) Good luck. Quote Link to comment Share on other sites More sharing options...
SandFlea[TK] Posted January 30, 2011 Author Report Share Posted January 30, 2011 Nice Darren. Did you trim the top of the thighs cause to me they look small for AM. You should trim the plastic belt like this: http://media.photobucket.com/image/stormtrooper%20belt/Firebladejedi/teekaybelt005.jpg - raise the back plate a little . - trim the forearm overlap corners. (This only if you're looking for more accuracy beside that it looks good.) Good luck. I trimed them a bunch...couldn't walk in the at all and I wanted to be able to move in this armor. They are stream lined to my legs so I can move and run if I want in this armor. I like the way they turned out with the mobility I can get now. Can you explain the trim overlap on forearms more so I understand what your saying? Quote Link to comment Share on other sites More sharing options...
NoVATie[Admin] Posted January 30, 2011 Report Share Posted January 30, 2011 He's talking about right here: Some build threads or pics in the academy should show you how the movie suits were trimmed. Quote Link to comment Share on other sites More sharing options...
SandFlea[TK] Posted January 30, 2011 Author Report Share Posted January 30, 2011 He's talking about right here: Some build threads or pics in the academy should show you how the movie suits were trimmed. Dang I can't believed I missed that one. Thanks now that I see it NO WAY I can let that be...WOW. Must have been asleep at the wheel on that one. Thanks. Quote Link to comment Share on other sites More sharing options...
NoVATie[Admin] Posted January 31, 2011 Report Share Posted January 31, 2011 No biggie Darren. The hard part was putting it all together. These little tweaks will really just help it shine Quote Link to comment Share on other sites More sharing options...
blueboxer[501st] Posted February 5, 2011 Report Share Posted February 5, 2011 There should also be a total of six rivets on the left side of ab/ backplate junction... and an exposed snap at top of ab plate on the right side. Quote Link to comment Share on other sites More sharing options...
Daetrin[Admin] Posted February 5, 2011 Report Share Posted February 5, 2011 Remember that those are "nice to haves", not required elements for EI. Quote Link to comment Share on other sites More sharing options...
SandFlea[TK] Posted February 8, 2011 Author Report Share Posted February 8, 2011 There should also be a total of six rivets on the left side of ab/ backplate junction... and an exposed snap at top of ab plate on the right side. James, You have a pic of this or where to find it? I don't see why this would be that hard to add to my build. Update Helmet almost done paint is taking a bit. Fixed drop boxes to correct with white, trimed belt, back plate and forearm. Will be reposting pics once helmet is done. Darren Quote Link to comment Share on other sites More sharing options...
seantrooper[TK] Posted February 8, 2011 Report Share Posted February 8, 2011 James, You have a pic of this or where to find it? I don't see why this would be that hard to add to my build. Update Helmet almost done paint is taking a bit. Fixed drop boxes to correct with white, trimed belt, back plate and forearm. Will be reposting pics once helmet is done. Darren Rivets on the left side of the ab/kidney plates: a total of six rivets with three on the ab and three on the kidney plate, equally spaced out along the depth of the armour and about 10mm from the edge. They may be painted white, or not The six rivets are 9mm. Split rivets including jeans rivets can be used, please note they are not regular pop rivets and have solid caps. On the right hand side of the torso there is one male snap on the front ab plate. You see the back side of a 15mm male snap. Camping snaps without text or patterns look best. You will also see that the belt was held in place by a single snap on either side of the front torso. Also under the crotch the elastic was attached to the armour with a split rivet to the front and two snaps at the rear. Drilled all the way throught the armour. found the thread for you Quote Link to comment Share on other sites More sharing options...
Daetrin[Admin] Posted February 8, 2011 Report Share Posted February 8, 2011 Be careful on that butt plate esp the second snap. I tried doing that mod tonight and had a heckuva time trying to get the plyers to reach. Even using the hammer/anvil way didn't work as I had hoped. Quote Link to comment Share on other sites More sharing options...
SandFlea[TK] Posted February 13, 2011 Author Report Share Posted February 13, 2011 Thanks for all the tips and corrections are done. Adjusting paint on the bucket was a pain and took forever so I did not redo the tubestripes....I would be working on a complete repaint of the helmet to do it. Here are the pics Thanks to all and I hope to join you elite troopers Darren Quote Link to comment Share on other sites More sharing options...
pandatrooper[TK] Posted February 13, 2011 Report Share Posted February 13, 2011 The only thing I can see that might prevent approval. The lip area of the teeth are painted grey, and the Eib guidelines state that only the teeth should be painted (as seen in the screen used helmets). * Frown must be painted gray and not leave the teeth area. Eight total teeth on the frown are to be cut out. Check out the teeth on the original lids here. http://www.starwarshelmets.com/original-ANH-Stunt-Stormtrooper-armor-helmets.htm Theres a couple other small things that look a bit inconsistent in terms of accuracy: - the brow trim looks a bit off. Looks like the backside of the trim was removed near the temples? It should just run as 1 piece frim the temple to the other temple - the belt armor corners look very over trimmed. Too much material has been removed - the drop box straps seem a little long I hope you take these points as constructive criticism. I think a certain level of detail needs to be upheld for EIB receipients. Quote Link to comment Share on other sites More sharing options...
dashrazor Posted February 13, 2011 Report Share Posted February 13, 2011 punchlist sent, i am sure when the new parts arrive it will be an easy pass keep up the good work trooper!! Quote Link to comment Share on other sites More sharing options...
RogueTrooper[TK] Posted February 13, 2011 Report Share Posted February 13, 2011 Hey Darren, Don't want to pile on the list, but I just want to make sure that you acheive the best that you can. Your tube stripes look to be a little long and a little wide. My suggestion is to get one of Mike's tube stripe stencils, here is the link: http://members.cox.net/appstronaut/tube_mask.html Also, if you need new brow trim, he will have it as well: http://members.cox.net/appstronaut/tk4510_decals.html. BTW, here is a four part video tutorial that should help you with the hand painted parts of the ANH lid:http://forum.whitearmor.net/index.php?showtopic=12855&st=0&p=159463&hl=humbrol&fromsearch=1entry159463 Like Panda said, study the pix of the ANH Stunt lids. Quote Link to comment Share on other sites More sharing options...
SandFlea[TK] Posted February 13, 2011 Author Report Share Posted February 13, 2011 I just figured out what you all talking about with the grey touching the lips. I am going to get my hands on an air brush and redo the tubestripes and frown. I shortened it instead of actually correcting what you all were talking about. It clicked after Terry sent me the link. I have decals and the tubestripes from Mike already so it should be an easy fix. Issue is getting my hands on an air brush gun. Give me a bit and I'll get it fixed. First attempt at air brushing so I don't think I did too bad. Just didn't see what you all were saying. Thanks. Quote Link to comment Share on other sites More sharing options...

Recommended Posts
Join the conversation
You can post now and register later. If you have an account, sign in now to post with your account.