Pyro[TK] Posted August 27, 2010 Report Posted August 27, 2010 I have pics on what Ive got done so far Here is my belt, neck seal and pauldron that i made Quote
Quebectrooper Posted August 27, 2010 Report Posted August 27, 2010 nice. what kind of white spray paint is that? Quote
Pyro[TK] Posted August 27, 2010 Author Report Posted August 27, 2010 Thanks Rustolium gloss white and the grey primer Quote
dashrazor Posted August 27, 2010 Report Posted August 27, 2010 great job on the pauldron ! the only problem you may have is the glue will not bond to the painted surfaces unless you remove all paint and primer from the areas you are gluing, if i were you i would trim all the parts then remove "ALL" of the paint from the seams/joints and re sand the areas before gluing. and paint all parts after it is fully assembled trust me.. if you dont your armor will fall apart as soon as you try to wear it the glue will bond to the paint not the plastic Quote
Pyro[TK] Posted October 30, 2010 Author Report Posted October 30, 2010 Here is a teaser pic (hopefully tomorrow I will done with it) I got an Efx Helmet and am very pleased with it Quote
Pyro[TK] Posted January 6, 2011 Author Report Posted January 6, 2011 (edited) Small update What do you guys think? Edited January 6, 2011 by Pyro Quote
dashrazor Posted January 7, 2011 Report Posted January 7, 2011 looking good , the efx looks really good for this build, it is symmetrical like in the game.. Quote
Pyro[TK] Posted January 7, 2011 Author Report Posted January 7, 2011 Thanks I love my helmet! If all goes well I should have this done tomarrow except for the trim on the cod, and butt/kidney. I ran out of trim and will have to order more Quote
Pyro[TK] Posted January 13, 2011 Author Report Posted January 13, 2011 (edited) and is this to much weathering? (it has been removed as i did not have time for to do the rest on the armor for a con this weekend) Edited January 13, 2011 by Pyro Quote
Sonnenschein Posted January 13, 2011 Report Posted January 13, 2011 It looks a little too much for me... Quote
dashrazor Posted January 13, 2011 Report Posted January 13, 2011 looks like a bit too heavy on the weathering. but otherwise it looks great! a good blackwashing looks more natural Quote
Pyro[TK] Posted January 14, 2011 Author Report Posted January 14, 2011 ok sounds pics are coming very soon of the body! Quote
RogueTrooper[TK] Posted January 14, 2011 Report Posted January 14, 2011 Too heavy on the black wash weathering. I think the battle scars in the red need to be blended/feathered a bit more. Try using a sanding sponge or maybe some #0000 steel wool to try to feather the paint edges of where the battle scars are in the red to make it look more random/scraped. To me it just looks like little tears in the paint job right now. Quote
dashrazor Posted January 14, 2011 Report Posted January 14, 2011 if you used the krylon plastic paint it should remove easily with a little soap and water and steel wool or green scrub pad. that stuff doesn't really bond to plastic all that well as it is advertised, for weathering i find acrylic craft paints are the best (for drybrushing and blackwash). and just coat it with a clear acrylic craft sealer when done (clear matte finish looks nice). after sealing apply a coat of automotive wax and it will be just as permanent than any spray paint... the benefit of acrylics is, if you make a mistake it can be washed off with soap and water and a paper towel, and it has no fumes so you can apply it inside without ventilation an airbrush also adds a nice touch.... remember only water based paints can be thinned with water, spray paints/model paints can not be thinned without a proper thinner or reducer check out this site it has some good techniques http://www.starwarsmodels.com/techweath.html Quote
Pyro[TK] Posted January 15, 2011 Author Report Posted January 15, 2011 ok heres what its going to look like for ABQ Comic Con What do you guys think? Quote
dashrazor Posted January 15, 2011 Report Posted January 15, 2011 looks bads$$ i think if you do the scraping like tom suggested it will be perfect.. i just painted all the red areas then lightly sanded the battle damaged areas to scuff up the red i also airbrushed some transparent black on areas to make it appeared scorched (but it is hard to tell in the photo) Quote
seantrooper[TK] Posted January 19, 2011 Report Posted January 19, 2011 agreed, take some sandpaper to that bad boy. Looks great though! Quote
Locitus[Admin] Posted January 19, 2011 Report Posted January 19, 2011 Looks like you might want to trim trim some more on that knee plate. But other than that it looks pretty good, apart from what was mentioned above about the sandpaper. Quote
seantrooper[TK] Posted February 5, 2011 Report Posted February 5, 2011 Looks a heap better. Maybe a bit more weathering (dirt) would really make it pop after all an inc is always near fire... Got to get a bit of charcoal on him lol. Quote
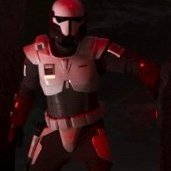
Pyro[TK] Posted February 6, 2011 Author Report Posted February 6, 2011 (edited) here ya go Is it app ready? Edited February 6, 2011 by Pyro Quote
seantrooper[TK] Posted February 6, 2011 Report Posted February 6, 2011 Looks awesome, but 1st of all, all the ab buttons need to be black. Also My personal opinion is that you need more weathering (black acrylic wash). When you think about it, If the paint is that beaten up, it would most definitely have been in a few battles, and battles are dirty! I also think there is a little too much paint chipping on the helmet, sort of takes away from the design... but once again thats just my $0.02 Quote
dashrazor Posted February 6, 2011 Report Posted February 6, 2011 like Sean stated above the chipping does take away from the design,, i think if you filled in most of the chipped areas it would look much better.. i think it is the contrast of the super bright white coming out through the chipped areas that makes it look too noisy.. i airbrushed in 90% of the white chipped areas just to show the difference before after airbrushing i think you could easily backfill the white areas with a small paintbrush . if you used spray paint just spray a little in a jar (this can get messy ) other than that you look ready for EIB the only thing i notice is that there appears to be no door trim on the butt or ab plate.. but it may be i cant see it in the photos?? correct me if i am wrong. Quote
Pyro[TK] Posted February 6, 2011 Author Report Posted February 6, 2011 Yes there is no trim and I realy like the chips on the armor Quote

Recommended Posts
Join the conversation
You can post now and register later. If you have an account, sign in now to post with your account.