

Chemi
-
Posts
1,887 -
Joined
-
Last visited
-
Days Won
5
Content Type
Profiles
Forums
Gallery
Articles
Everything posted by Chemi
-
 Hi Alfredo, and thank you for your EIB application! CRL and EIB Application Requirements: All required photos have been submitted, and on behalf of the entire D.O. staff we are pleased to welcome you to the rank of Expert Infantry. Congratulations! Other-Armor Fit/Assembly; In this area we review observations made by your fellow troopers and the DO team. Some observations may lead to suggestions to improve the overall look of your armor, and please keep in mind that we consider both text (CRL) and pictures (screen caps/reference images) when reviewing submissions. Before we start with the review, we would like to congratulate you, your armor looks great! -Starting with the helmet, it looks like you're wearing it too high. By wearing the helmet so high, too much of the neck seal is visible. If possible, we recommend that you remove some of the inner padding of the helmet (upper area) so that it sits a little lower. Reference images -You can add a black mesh behind the teeth to prevent people (especially children) from seeing our faces. This is a suggestion to "preserve the magic" . Reference images -It looks like the clips on your TD are a bit detached. It may be an optical effect, but if not, you can unscrew the clips, give them the correct shape and put them back on. You can take a look at the reference images to see its ideal position. Reference images -A very easy fix. Make sure the calf ridges are aligned. The appearance of your armor will be greatly improved. Reference images ********************************************************************************************************************************************************* Centurion Requirements: In this section we prepare you for our highest tier of approval. Because Centurion photos must show more detail than EIB, items pertaining to Level 3 might be seen there and not here and additional photos may be required. We try to point out all that we can from what we are able to clearly see, but the final accuracy is the responsibility of the trooper. -L3.The plastic shoulder straps need to be held down in the back via a white elastic band to the white fabric that connects/bridges the chest and back piece. Although it looks like those elastics are there, in the Centurion application we will need a better picture. You can place those elastics a little further back, so they will help the shoulder straps to go down to touch the armor. If not, you can give them a little heat (very carefully and little by little) to give them the correct shape. Reference images -It appears that the left side of this area opens slightly outward. Probably by applying a little heat (very carefully so as not to melt the ABS, even a hair dryer would probably do the trick), would be sufficient to be able to return the proper shape to that part of the armor. Reference images -This is one of the points that we DOs try to avoid, but in this case it is necessary, as it is far from its optimal position. L3. A single male snap on the top right corner of the ab plate is present. You should remove the snap from its current positionb, fill the hole with abs (or similar) and make another one as close as possible to the upper right corner of the ab plate. It looks more complicated than it is, really. Reference images -In the case of the 6-rivet pack, the same is true as in the previous case. We believe that in your case, they are too far away from their ideal position and therefore, you will have to move them. In the first reference image, you can see the measures considered "optimal" for its repositioning. As in the previous point (Han snap), it will be necessary to fill the holes and make new ones. Reference images -L3 Abdominal and Kidney Plate align horizontally at top. Your left side is perfect. Only a small adjustment will be needed on the right side. Perfect! Reference images -This is a very easy issue to fix. L3-The top of the ABS ammo belt should sit at or just above the bottom of the central and vertical abdomen button panels. You can put some Velcro on the inside of the belt to keep it in it ideal position. Reference images -L3.Drop boxes are vertically aligned with the end of the ammo belt with minimal gap between belt and box. It is very little, but you can glue the elastic to the belt (a few drops of hot glue or similar on the inside of the belt) and then, the boxes will not move from their position. Reference images -L3.The corners of the plastic ammo belt shall be trimmed at a 45 degree angle that that meets the outer edge of the cloth belt. You will need to trim the abs of the belt a little so that the corners match the cloth belt. Reference image -There appears to be some weathering on the grip. L3.-"....T-tracks and grips shall be of a black plastic appearance with no silver/metallic weathering allowed.". A small coat of black paint will do the trick. Very, very easy... Reference images Nothing more to add Alfredo. Congratulations, now, you have the badge under your name . We are sure you will soon apply for the Centurion badge as well. Don't forget to request your EIB certificate :
 -
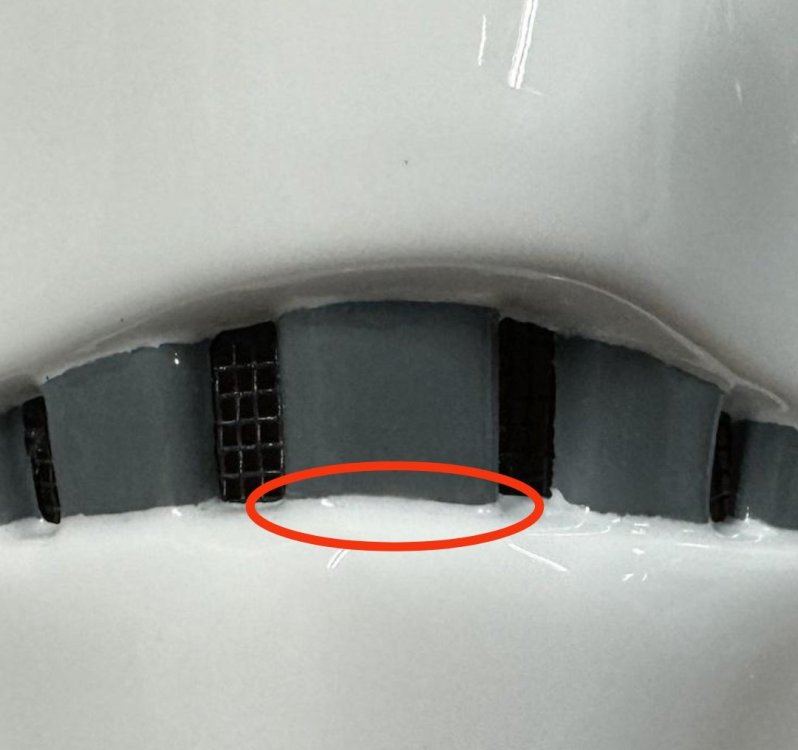
Hi Alfredo. Those pictures are perfect! One last favor. Could you add a picture like this so we can see the rivets perfectly? Thank you for your patience.
-
Hi Alfredo. While we start with your request, could you add a picture of the helmet where we can see "well" the lower screw of the ears (both sides)? Thanks!!!
-
TK-91213 Requesting ANH Stunt EIB Status (WTF) (1075)
Chemi replied to JBar's topic in Request Expert Infantry Status
HI John. Thanks for your request. Added to de process line! -
Hello @Salome (Maria), and welcome to FISD. Personally, I would not buy my armor on sites like Etsy, Ebay etc..., not everything sold there is valid for the 501st, and we don't want you to spend your money on something it's not valid... Take a look at the list sent to you by Nairy, and if you have any questions, ask...there is always someone willing to help in this great family that is FISD.
-
Introduction from Riverside California.
Chemi replied to Lukeasite's topic in New Member Introductions
Hi Luke. Welcome to FISD! -
Congratulations Trooper!!!
-
Bienvenida Laura!!! Welcome to FISD!
-
Congratulations #531
-
Hi Tim.Thanks for your request. Added to the process line.
-
I'm so happy / TK-11454 reporting for duty
Chemi replied to dblcross's topic in Newly Approved Members - Sound Off!
Congratulations!!! For me, there was a before and after with my first visit to the pediatric area of a children's hospital. Missions with a lot of feelings, but the children, even if they are not at their best, give you more than they receive. -
@TheRascalKing I have no intention of adding anything else to this thread. Thank you very much for the excellent work in creating this CRL. I hope you get to finish it and enjoy it.
-
Congratulations Tim!!!
-
Hi Joey. Wow, a superb level of detail. I love it! If I may, I would also like to add a comment about the button panel. The button panel that we can see in Enoch, is a solid button panel. Yours, however, looks a little strange...
-
Congratulations!!!
-
Congratulations Chris( @themaninthesuitcase)!!! I hope that with our help, we can make this a little easier for you. And thanks also to Andrew( @Sly11), who prefers to be with us instead of enjoying his retirement in Hawaii... I would also like to wish Joseph( @justjoseph63) all the best. I hope all is well, brother.
-
Hi Tim. Thanks for your request. Added to the process line
-
Yeah, nice work Perhaps, I would remove a little more paint on the center tooth, but only because my OCD wouldn't let me have a line that wasn't straight Keep up the good work, Wil !
-
Tim’s first time build (RS Prop Masters ESB TK)
Chemi replied to TrickyT81's topic in ESB Build Threads
Congratulations!!! -
Tim’s first time build (RS Prop Masters ESB TK)
Chemi replied to TrickyT81's topic in ESB Build Threads
I've never used that glue, but I'm sure someone will be able to give you some advice. Maybe soaking it in warm water, or using isopropyl alcohol, or mineral spirits might help. What is very important, is that you don't use products with acetone. -
Hi Jim, Welcome aboard!!!
-
Tim’s first time build (RS Prop Masters ESB TK)
Chemi replied to TrickyT81's topic in ESB Build Threads
Well, actually, D.O.s don't just follow the CRL. If you look at the reviews, we always say the following: "please keep in mind that we consider both text (CRL) and pictures (screen caps/reference images) when reviewing submissions." However, we never ask for a photo with a measurement scale to check that everything is OK, we only ask to correct the TD in the case that it is clear that something is not measuring what it should... We can also be wrong. We may think something is wrong and it's really ok... The CRL states(L1, Basic): -The total length is approximately 7.50" (190.5mm). -End caps are approximately .78" (20mm)in width. I think RS should not send the clips screwed on in the kits, because when you glue the end caps, it can happen as in your case. You could have glued them without inserting them all the way and you would have had the millimeters you needed... What glue did you use? If it is cyanoacrylate, it will be difficult to remove it... -
Tim’s first time build (RS Prop Masters ESB TK)
Chemi replied to TrickyT81's topic in ESB Build Threads
The armor looks great (the TD is a little crooked and a little high with respect to the canvas belt,a simple dressing issue, lol). You shouldn't have any problems for basic. P.S.: Did you check the the gaps and endcaps on your TD, that @gmrhodes13 pointed out? -
TK-13239 Requesting ANH Stunt EIB Status (AM) (1071)
Chemi replied to Sawanator's topic in Request Expert Infantry Status
Hi Matt. Try filling the inside of the sliding bolt by gluing some black foam (or any other black material, being careful not to let it show from the outside). This will prevent the spring from sliding forward. Gluing the spring to the end cap doesn't seem like a bad idea either(using a glue that withstands the hard life of a trooper). -
Wow

