

shashachu
-
Posts
1,676 -
Joined
-
Last visited
-
Days Won
9
Content Type
Profiles
Forums
Gallery
Articles
Everything posted by shashachu
-
 Apologies for the delay, Shawn. I'll be back to you shortly.
 -
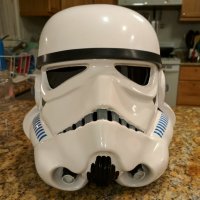
Looks much better, Shawn! One last request: could you please post a photo of a more head-on angle of your hovi tips? They look like they're pointed down quite a bit but it could also just be the angle you took your helmet pics. Yours: Reference:
-
TK-40473 Requesting ANH-S TK EIB Status [Anovos]
shashachu replied to Crow2xs's topic in Request Expert Infantry Status
Hi Michael! I'll be the DO doing your review. First I just wanted to check in to see if there's anything we can do to help. Definitely take as much time as you need, but please reach out if you have any questions. Next, I wanted to clarify that the only two changes we would *require* for your EIB submission are the frown paint fix that @TKSpartan indicated above, as well as reducing the ab/kidney gap on the right side since that is an EIB requirement Any gap between the abdomen and kidney armor is no more than 1/2" (12.5mm) wide. Any shims used to achieve this effect are of a similar material and color as the abdomen and kidney armor. Shims fit flush and seams are allowed. This isn't an area that we necessarily need you to break out the ruler for, but there is a significant gap on the lower part of the ab/kidney connection. Hopefully it can be corrected by tightening your belt, or you may need to add some strapping to bring the lower gap closer together. Note that a small gap is acceptable for EIB, but if you'd like to go for Centurion, that gap will need to be eliminated completely. Reference Image: -
Hi Ardeshir, Thanks for your Centurion application. Joseph really nailed it in his answer above, but I just want to emphasize that on the whole, we go for the 'fresh off the Death Star' ideal trooper look. In order to come up with these guidelines we examine a lot of screen reference and try to come up with the most common look for that trooper. Now as we all know, there will always be exceptions (e.g. everyone's favorite Mr. No-Stripes). With ESB in particular, two things make this job difficult - 1) my understanding is that most of the suits were re-used ANH suits which were just trashed by the time the second movie came out and 2) there are actually very few scenes with TKs in ESB, giving us limited information to work with. When we do these reviews, we try as hard we can to maintain consistency no matter which DO is doing your review (this is why we have every application reviewed by the entire team before posting), but in the end we are only human and things definitely slip through the cracks. I also want to ensure that you and others know that we try to be clear what are requirements and what are suggestions. Suggestions are just that - things which we think will improve the look of your armor, but won't block L2 or L3 approval. With all that out of the way, let's get to what we're all really here for! CRL and Centurion Application Requirements All required photos are now in and, after review, we are pleased to welcome you to Centurion! On behalf of the DO team and myself, many congratulations! Other-Armor Fit/Assembly In this area we discuss areas that could benefit from additional improvement. Note that we consider both text (CRL) and pictures (screen caps/reference images) when reviewing submissions As already mentioned, just keep an eye on your cover strip alignment once you suit up. Of course the instant you take a step everything will shift around. Reference Image: Congratulations again on your fourth Centurion award!
-
No problem! Take your time.
-
@Firedog No hurry at all, just wanted to be sure you weren't waiting on us for anything. We'll be here when you're ready.
-
It would have no impact on L2/L3; just ensure that the black oval on the shins is still visible when the spats are attached.
-
Haha all DO reviews get posted in the staff area so that we can sign off on them before posting. I accidentally posted my draft review here instead of the staff area. It was very briefly but I didn't want you or anyone else to get confused if they saw it and then it disappeared.
-
Hi Ardeshir, Thanks for your application and for the quick fix with the frown paint. CRL and EIB Application Requirements All required photos are now in and, after review, we are pleased to award you another Expert Infantry! On behalf of the DO team and myself, many congratulations! Other-Armor Fit/Assembly In this area we review observations made by your fellow troopers and the DO team. Some observations may lead to suggestions to improve the overall look of your armor. Note that we consider both text (CRL) and pictures (screen caps/reference images) when reviewing submissions Starting with the helmet, Anovos helmets tend to paint the vocoders a little soft compared to screen-used helmets, so if you like you could spend a few minutes sharpening up the shape. Reference Images: Next, we do want the belt to be at the button of the ab buttons, but be careful that your belt is not *too* high. Ideally it is touching or just barely covering the bottom of the ab buttons. Next, it's worth pointing out that ideally the thermal detonator screws would be closer to the end of the clips, and the ends of the clips themselves could be more squared-off. Reference Image: Finally, I noticed that the ends of your ABS belt tend to stick out a bit. It would give you a cleaner look if it wrapped around your body a bit more. This could be accomplished with a hot water bath. Reference Images: Centurion Requirements In this section we prepare you for Centurion. More photos may be requested in the future that allow us to make better decisions on possible adjustments. If there are any areas of concern they will be discussed here. Because Centurion photos show much more detail than EIB, items to pertaining to Centurion might be seen there and not here. We try to point out all that we can from what is seen, but the final accuracy is the responsibility of the trooper. I'm nearly certain this is a dressing issue or maybe even a photo angle issue, but your left dropbox seems to be not quite aligned with the ends of your belt. So for your Centurion application, be sure to double check the positioning when taking your photos. Reference Image: And that's it! Congratulations on your _fourth_ EIB award, and just one small correction and we'll see you at Centurion soon.
-
Apologies if you briefly saw a post from me here; I accidentally posted my draft review here instead of in the DO area. :facepalm:
-
Understood. Again, this isn't something we go crazy over, so just do your best.
-
Hey Ardeshir! Thanks for your patience. It's always a pleasure to see applications from you. One possible area for correction. It could just be the photo, but it appears that you may have a bit of the black frown paint on the gums of the teeth: Like ANH armor, ESB helmets should also be sure not to have any frown paint on the gums. If the paint is indeed on the gums, we'll need to you correct that before moving on with your applications; otherwise if you can post different photos that show otherwise, that would be fine as well. Reference: Thanks!
-
Hey Shawn, Thanks so much for your patience. Joseph is swamped with doing merch runs, so I'll be taking over this review. You've done a superb job with your build, but there are a couple items which we'd like to see corrected before proceeding with your application. First, the L3 CRL states Canvas belt must be firm / sturdy in appearance. No creasing or sagging You've done a really nice job with your self-made belt, but I do see some creasing around the edges. It may simply be a matter of ironing out those creases, or maybe just adjusting the way you're wearing the belt. Reference: Next, you've done a great job with the shoulder bell gap on the front, but the rear one is still a bit larger than we'd like to see. There should be a minimal gap between the shoulder armor and the chest/back plates. Ideally there's essentially no gap but we understand that armor kits and troopers' bodies are different, so please do the best that you can. In your case it may just be a matter of trying to even out the gap between the front and rear. Reference Image: Please let us know if you have any questions!
-
TK-84881 Requesting ANH Stunt Centurion Status (ATA) (474)
shashachu replied to Labaki's topic in Request Centurion Status
Congrats! -
Congrats, Dani!
-
TK-98695 Requesting ANH Hero Centurion Status (SDS) [473]
shashachu replied to Helotech's topic in Request Centurion Status
Hi Dave, Thanks for your application and for the fixes with your belt and forearms. CRL and Centurion Application Requirements All required photos are now in and, after review, we are pleased to welcome you to Centurion! On behalf of the DO team and myself, many congratulations! Other-Armor Fit/Assembly In this area we discuss areas that could benefit from additional improvement. Note that we consider both text (CRL) and pictures (screen caps/reference images) when reviewing submissions Starting from the top, the vocoder paint is nice and clean, but it looks like it could be extended some to better match the shape of the plastic: Reference Image: Moving on, your right shoulder strap seems to want to sit higher than the left. A hot water bath to curve it more should help it stay in place. Reference Image: Next, you appear to have a very slight overlap between the back and kidney plates. Not enough to block you from Centurion, but worth double checking the strapping in that area. It could also just be that your back piece sits away from your body a bit, causing it to look like there's an overlap. Reference Image: Similarly, you appear to have a possible slight overlap between the right side ab and kidney. Ideally these would meet but not overlap. Reference Image: Next, your butt plate could use some adjustment as well. As pointed out, it's sticking out a bit on the right side, something that could be resolved with some heat bending. Next, the back of your right thigh and the butt plate are running into each other some, so you could consider dropping the thighs just a touch to resolve it. Reference Image: Moving along, ideally the gap where the lower rear ridge of your thigh armor meets would be filled, or you could simply back it with a small square of ABS so that the black of your undersuit doesn't show through. Reference Image: Finally, a minor dressing issue. It looks best when your cover strips are aligned, so next time you're getting suited up, just double check the rotation of your shins. Some troopers also add velcro to the front of their boots to keep the shins from rotating or otherwise shifting around. Reference Image: And that's it! Congratulations again from the entire DO team on reaching Centurion! -
TK-84881 Requesting ANH Stunt Centurion Status (ATA) (474)
shashachu replied to Labaki's topic in Request Centurion Status
Hi Bryan, Happy Monday! Taking a closer look at your new photos, I do think you might have overcorrected the belt position from your EIB pics. As Glen stated, it can be a *slight* overlap of the bottom buttons, but your bottom button of the smaller button panel is completely covered, making it look like there are only 3 buttons. Do you think you could submit a new photo with the belt position slightly adjusted down? You don't need to get completely suited up, just the torso and belt is fine. This is what we're aiming for: Thank you! -
TK-98695 Requesting ANH Hero Centurion Status (SDS) [473]
shashachu replied to Helotech's topic in Request Centurion Status
Thanks, Dave! I'll be with you as soon as I can. Hope you're having a restful weekend. -
TK-84881 Requesting ANH Stunt Centurion Status (ATA) (474)
shashachu replied to Labaki's topic in Request Centurion Status
Hi Bryan, Nice work on the fixes from your EIB application. After discussing with the DO team, we'd like you to make a few corrections before we move forward with your application. First, you've improved the shoulder bell gap a lot since your EIB app, but the right one is still a bit larger than we'd like to see. It looks like there's room to bring in the strapping, or it could be a simple dressing issue. Reference: Next, a bit of paint cleanup. As mentioned above, your frown paint shouldn't be on the 'gums' of the frown at all. I've indicated the areas I can see, but definitely take a look at the reference photos to see that slightly underpainting the teeth is acceptable. Also, this is something that was visible in your EIB application but I missed it; so I apologize for the oversight. Reference Image: Finally, we'd still liked you to clean up the ab button paint. Similarly to the frown paint, you can err on the side of underpainting the buttons. Reference Image: Both of the paint cleanups should be relatively straightforward - just a bit of careful work with some paint thinner or mineral spirits. Please reach out if we can be of assistance. Have a great weekend! -Sha Sha -
TK-84881 Requesting ANH Stunt Centurion Status (ATA) (474)
shashachu replied to Labaki's topic in Request Centurion Status
Hi Bryan, Thanks for your patience; we were a bit busy with the hullabaloo around EIB #1000. I'll get back to you soon. -
TK-98695 Requesting ANH Hero Centurion Status (SDS) [473]
shashachu replied to Helotech's topic in Request Centurion Status
On you would be preferable. Take your time. -
TK-98695 Requesting ANH Hero Centurion Status (SDS) [473]
shashachu replied to Helotech's topic in Request Centurion Status
Hi Dave! Just checking in on your progress here with the updated belt photos. Definitely take any time you need, but I wanted to make sure you weren't waiting on us for anything. The wrist return edge looks great. -
Congrats, Will!
-
Hi @Shimo, it makes the reviews a lot easier for us if you paste direct links to the larger sized images instead of us having to click through on each image to see it larger. Can you update your (and Dani's) applications with the larger photos? You can click into each photo, and right-click and select 'Copy image address' (probably slightly different language on different Browsers) and then paste that URL. For example, for your chest armor image: Thanks!
-
TK-98695 Requesting ANH Hero Centurion Status (SDS) [473]
shashachu replied to Helotech's topic in Request Centurion Status
Thanks for the updated pics! After conferring with the rest of the DO team, we'd like you to remove the remaining bits indicated below: I think at this point it's largely semantics and maybe not even correct to call that 'return edge' but the idea is that we remove all traces of the narrowing of the wrist. Should be a relatively quick fix. Thanks!
