

shashachu
-
Posts
1,676 -
Joined
-
Last visited
-
Days Won
10
Content Type
Profiles
Forums
Gallery
Articles
Everything posted by shashachu
-

Sha Sha's (Slow) KB/850/3D printed FOTK Build for Short Troopers
shashachu replied to shashachu's topic in TFA Build Threads
That's a good thought - I hadn't really noticed the difference in shape, but looking at the CRL image, the shoulder bells do seem rounder. I'll probably give that a go - they are definitely large on me. -
Sha Sha's (Slow) KB/850/3D printed FOTK Build for Short Troopers
shashachu replied to shashachu's topic in TFA Build Threads
Thanks! Tbh I kind of forgot about the TD until I was looking at someone else's build the other day... But yes it's primarily the width I'm worried about. -
Sha Sha's (Slow) KB/850/3D printed FOTK Build for Short Troopers
shashachu replied to shashachu's topic in TFA Build Threads
Thanks for the encouragement, everyone! -
Sha Sha's (Slow) KB/850/3D printed FOTK Build for Short Troopers
shashachu replied to shashachu's topic in TFA Build Threads
A bit more progress. Finished assembling the left forearm. It went a bit more smoothly than the right, but still had to do weird brackets. I'll likely need to add more, or I might use a bit of milliput to fill some of the seams and help hold things together. With all arm pieces together, I tried the arms on with the shoulder gaskets. It was all right, but I think I'll need to take in the shoulder gasket a bit, because my bicep piece circumference is pretty small. And a shoulder bell for good measure: Moving along, I decided to go ahead and assemble the back and yoke. (Forgot to take many photos.) It actually wasn't as bad as people had made it out to be. I'll definitely have to do some heavy seam/gap filling, but overall it was relatively straightforward. I started by gluing the yoke to the connector piece, let that dry overnight, then glued everything to the back. I know the chest/yoke/back is going to be one of the most challenging parts of the build because it is just *so* big. KB claims it's meant for average sized people, but it's really quite barrel chested. The first thing I did is trim off a bunch of excess material from the...wings? I don't know what they're called: Next up, a *lot* of heat bending with my trusty heat gun. My goal was to wrap the wings more tightly around me, and greatly reduce the width of the back and chest. As with my TK, I set the heat gun around 450F-500F and slowly heated up the areas I wanted to bend. When the ABS just starts to lose it's springiness, I'd turn off the heat gun. Incidentally, the KB kit is much thinner than my WTF original TK, so I had to be careful not to overheat. Back before: Back after: No individual photos of the chest, but here's everything on me: This whole build has been kind of a rollercoaster for me - I flip flop between feeling really encouraged and being totally convinced it's impossible to fit this kit to someone my size, especially with how tough my GML is. For now I'll soldier on. -
Woo! Congrats!!
-
Great work! Good luck
-
Awesome, yeah I think it'd be helpful to get as much hands-on help as possible. You're short enough that there really shouldn't be a gap inbetween the ab and cod - on the contrary, they should probably be overlapping. Good luck! You're getting there.
-
Taylor - what Garrison would you be joining?
-
Agree with Luc - the cod doesn't need to be so much in between your legs - let it just hang off the ab and it hopefully won't dig into your thighs so much. Definitely try detaching it from the butt and position them independently.
-
Agree with Luc. The entire ab/kidney/cod area looks too high. None of the back, kidney, or butt should be overlapping. The cod and butt should not be attached. If you detach them, you should be be able to drop the butt down way lower. If the cod is digging into your thighs you should be able to trim in down a bit. The whole ab is sitting too high - drop it down and tuck the cod behind it. On me, the bottom of the ab piece hits just around my hip bones. On you it looks like it could be lowered by a few inches.
-
Lorelei's 5'4" ATA ANH-S Centurion-Hopeful Build
shashachu replied to TheLorelei's topic in ANH Build Threads
I did do a lot of trimming on my forearms. I somewhat regret it not because it didn't turn out well, but because it was a pain in the butt. I think it's more common to leave the forearms a bit bigger and just add foam to make up the room. -
Sha Sha's (Slow) KB/850/3D printed FOTK Build for Short Troopers
shashachu replied to shashachu's topic in TFA Build Threads
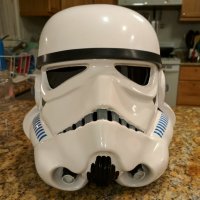
Now that I have the right arm pieces assembled, I decided to try them on (with the proper gaskets and gloves as well.) I have to say that it doesn't look too bad in my opinion: And a test to see if I can touch my helmet Here's a side by side of now vs my initial fitting. I'm pretty happy with how I've managed to size things down, although the bicep is still pretty big: I also started work on the left arm pieces: -
Looks fantastic! And the way you sanded them actually makes it look like you've got a return edge there as well. Nicely done.
-
Sha Sha's (Slow) KB/850/3D printed FOTK Build for Short Troopers
shashachu replied to shashachu's topic in TFA Build Threads
I have the 4 part as well. I feel like I just did something slightly strangely. Oh well will probably work. -
Sha Sha's (Slow) KB/850/3D printed FOTK Build for Short Troopers
shashachu replied to shashachu's topic in TFA Build Threads
I have no idea how it's supposed to be glued down...or do most people leave that area unglued? My hands are small enough to glue the whole thing. Or is it easier if you use a stronger adhesive? Who knows! -
Sha Sha's (Slow) KB/850/3D printed FOTK Build for Short Troopers
shashachu replied to shashachu's topic in TFA Build Threads
Took the clamps and magnets off the forearm this morning and it looks...okay? Haha. It's pretty wonky. I think it should be okay but it'll need a lot of filler and sanding. -
Sha Sha's (Slow) KB/850/3D printed FOTK Build for Short Troopers
shashachu replied to shashachu's topic in TFA Build Threads
I'm beginning to see why the FOTK forearms seem to be the bane of everyone's build. The 4-part KB forearms just don't have much gluing surface to hold everything together, and the fact that I've sized them down probably doesn't help. I was kind of able to glue the elbow side of the flat inner forearm piece to the rails (which are not flat so really don't provide that much contact surface for glue), but the wrist side (the box) just had nothing to adhere to. So I ended up making little gluing brackets out of scrap ABS to try to hold everything together: Would you believe this single forearm took me 3 hours? :'( And it's still full of gaps. I'm hoping that the filler with help hold things together some. One detail that I left out was that I've decided to do my build with E6000. It might be something I'm kicking myself over later, but it's just the adhesive that I'm most comfortable with, and with the amount of disassembling and reassembling I've already done, I just don't see this build working for me with a more permanent adhesive. -
Tee-Bowls' First Order Trooper TFA/TLJE Build (KB Props)
shashachu replied to Tee-Bowls's topic in TFA Build Threads
Personally I'd probably just trim the curled part off, glue with an inner cover strip, then fill the seam. (Caveat I do have a KB kit but haven't gotten to the ab section yet.) -
Many of us short troopers cut the first notch (wrist side) off of the forearms. Totally approveable. And I believe you should cut at the other trim line on the inner forearm unless that makes them too small.
-
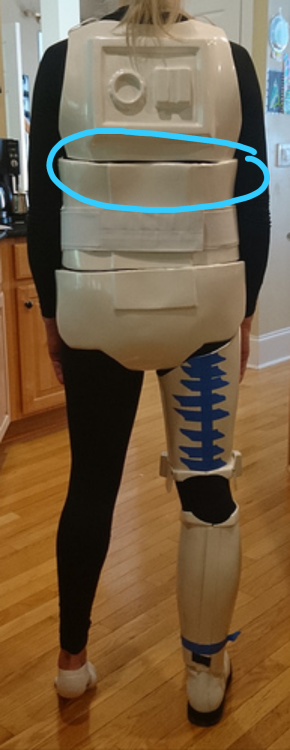
Wow can't believe how fast you're blowing through this build! And glad you found the heat gun useful and not that scary - it's my #1 indispensable tool for armor building. I'm just way too impatient to use a hot water bath. From the back, the kidney looks just a tad bit big. I wonder if a touch of reshaping to get it to match the width of the back better would make it look more proportional?
-
Nice work! Easy pass!
-
Sharkbait's TFA Captain Phasma Build
shashachu replied to sharkbait's topic in Captain Phasma Build Threads
@TheSwede has a newer KB kit and a great build thread: He made some interesting mods to the 2-part forearms so it should be a good reference. -
Sharkbait's TFA Captain Phasma Build
shashachu replied to sharkbait's topic in Captain Phasma Build Threads
Awesome! Following your build because I have a KB FOTK, so mine will be pretty similar. Looks like you have the upgraded kit with the resin TD and 2 part forearms? -
Sometimes it can help to let the E6000 sit for a minute or two before putting the cover strips on so that it gets a bit tacky and will hold things in place better.
-
TK-8136 Requesting TFA EIB status (Anovos) (859)
shashachu replied to Patricktt's topic in Request Expert Infantry Status
Wow looks great!

