

JBar
-
Posts
421 -
Joined
-
Last visited
-
Days Won
20
Content Type
Profiles
Forums
Gallery
Articles
Everything posted by JBar
-
Sent!
-
I recently posted two videos on how I assembled the shin of somebody’s armor but I wanted to go ahead with a different skill which is how to do basic painting. I painted a button plate and wanted to talk through how I go about it because I think it turned out pretty well
-
Getting closer to apprentice with these three in the last year: Brian McCarthy TK-21269 ANH Stunt: -Re trimmed, adjusted, and fixed brow trim to be more horizontal and secure -Added full padding and frown mesh to the inside of the helmet -In person suit up and photos for submission Brian McCarthy TK-21269 ESB: -Added full padding and frown mesh to the inside of the helmet - In person suit up and photos for submission Kristina Murtha TK 91734 ANH Stunt: - Strap/snap overhaul on a used kit. Added new ears and repainted helmet Richie Iannuzzo TK-10456 -Strap/snap refit
-
- 1
-

-
I was building shins for a friend of mine in the ECG and I figured I might as well record the process so that I can share it. I'm no video expert but I just talked my way through the build and tried to hand out as many tips and tricks I could think of as I went along. Hope it's useful for someone! Part 1: Part 2:
-

TK 87665 Requesting ANH Hero Centurion status (RS) (546)
JBar replied to Stardust665's topic in Request Centurion Status
Huge congratulations @Stardust665! Can't wait to see this all in person next troop. You've put a ton of work into it and it paid off -
Its outrageous. It’s unfair! But seriously why would they do this and I wonder if it’ll be reversed
-
Great seeing another WTF kit. Congrats!
-
TK-18199 Requesting ANH Stunt Centurion Status [TM] 542
JBar replied to Spadille's topic in Request Centurion Status
The armor fits you well. Excellent job! -
TK-8687 Requesting ANH Stunt Centurion Status [Anovos] 543
JBar replied to TK-8687's topic in Request Centurion Status
Looking sharp. Congratulations and great job -
TK-19525 Requesting ANH Stunt Centurion Status [RWA] 541
JBar replied to Tall_Trooper's topic in Request Centurion Status
I'm late to the party but congrats! -
Hello and welcome. Maybe I saw you at Celebration if you were there. Glad to have you here
-
Am I too tall for an ANH TK trooper?
JBar replied to SenseiFetter's topic in Assembly, Mods, and Painting
Yeah Walt's kits are built for troopers on the shorter side. I would find some super strong elastic for the chest/ab connection and also make some new white elastic shoulder straps to extend the spacing between the chest and back armor to allow them both to slide down a bit farther while still allowing the shoulder bridges to overlap. -
I've never heard of these. The cheap mics you get on Amazon either don't pick up my voice or is too sensitive with my fans. Looking for a different option or something high end.
-
This is why I always bring a safety pin too! Helps in case of emergencies or for other troopers
-
Oga's Cantina - 6 Star Wars Galaxy's Edge Coasters
JBar replied to gmrhodes13's topic in 3D Fun Files
I'd love to order a set of these. I don't see physical options for sale and I don't have a printer for them -
@gmrhodes13 beat me by a few seconds. Those links above are fantastic resources.
-
When you get to this step I put my shoulder bell snap close to my neck to prevent sagging from the shoulders tugging on the elastic:
-
I had something similar! I stored my armor in blue bags but the blue rubbed off and I thought it was ruined! What worked for me was Goo Gone and a paper towel with some scrubbing. Be careful though as even a paper towel can be abrasive. Don't use a sponge as that definitely scratched mine slightly in the areas that I tried it with. You can always just try Dawn soap and water with the paper towel as well. Just take your time as you''ll need to scrub for a while to remove the stain
-
You put a ton of time and work in to this. Incredible job!
-
I'd hold off on the shims between your kidney and ab armor until you've gotten everything all fitted and glued together. I feel that your stature won't require them but I could be wrong. And for basic approval some gap is generally acceptable. Even level 2 allows for a 1/2 gap on either side. Looking forward to your progress gluing it all together. Just give a bit of sanding between contact points on the cover strips but don't sand beyond the contact areas so everything stays shiny. I always give a solid 2 days of drying for every cover strip. Hope you have lots of magnets and clamps! Good luck!
-
Greetings from Florida!! Excited to meet you all!
JBar replied to al3x_h.xm's topic in New Member Introductions
Have you met any or many locals in the Everglades Squad? From my understanding they're very active and should be super helpful if you want some in person guidance in addition to the forums. I just met a few of them last time in Disney and at Celebration. I'm sure they'd love to help -
Yeah when building mine I over stressed about how much return edge to leave and where. I personally just kept around 1/4" around most parts as I'm fairly thin and wanted a fuller armor look. As this guide talks about there's cases for both leaving and removing return edges. My philosophy was keep some return edge everywhere unless it created discomfort. Level 3 does require removing at the forearms however.
-
Greetings from Florida!! Excited to meet you all!
JBar replied to al3x_h.xm's topic in New Member Introductions
Welcome Alex! What area/garrison do you live in or near? Be sure to comb through the pinned topic here as it's a fantastic starting point: https://www.whitearmor.net/forum/forum/38-getting-started-read-this-first/ Do you know what kit you're looking at getting or have you made it that far yet? Here's some more good info on ANH kits: https://www.whitearmor.net/forum/forum/6-anh-stunt-and-hero/ After you make a few more posts you should start to see some more threads unlock. Please let us know if you have any questions at all. We're happy to help. Here's also where you can post a build thread for people to help comment on as you progress. Looking forward to seeing you around! https://www.whitearmor.net/forum/forum/80-anh-build-threads/ -
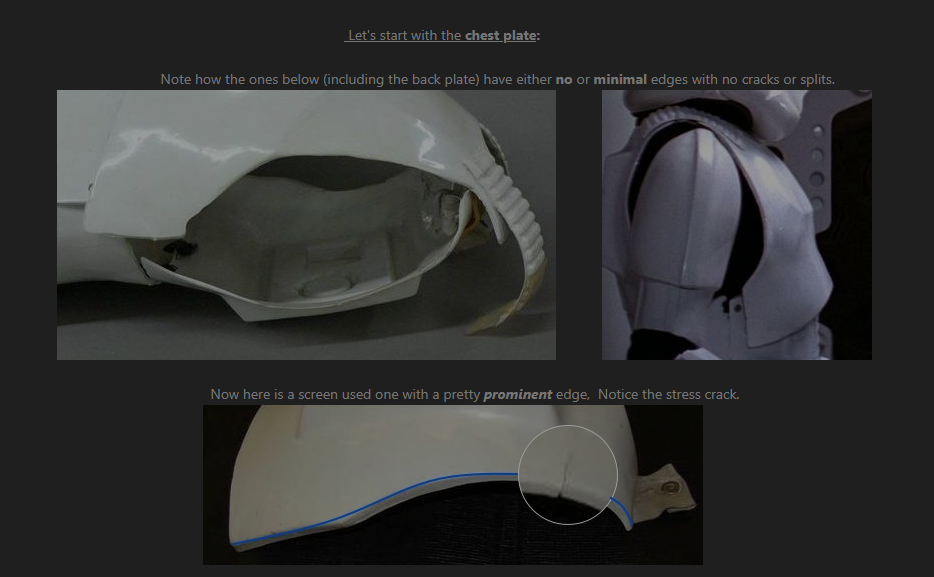
You're going through the same growing pains I went through when I built mine. It's all a bit nerve wracking putting it all together and seeing how everything doesn't seem to fit well but trust me once you get all the strapping installed it'll magically start to look the part. If it helps I made this document going through the my own trials and tribulations and maybe it can be some help for you: https://docs.google.com/document/d/1zDc4mtEDg0A_SfHcZXgXtmkzhSrBwaReTHWvdrcmMJg/edit?tab=t.0 I wanted to chime in about return edges. I personally kept around 1/4" of return edge around nearly all my armor pieces. This was my individual choice. You'll see in a lot of screen used shots that the return edges are completely removed while other troopers have thick return edges. I liked the "fuller" look of the armor so I tried to keep some return edge on everything. I did have to remove the return edge around the openings of my forearm/wrist for level 3 but otherwise all my armor has at least some return edge showing. Here's a return edge guide: Keep in mind though that this guide generally recommends removing return edges often at the very least for comfort reasons. But you'll see even it shows examples of some armor have return edges and some not: So in the end don't sweat the return edge thing too much. You can always remove plastic if you need to but you can't add it back. My personal opinion again is to leave around 1/4" around all the armor and trim it down for comfort as needed. Just keep putting together bit by bit. I had the same issue where often pieces wouldn't perfectly line up. That's part of the wonkiness and charm of the armor. Just use clamps and use E6000 over super glue so you can take back mistakes if you make them. And like I said it'll all come together once you put the strapping in. I was discouraged when dry fitting my armor but as soon as I installed snaps and had it all glued together I was shocked how much everything seemed to fix itself
-
I don't think you have a wrong choice weather you want more or the same weathering. I think either would look great with how well you're putting it all together