
JBar
-
Posts
421 -
Joined
-
Last visited
-
Days Won
20
Content Type
Profiles
Forums
Gallery
Articles
Everything posted by JBar
-
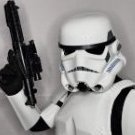
TK-20177 "Cybergrunt" - Apprentice Armorer (5 pts)
JBar replied to Cybergrunt's topic in FISD Master Armorer Program
Thanks @Cybergrunt Yeah in person we did the strapping for the thighs. Also help with return edge trimming both for basic and EIB. Couple of phone calls to regarding gluing the snaps and cover strips -
Ok here it is! I made the changes recommended in my EIB post. This has been such a rewarding experience going for Centurion. As always happy to make necessary changes. I'll not my changes from my EIB submission within the post in red Mandatory Information: ___ Armor Maker: Walt's Trooper Factory (WTF) ___ Helmet Maker Walt's Trooper Factory (WTF) ___ Blaster Maker: RS Props ___ Link to your EI Approval thread: ___ Permission photos social media: Yes Optional information: ___ Full name: John Barlow ___ Height/weight: 5'7"/145lb ___ Boot maker: Keep Trooping (Imperial Boots) ___ Canvas belt supplier: Tye O'Dell (Custom) ___ Hand guard supplier: Trooper Bay ___ Holster maker: Tye O'Dell (Custom) Full Body 1. ___ Front (Arms flat by side, no weapon) - Removed helmet padding to drop the helmet down an inch so that it's touching my head - Shoulder gap reduced further - Extended the strap between my bicep and forearms to allow a larger gap to match the forearm and hand plates (more prominent with the side view) - Belt now sits just touching the bottom button 2. ___ Back (Arms flat by side) - Shoulder straps held down with white elastic band - Shoulder strap ends trimmed off - Hook and Loop "patches" removed from canvas belt - Lower thigh ridge joints backed with ABS and filled 3. ___ Left side (Arms raised) - Drop boxes secured with hook and loop and moved farther back - Kidney and abdomen armor align 4. ___ Right side (Arms raised) - Drop boxes secured with hook and loop and moved farther back - Kidney and abdomen armor align 5. ___ Left side detail (arms raised) 6. ___ Right side detail (arms raised) Armor Details 7. ___ Cod and posterior plate connections showing rivet/snaps (exterior) - Six white painted rivets added on the left side of armor - "Han" snap added on the left side of armor 8. ___ Shoulder bridges- Front/rear/sides -White elastic string added for shoulder strap connection 9. ___ Thigh ammo pack connections (interior and exterior, left and right sides) 10. ___ Sniper knee plate (left and right sides) 11. ___ Wrist openings - Forearm end return edges sanded flat 12. ___ Abdomen button plates (close-up) -Luckily E6000 was used and I removed both plates and trimmed down further 13. ___ Posterior plate/kidney connection (back and/or front) Helmet Details 14. ___ Front 15. ___ Left side 16. ___ Right side 17. ___ Rear 18. ___ Close-up of Hovi tips 19. ___ S-trim (side view) 20. ___ Ear screws (close up, left, right and bottom) Accessories 21. ___ TD (Thermal Detonator) front and rear showing screw type 22. ___ Hand guards bent showing flexibility - Flexible hand guards added 23. ___ Holster attachment 24. ___ ABS/canvas belt (rear, showing drop boxes) 25. ___ Boots (tops and sides) BLASTER 26. ___ Left side 27. ___ Right side 28. ___ Rear (showing D-ring) BLASTER Action Shot
-
TK-91213 Requesting ANH Stunt EIB Status (WTF) (1075)
JBar replied to JBar's topic in Request Expert Infantry Status
Centurion is on the way for the ECG! Yeah and thanks for the help along the way -
Request your EIB Certificate here:
JBar replied to justjoseph63's topic in Request Expert Infantry Status
John Barlow 91213 EIB letter size Gerald Here you go John. Congratulations again. https://www.whitearmor.net/eib/certificates/91213-eib.png -
TK-91213 Requesting ANH Stunt EIB Status (WTF) (1075)
JBar replied to JBar's topic in Request Expert Infantry Status
Thanks again. Just to make sure I should list you (Gerald) as the DO correct? -
TK-91213 Requesting ANH Stunt EIB Status (WTF) (1075)
JBar replied to JBar's topic in Request Expert Infantry Status
Thanks so much @Doggydoc for the whole EIB process and especially for the Centurion critiques. It's something I definitely want to do and I'll start planning on the changes right away. This has been so much fun fleshing out all the details and learning so much more about this hobby -
TK-91213 Requesting ANH Stunt EIB Status (WTF) (1075)
JBar replied to JBar's topic in Request Expert Infantry Status
Ok here's take two. 1. Cleaned up the gum lines so that the grey doesn't touch outside. While I was at it I straitened up the lines 2. Installed larger mic tip mesh 3. I curled the TD at a more level angle but found the clips rode way to high. So I took them off, cut them down about 3'4" and bent them back into shape. Much better now 4. Found a better blaster with RS props. I miss the rubber but this one looks a lot more accurate and feels great to hold Lastly, here's my new changes all suited up: And my new action shot -
The ANH E-11: Sterling -vs- Bapty differences UPDATED 8/2/25
JBar replied to justjoseph63's topic in ANH BlasTech E11
Amazing read thank you. Any idea why the Bapty version isn't allowed for Centurion if they were used on screen? -
TK-91213 Requesting ANH Stunt EIB Status (WTF) (1075)
JBar replied to JBar's topic in Request Expert Infantry Status
Great points thanks. I’ll get to work on all that right away ? -
TK-91213 Requesting ANH Stunt EIB Status (WTF) (1075)
JBar replied to JBar's topic in Request Expert Infantry Status
Great thanks. Happy to make any changes. Outside the additional rivets and snaps I’d love to get pointers and what to fix for upcoming Centurion too -
TK-91213 Requesting ANH Stunt EIB Status (WTF) (1075)
JBar replied to JBar's topic in Request Expert Infantry Status
@MaskedVengeance Thank you! Crazy to think two months ago I knew nothing about TKs. I agree and they should be easy changes relative to everything I’ve done so far -
TK-91213 Requesting ANH Stunt EIB Status (WTF) (1075)
JBar replied to JBar's topic in Request Expert Infantry Status
Thank you! This whole build was a lot of fun. About 4 actual weeks of building in the making. Went from zero knowledge of a stormtrooper to this. I'm sure there are tweaks and I'm looking forward to feedback. Hoping to make my way to Centurion if it's feasible. Thanks in advance for all the resources everyone has helped me with along the way. I learned so much about this hobby building from scratch -
Armor = WTF Helmet= WTF Blaster= Rubber Blasters etc. (second hand) https://www.501st.com/members/displaymemberdetails.php?userID=22499 Height = 5'7" Weight = 145 Boots = Keep Trooping (Imperial Boots) Canvas belt = Tye O'Dell Hand Plates = ABS WTF Electronics= TRamp Neck Seal = Darman's Props (Etsy) Holster = Tye O'Dell Full Body 1. ___ Front (Arms flat by side) 2. ___ Back (Arms flat by side) 3. ___ Left side (Arms raised) 4. ___ Right side (Arms raised) 5. ___ Left side detail (arms raised showing ab/kidney connection clearly) 6. ___ Right side detail (arms raised showing ab/kidney connection clearly) 7. ___ Action shot Armor Details 8. ___ Abdomen button plates (close-up) 9. ___ Cod and posterior plate connections showing rivet/snaps (exterior) 10. ___ Interior strapping 11. ___ Wrist openings (close-up) 12. ___ Close-up of ab/kidney rivets (N/A- will install them for Centurion) 13. ___ "Han" snap (N/A- will install for Centurion) 14. ___ Left sniper knee plate close up 15. ___ Right sniper knee plate close up 16. ___ Left thigh ammo pack rivet close up 17. ___ Right thigh ammo pack rivet close up Helmet Details 18. ___ Front 19. ___ Left side 20. ___ Right side 21. ___ Rear 22. ___ Back-lit shot showing lens color 23. ___ Close-up of Hovi tips Accessories 24. ___ Neck seal 25. ___ TD (Thermal Detonator) front 26. ___ TD Rear, showing close up of screw type 27. ___ Holster attachment 28. ___ ABS/canvas belt (rear) 29. ___ Boots (showing tops and sides) 30. ___ Rubber gloves Blaster Details 31. ___ Left side 32. ___ Right side 33. ___ Rear showing D-ring
-
@gmrhodes13 Ok I got two sizes of smaller screws. I feel like the ones on the left are the best especially since I cut my clips tight. The entire length is a bit small at 7” and the white part is just under 4.5” to compensate for the smaller ish TD. Hopefully this will be close enough once I paint them black
-
Hello I just got approved as TK 91213. I’m already diving into the EIB level but before I take pictures I had a few questions. First is regarding the helmet. In mine I have the ears facing at a slightly downward angle from the top trapezoids. I was following the pinned guidance of this post: Here is mine: And here are some movie references. I was wondering if my ears will be approvable. I did my best to match the movies but realized most peoples ears are more “straight” Second question is if my black flat screws are too large or if I drilled holes too close to the end. They are 5mm wide (ignore the Velcro for now that’s just to keep armor from scratching while I fit the TD) Hoping my first TK can make it to EIB levels and maybe Centurion down the road
-
Thanks for the update for us. Hoping to get in before the locked detachment merch sells out. Not sure how long that stays open for but I heard there’s some new stuff posted
-
Thanks! What an amazing day
-
Thanks. I’m already getting pics ready for EIB!
-
-
Had the month off from work so I decided to put together my first TK. Took five busy weeks but got it done. First troop was today. Just in time for the May 4th Yankees baseball game.
-
TK 91213 requesting full stormtrooper access I’ll make my intro posts soon https://www.501st.com/members/displaymemberdetails.php?userID=22499
-
Spraying white finish to match bare ABS
JBar replied to DarthOnarged's topic in Hard Armor (General Discussion)
Do you remember the process of wet sanding and polishing that you used? It looks like it worked really well. I was curious what grit number and what polish you used. -
Request 501st access TI-91213 Timberline Garrison https://www.501st.com/members/displaymemberdetails.php?userID=22499
