JAFO
-
Posts
1,530 -
Joined
-
Last visited
-
Days Won
7
Content Type
Profiles
Forums
Gallery
Articles
Everything posted by JAFO
-
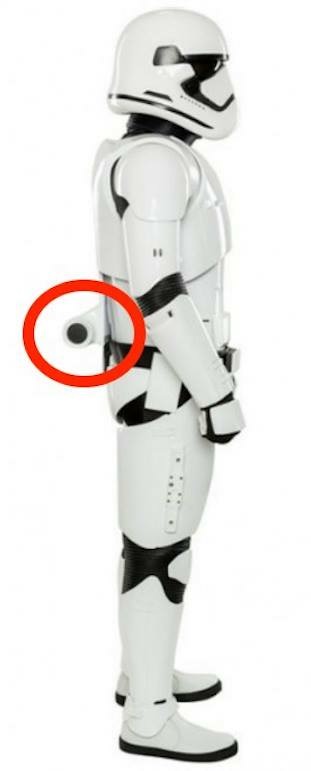
Hi Josh I'm guessing you're part of the Jimmiroquai build group on Facebook and saw my post about my TD. Prior to approval my GML requested the black circle on the TD be in line with the Anovos TD. The righthand TD circle on Jimmi's TD is smaller and the decals provided by Trooperbay fit this. I have made both suppliers aware. Obviously many Jimmi kits prior to mine have been approved without issue. This was just a upgrade my GML requested and I'm cool with that. Here are some pics to show the difference in size between my original approval shot and the one they asked me to match (the one with the red circle).


-
Looks like you're off to a flying start. This kit will come together in no time. Look forward to seeing the progress
-
Photobucket want to charge people $400 for an account to third party host. i won't be opting in!
-

JAFO'S FIRST ORDER STORMTROOPER BUILD (Jimmiroquai)
JAFO replied to JAFO's topic in Build Threads Requireing Maintenance
It should be a moot point now that FISD allows for direct uploading but here are the new terms/pricing as of 28 June:
-
JAFO'S FIRST ORDER STORMTROOPER BUILD (Jimmiroquai)
JAFO replied to JAFO's topic in Build Threads Requireing Maintenance
It has become apparent that Photobucket has recently updated their terms of service and no longer allow third party hosting UNLESS you're willing to pay up $400/year! As a result you'll find many pictures missing in this thread. I won't be spending time reinstating photos or moving to another provider but if you would like a picture based on a description in my thread p[lease just let me know -
Don't be afraid to track out to Jim regarding the damage - he is very helpful. I had the same crack appear on ab and thigh over time. You can use expanding foam filler on the TD but do it VERY slowly and make sure you cut a vent for it to come out of if need be. Sent from my iPhone using Tapatalk Pro
-
Absolutely no chance of a concession. I was just making a little fun out of the fact the kit will likely arrive just as they release the new EPVIII FOTK style helmet [emoji3] Sent from my iPhone using Tapatalk Pro
-
If they do deliver on time maybe they'll be kind enough to offer you the new style FO bucket too [emoji3] Sent from my iPhone using Tapatalk Pro
-
You may need to keep an eye on the cancellation and even follow-up. Based on anecdotal forum feedback it seems 'getting out' might be as quick as getting your armour Sent from my iPhone using Tapatalk Pro
-
JAFO'S FIRST ORDER STORMTROOPER BUILD (Jimmiroquai)
JAFO replied to JAFO's topic in Build Threads Requireing Maintenance
Thanks! It feels great. Haven't trooped in it yet but I'm sure I'll uncover what everyone says about weight and heat. Don't really see that as an issue though. There was probably more sanding than I had anticipated. To be honest, I could probably have gone even more but I'm still happy with the finish. As a creative director I'm something of a perfectionist but I quickly came to realise there is no such thing as a perfect kit - there will always be small annoyances or imperfections, and when trooping starts there will be no shortage of scuffs, nicks and, probably, cracks. The main is to create the perfect armour for YOU and be happy with the work it has taken to create. There is pride and joy in passing the CRL and getting approved but I suspect greater pride and joy is yet to be discovered whilst trooping. Sent from my iPhone using Tapatalk Pro -
Look him up on thrRPF. He has also started a build thread under TFA on FISD. Sent from my iPhone using Tapatalk Pro
-
I've heard of so many people cancelling this kit in the last few days and ordering elsewhere. Sent from my iPhone using Tapatalk Pro
-
BTW Max ... you're in Europe, right? Check out the new kit from Mimic out of the UK. Looks pretty awesome. You might want to cancel and jump ship! Sent from my iPhone using Tapatalk Pro
-
Sadly this has been going on for too long. I hear of people still waiting on goods they purchased two-years ago. When they get it right they knock it out of the ballpark. Sadly, they seem to strike out more often. Sent from my iPhone using Tapatalk Pro
-
They're certainly consistent! Sent from my iPhone using Tapatalk Pro
-
JAFO'S FIRST ORDER STORMTROOPER BUILD (Jimmiroquai)
JAFO replied to JAFO's topic in Build Threads Requireing Maintenance
Delighted to report that TK11412 is approved! The same day that the Legion reported 11412 active global members - must be a sign! A huge thank you to all those who inspired this build and shared their learnings. Of course, the biggest props go to Jim Tripon for his incredible artistry and workmanship on an awesome kit. My first troop is next week at one of the largest Cons on the Australian calendar. I'm sure there will be many learnings from that experience and I will no doubt continue to mod my kit forever and a day. For now...this build is complete! Thanks for stopping by -
TK11412 proudly requesting access http://www.501st.com/members/displaymemberdetails.php?userID=25045
-
Greetings from Sydney [emoji3] Great to see another First Order recruit in the making! Sent from my iPhone using Tapatalk Pro
-
Hi Daniel! Greetings from Sydney [emoji3] Great to see another Jimmi build looming. It's such a great kit to work with. Looking forward to watching your progress! Sent from my iPhone using Tapatalk Pro
-
Terrific work as always Mimic! Are these pics of the latest kit of the earlier one? The cod still looks a little too stylised.
-
Outstanding work as ever Jim [emoji106] Sent from my iPad using Tapatalk
-
JAFO'S FIRST ORDER STORMTROOPER BUILD (Jimmiroquai)
JAFO replied to JAFO's topic in Build Threads Requireing Maintenance
Thanks Tony! -
JAFO'S FIRST ORDER STORMTROOPER BUILD (Jimmiroquai)
JAFO replied to JAFO's topic in Build Threads Requireing Maintenance
And here it is... The suit-up was a pretty straightforward experience and whilst I could put a lot on myself I have come to realise this will never be a 100% self kit-up armour. Does one even exist anywhere?!? I was pretty happy with the way everything was working. It was very comfortable and the mobility was really good. It was great to take the shots, sit back and then look at what needed refining. As far as I was concerned it was just the usual culprits - the belt, the shoulder bells and biceps and the thighs and knee plates... And so, with the test suit-up completed and some clear thoughts on what I needed to do I took a couple of days to weak. Which brings us to today!!!! I'm delighted to report that I have submitted my approval pics! Here's a little preview... So, there we have it! A long time coming but a BIG race to the finish over the last couple of weeks. It's now time to sit back and wait to see what happens. Standby for an update but wish me luck for now -
JAFO'S FIRST ORDER STORMTROOPER BUILD (Jimmiroquai)
JAFO replied to JAFO's topic in Build Threads Requireing Maintenance
I'll be honest. The thighs have long troubled me. First getting the shaping right, then getting the suspension system right. It really is a two person job and, thankfully, I managed to get the help when I needed it to get this piece nailed. I considered using a back support harness as a solution for the ab and thighs but found they were too bulky for my liking. After considering a few designs I decided I would create a garter system with an elasticated waist that would allow for a certain amount of flexibility and adjustment. I found this great belting elastic which is both wide and strong... I stitched some wide Velcro onto the elastic... I then created some webbing and buckles for the drop down connection system... And then took time to get the placement of the drop downs correct before stitching stitching to the elastic waistband... Once stitched in place I removed the excess webbing for a tidier finish... You'll see I added some tri-glides to allow for a certain amount of adjustment. I can also pull the waistband up/down as required though I may yet consider adding a simple harness to the waistband at a later date, or connecting it to the one that is already in use for the ab piece. We'll see. Of course, the drop down starts need something to connect to so the female buckle and strap were heavily glued in place on the thighs... Over the course of the last week my to-do list was getting ever shorter and I found myself ready for the very first full suit-up... -
JAFO'S FIRST ORDER STORMTROOPER BUILD (Jimmiroquai)
JAFO replied to JAFO's topic in Build Threads Requireing Maintenance
When I started my build last July I knew I would take my time as I was looking to try and innovate along the way to see if I could challenge myself to make things work better when it comes to suiting up. Having used magnets extensively in this build I always knew I wanted to create a magnet solution for the chest plate. I'd seen some great stuff on other builds and received some great advice along the way from people who had already done it. I'd already added 'magnetic wings' to my ab sides and now just needed to work with the chest plate to find best positioning/alignment between it and the yoke shoulders. It was a simple case of patience and trial and error - always remembering to check polarity before affixing the magnets with two part Epoxy. I used 18mm x 3mm rare earth magnets and built them up in a stack of two to get a better connection. This is a process you can't afford to rush as you want the Epoxy to be absolutely cured before trying to put the pieces together. The finished effect is terrific and here's a shot with the pauldron - also secured by magnets - in place. Whilst dealing with everything torso related I had come to realise that I wasn't happy with my original harness set-up. It was ok and it worked but it wasn't very manageable given it required trying to get your fingers inside the ab piece to secure the snaps between the webbing and the ab. I decided to recreate the ab harness using buckles that would allow me to suit up much more easily. Here are some pics of the build which essentially consisted of sizing, stitching and adding new snaps to attach to the existing snaps that have long been attached to the ab piece... A much better solution and one that I'm glad I took the time to revisit. So...with the chest place connection sorted and the new harness created it was time to turn attention to my thighs...