
.jpeg.ff3078cf696d324fa576c149490ede78.jpeg)

themaninthesuitcase
-
Posts
4,138 -
Joined
-
Last visited
-
Days Won
31
Content Type
Profiles
Forums
Gallery
Articles
Media Demo
Posts posted by themaninthesuitcase
-
-
If you run the numbers it's actually surprisingly close to a fan made kit once you account for this comes with a premium line bucket, boots, gloves and gaskets.Woooooaaa<br>
I know this a more complex armor, an also a harder to build, but 2,225$ just for the kit seems a little too much. Don't know if it's off the market. Will it worth it?
-
 2
2
-
-
Gloves from ISD came today. I went with the silicone option rather than latex as theres a chance one of my daughters has a latex allergy and also it's becoming more common so I wouldn't want to give someone at a troop a reaction.
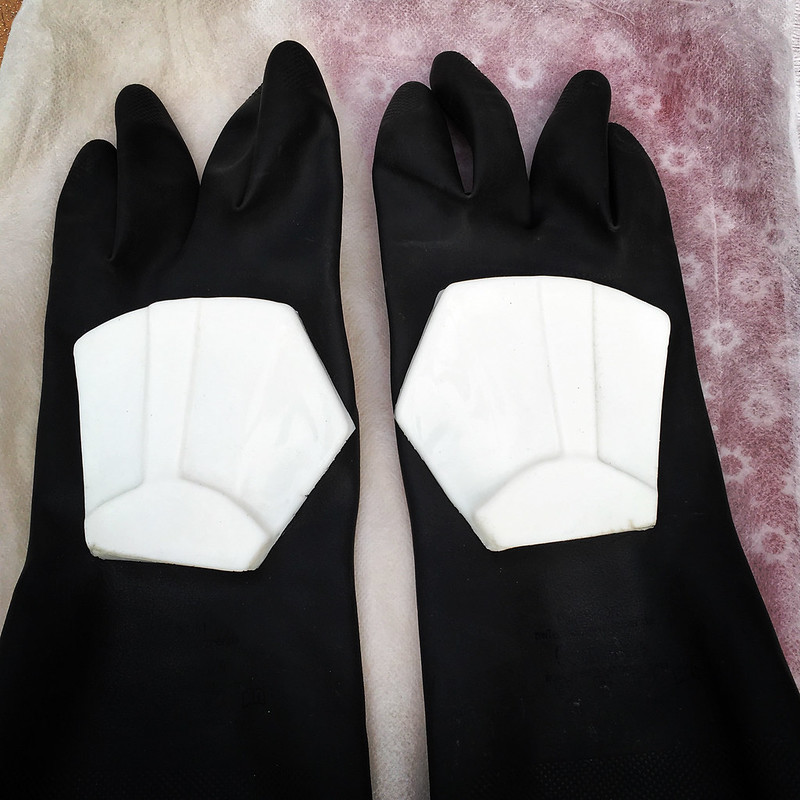
The gloves are a nice thin material compared to my Black HD Marigold brand ones so I might actually be able to feel what I'm holding, like say an E-11. The silicone has a few small holes from air bubbles during casting but nothing too alarming.
These where the last parts I was waiting on for my Centurion application. However I've still got to address the shoulder bell gap. The elastic is the correct length, or at least pretty close to it. The issue is my shoulder doesn't fit into the bell properly so they all need to be heat formed to flare them out a touch. As I am trooping tomorrow I won't be doing that until either Sunday or Monday. I'll need to take some elastic off too allow for this so I'll have to check how much I've got left.
Once all that's done I should be okay to go for Centurion which will be a nice achievement if I can get it.
-
1
-
-
Thanks thats perfect. I wasn't sure where I'd need to apply the pressure. I'm guessing you dunked the whole bell?
-
1
-
-
Would you mind detailing what you did to them when heated? I have the same issue, the elastic is the right length but my shoulders push them out more than I'd like.
-
I binned my DD flash guards and used some 3D printed ones.
For the front stock I added a screw to fit into the slot which is molded in but needs filing out.
-
Got news from Imperial Supply Depot that my new gloves are ready so those are now paid for. Probably won't be here in time for my first troop on Saturday but oh well. Should be good to go for centurion next week though which is nice.
I also got a helmet bag today which I should have done a long time ago.
-
1
-
-
Welcome to the detchment and the UKG, I look forward to your WIP.
-
Also if you're planning on joining the 501st you'll need to sign up on the UK Garrison too and start a WIP thread over there too as part of the clearance procedure.
-
1
-
-
Welcome to the FISD. Always nice to see more of us from the UK.
-
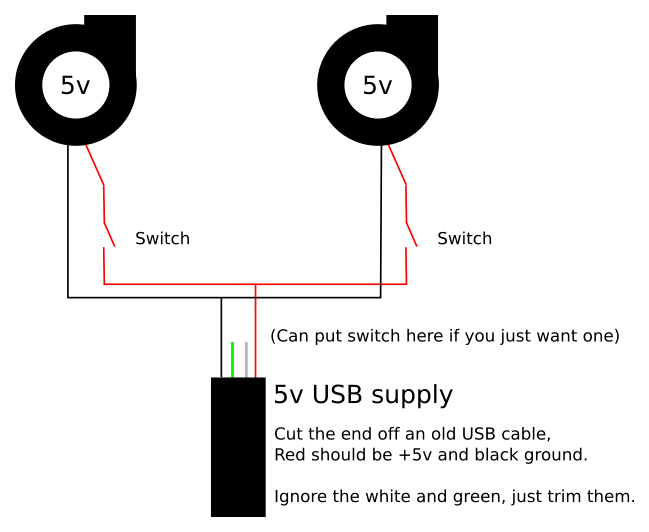
Someone on the FB group was asking how I wired my fans so I drew a schematic:
-
2
-
-
The end bits are 50mm sqares, the strips are 1.5" wide (yay for mixed units!). I can't tell you the length though. I basically cut long strips of paper and then glued them together to get the shape than transfered that to the ABS.Any chance you could share the dimensions of the plastic that your fan setup is mounted to? I've got a big sheet of ABS I'm going to cut a mount out of quite similar to your setup.
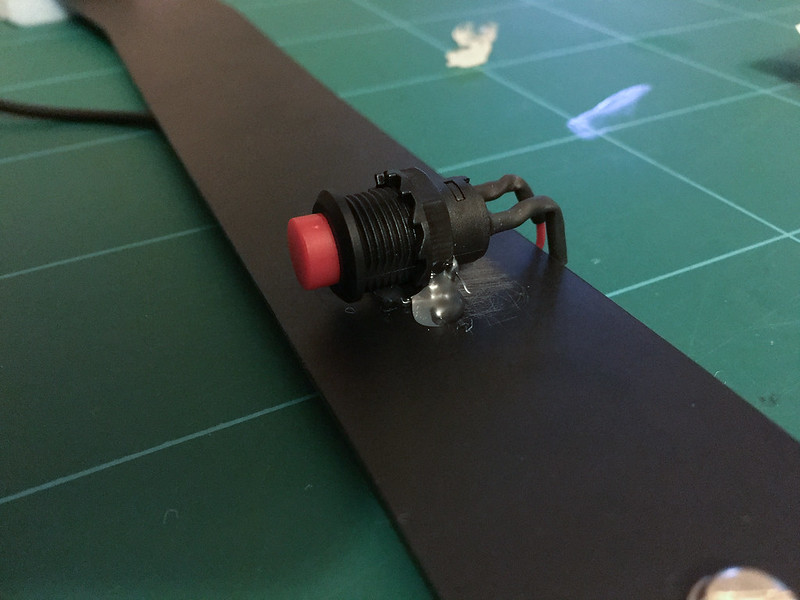
If I come accross something suitable I will but once I rough up the surface the hot glue is actually pretty strong. It required some decent effort to pull it off the switch that came off.Just a thought: For the switches, you might want to find a small piece of scrap plastic (not Anovos plastic, just pretty much some trash plastic the right size and strength) and make a little 90 degree "L" bracket with a proper mounting hole for you to actually mount the switch into, then you'll have a much larger (and flat) surface area you can E6000 the switch (or rivet if you're feeling confident) to the larger bracket. It'll just be a lot more secure than a dab of glue like that.
Just a thought I had while looking at it.
 I mounted my switch directly into the main bracket, but yours is too deep to do that, I think. An L-bracket would let you mount that switch as it's intended to be mounted, though.
 -
When positioning the end cap clip it should only be engaged when the cap is fully pressed in. So if the cap is held out under the spring pressure (which is totally doable with the wire in the T-Jay kit as mine is) you have about a 2-3mm ish gap between the end of the clip and the cap.
This threw me so mines actually in the wrong place.
Ninja edit to add reference image:

Looks like you've done a FAR better job of all your drilling than me too! Did you use a drill press?
-
1
-
-
I had an epiphany this evening: aka an I'm an idiot moment. I have LOTS of foam...
So I cut some of the left over bits from the leg armour in half to make it 1/2" thick cut it to 2" square and bingo, no vibration noise!
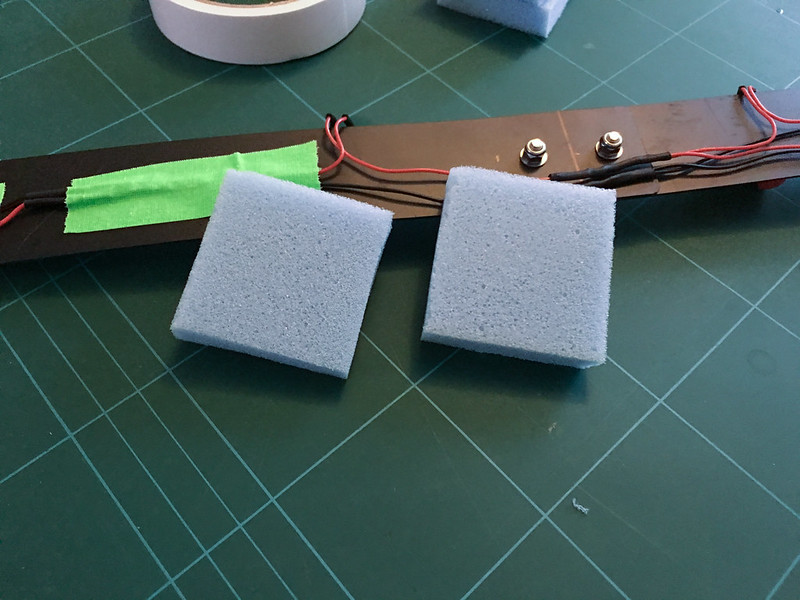
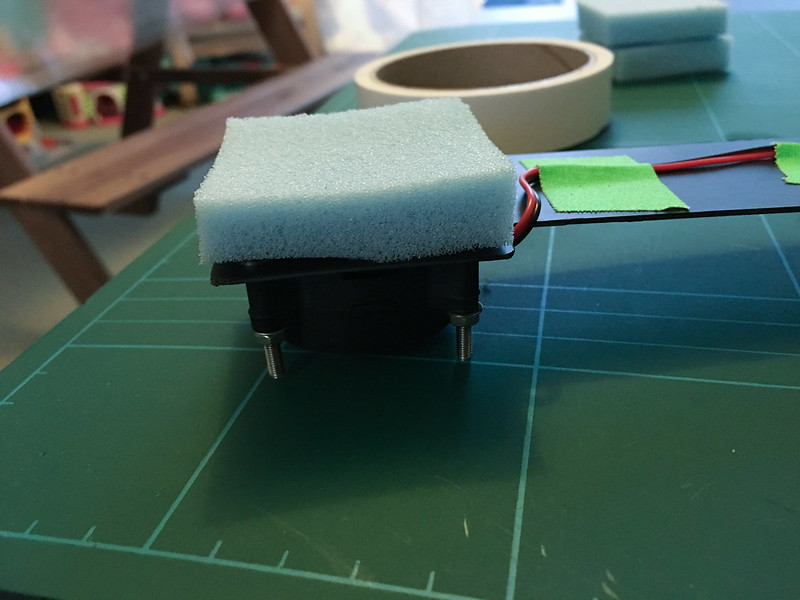
I also had to re-glue one the switches back on. This was the one I'd not roughed up the plastic on before gluing so this time gave it a quick rub with the 180 to give the glue something to grip to.
Primitive but functional.
The battery is held in with velcro in the chin. It's a bit long but there's not really anywhere else to put it. I will look into a new battery that doesn't need to be turned on and maybe I can find one a cm or so shorter. The green gaff tape is there as it sticks to the battery better than the velcro and also means I can write my name on it in case I misplace it at a troop.
Despite the fans pointing directly at the mic it doesn't pick them up at all, so I am really happy with the Wireless Trooping Systems setup. I probably only need 1 fan running but having two gives me some options. They aren't the quietest fans ever but in a busy hall you wouldn't hear them, I might not hear you though however. This is all just held in with friction so easy enough to remove if I decide I don't like it.
edit: just found a short USB right angle adapter I'll try but will take a while to get here.
-
2
-
-
They are an FISD member and there was a thread in one of the sales forums. I got mine on here.Are they FB only? How would I order as I absolutely do not use FB?
-
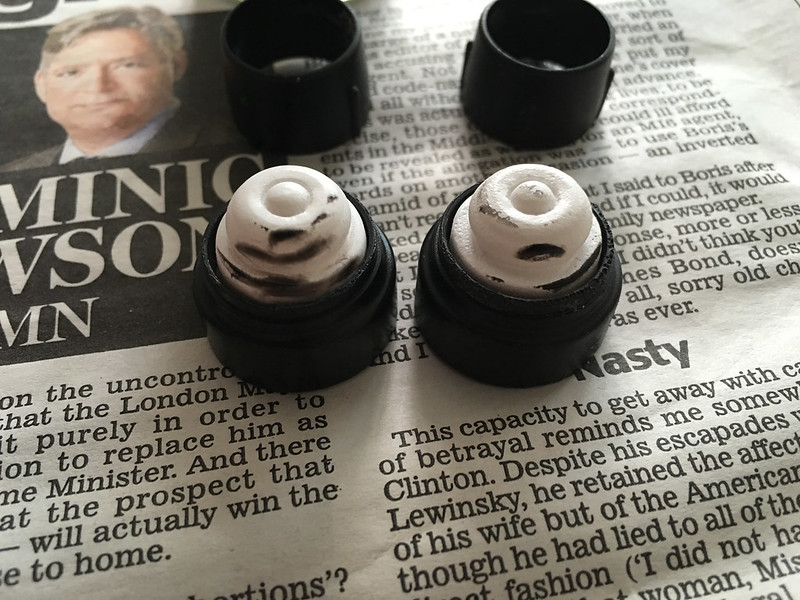
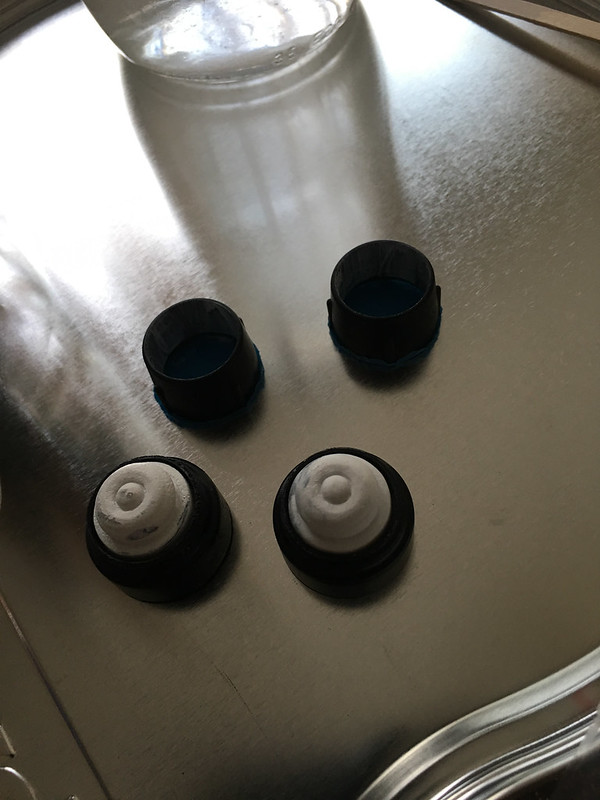
I finished up the hovi tip update last night:
After 4 coats of the matt white they looked like this (still not glued back together, just placed)
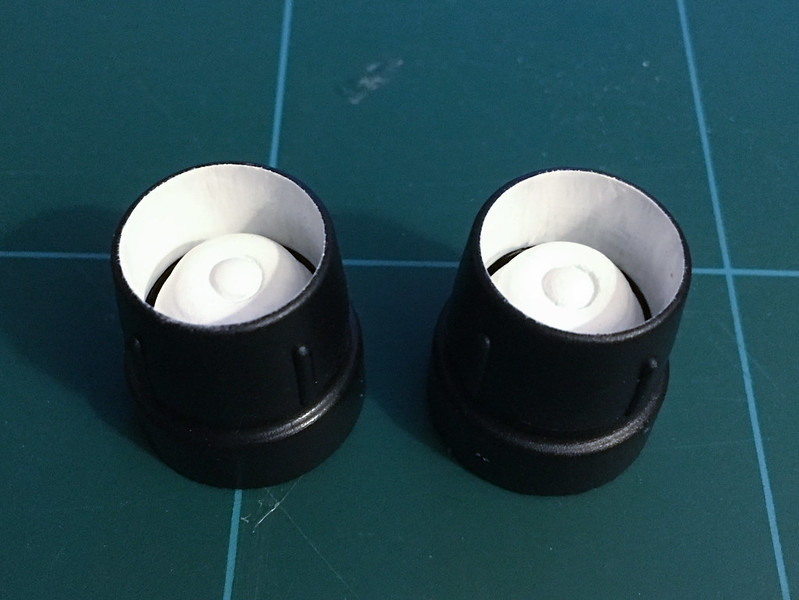
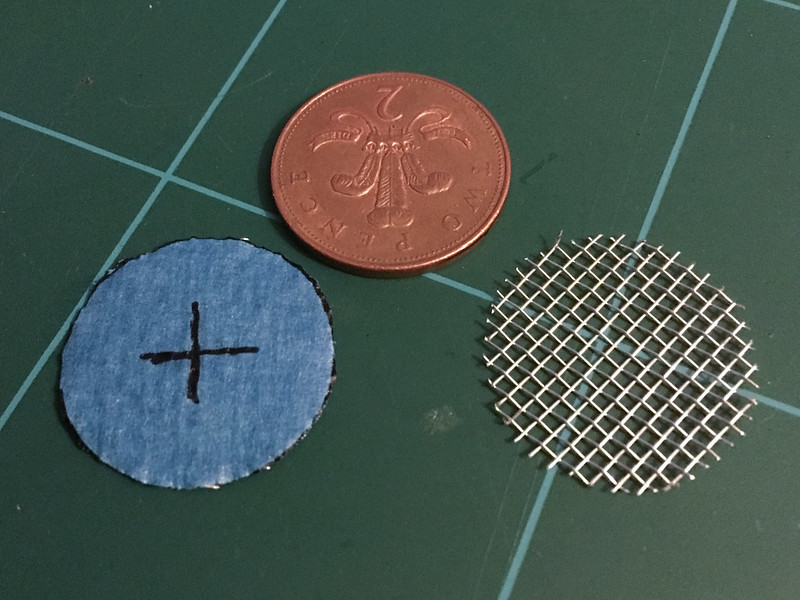
For the mesh I used a sieve from, I think, Poundland. I applied a layer of tape to each side and drew around a 2p. I cut them out with some kitchen scissors, after telling the wife if this killed them I'd buy some more.
With the tape on it was actually rather stiff. To bend them to shape I used an AA battery and pushed them over the end until it was as good as it was going to get. They are still slightly domed rather than flat but it will have to do.
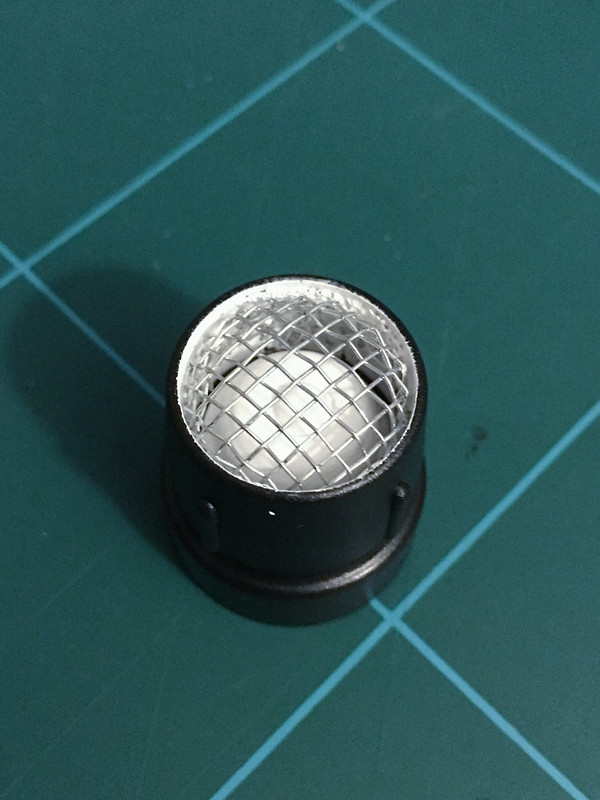
They were pushed in from the rear, using the battery to help align things. This scratched the paint a bit so this was touched up after they were super glued in place.
When I went to screw them back on 1 came apart. They are made of 3 parts, 2 black plastic parts that might have been injection moulded and a resin part that was clearly moulded from a SLS 3D printed master.
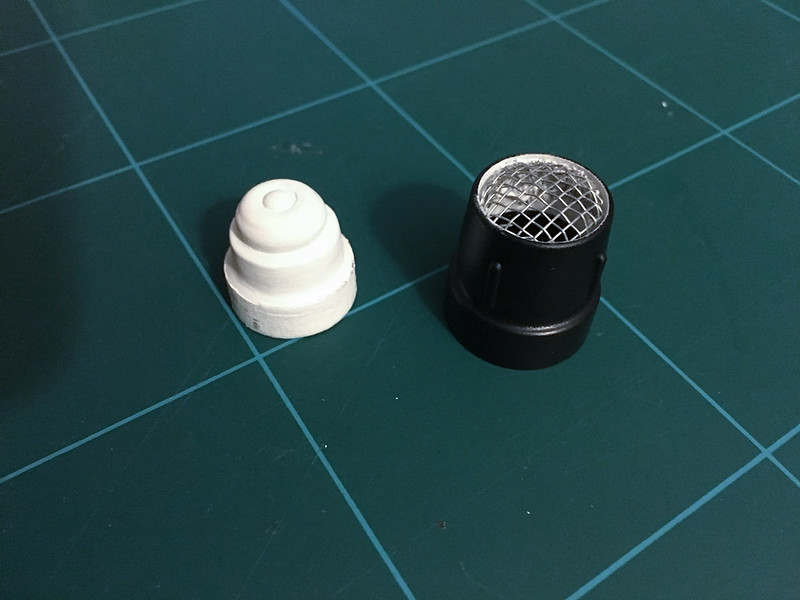
A couple of drops of super glue had it back together.

Back on the bucket and ready for Centurion approval, just waiting on the gloves really.
-
4
-
-
The battery is 3350 mA and the fans quote 0.14A on them. If my maths is right that's in the 10-12 hour region.
-
1
-
-
not yet, the longest I've gone so far is about 5 minutes lol.Nice job on the fans, have you run them constantly to get a run time with that battery? Curious to know...
the force? oh I'll use the force, bring me a hammer...
-
It's meant be white I've checked a few place but it's a real not big deal, but in for a penny...Interesting idea, painting the inside of the hovi tubes. I think you're right and they are supposed to be white, actually. I might paint mine, too, we'll have to see.
I really don't want to order another bottle paint just for this, though. I wonder how well Liquid Paper would work? It's fairly matte, IIRC. Probably moreso than the Humbrol #22 paint I have, at least.
If you don't have any scrap foam laying around that you can steal, you might also be able to make do with a small piece of cloth, at least as a temporary measure. Do you have a rag you can snip a couple of pieces from?
The Tamiya paint was £1.44 a jar (plus £2 because I didn't want to drive out to the store again which means a full shopping trip and so is cheaper). I needed it anyway to touch up the mess of the glue so painting the insides is not really any more work.
I might have something I can use but I'm so close to done I'd rather wait and get the right thing which is some 2mm craft foam.
-
I've just posted a couple of images of my set up to my build thread:
http://www.whitearmor.net/forum/topic/35424-themaninthesuitcase-anovos-ahn-stunt-build/?p=493944
-
Progress on 2 fronts:
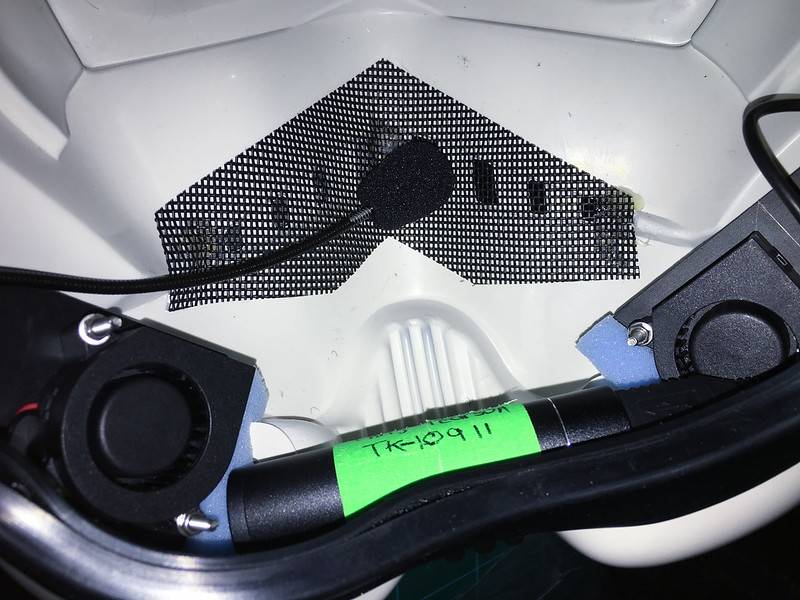
Front 1 - Fan brackets.
I've not completed my basic bracket and fans which work quite well, there is one issue, well 2, though which I will come back to.
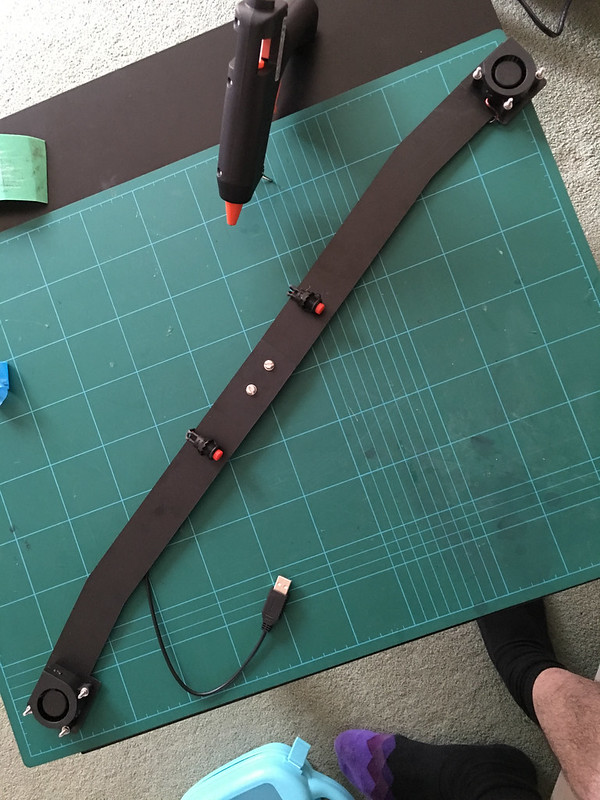
The bracket is basically 2 1.5" wide strips with a kink at the end and a 5cm square to mount the fan to. They are joined in the middle by 2 M4 screws, and the fans are mounted with M3 screws. The fans are individually switchable via the switches which are just hot glued on. These are easily accessible from the back so a spotter could access these reasonably subtly to switch as needed.
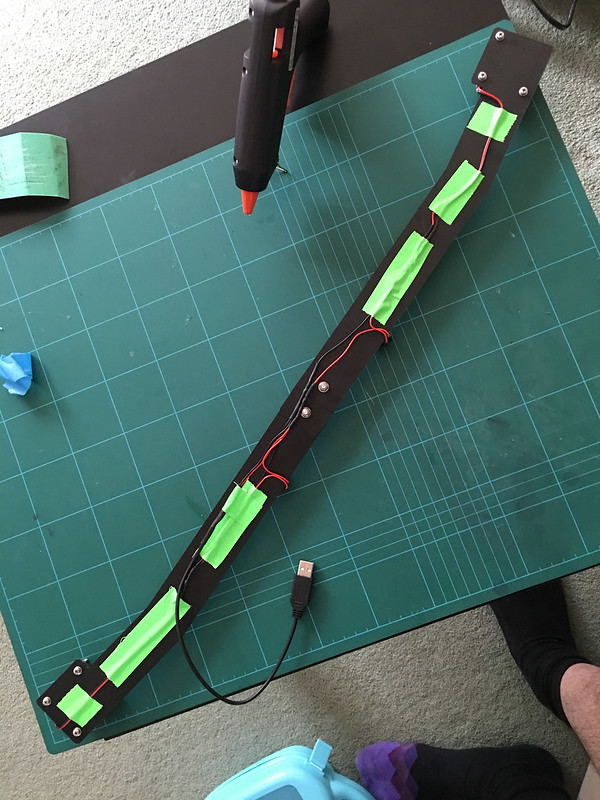
Who doesn't love lime green gaff tape? The wiring is all hidden along the back and secured with gaff tape because it's what I had. It's all hard soldered, no plugs to come loose. There's also lots of heat shrink to cover the joins and make things stronger. The power lead is a USB cable cut from one of those dual USB type A cables for high draw devices. I cut of the power only cable to use for this.
The whole thing works really well and blows air up to the eyes and keeps the bucket from warming up.
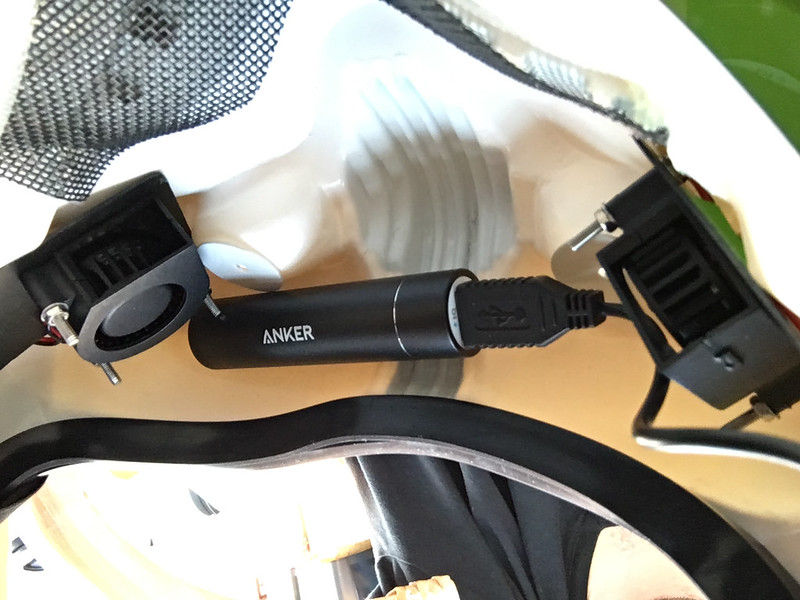
The battery fits nicely at the front of the bucket and doesn't really need any further securing there. Also being at the front means I can see it. Whilst Anker makes good stuff I'm still wary of having a battery so close to my head.
I mentioned issues:
1 - The battery needs a button pushing to turn it on. This was not mentioned in the Amazon listing which is super annoying or I'd have got a different one. Whilst not a complete disaster it does mean if I turn off both fans after about 30s I can't turn them back on again with out taking off the bucket which means a trip back to the changing room.
2 - This is a bigger issue. The fans vibrate against the bucket and make a right racket. If I hold them to stop the vibration its FAR quieter. I'll need to add some craft foam or something to the back to stop the vibration transfer but that will gave to wait for now as the budget has been blown.
So I have a nice fan set up I can't use yet, which makes me sad

Front 2 - Hovi tips:
I've discovered Tamiya paint is pretty decent, thin, but decent so I ordered their XF-2 matt white for the tips. As it's quite thin it's taking a few coats to get good coverage.
Before paint
After 1 coat
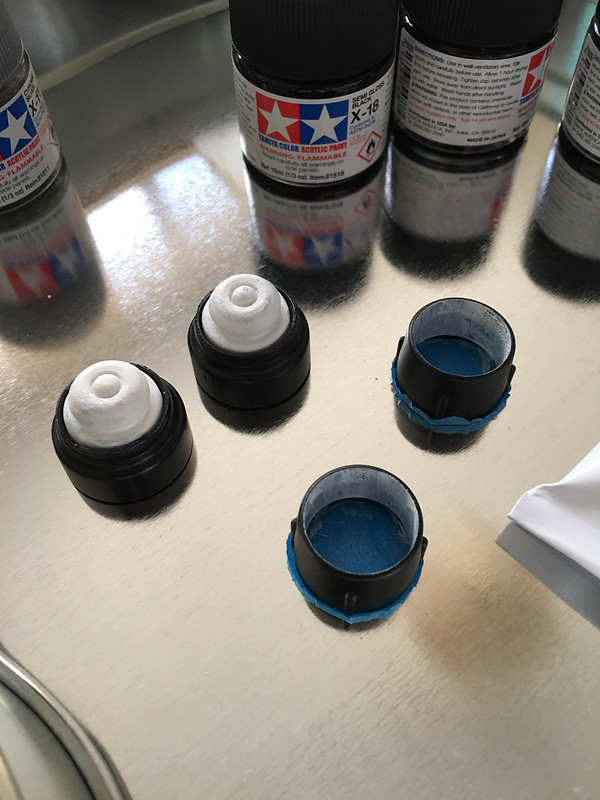
After 2 coats.
I'm hoping 3 coats should do the job which will be done this evening and mean I can get on with adding the mesh from a sieve. You can also see where I'm painting the insides of the "tube" white to better match the original items. Not needed but a nice touch.
-
1
-
-
Another red flag: "TK Armour UK" yet all the images are clearly Thailand (the cheque is from the Thailand garrison for example)
A who-is lookup is more telling: https://who.godaddy.com/whoisstd.aspx?domain=tkarmour.com&prog_id=GoDaddy&k=TfquYX3SQOUSiZpPh%20TIvsLLyIvLQ5R5lK7aOzvlFcIgF2erynXesAUmXkSADzhK
The address is 152 City Road, London, UK which according to google is a Virtual office company (ie a front). The email address is .au.
In all a 10foot pole doesn't seem to be long enough.
-
1
-
-
On 5/12/2016 at 8:12 PM, bells0 said:
Ordered 1 from ebay a couple of days ago for £17 ish. Looking forward to trying it with the iphone app. Not sure what the difference is between this and the £45 version being sold [and used in TRAMP's new system].
From the horses mouth:
-----------
-
The fans came today and have now been wired up to a USB cable for power, work great. I'll post an image tomorrow once I finish the tidy up work on the mount.
-
1
-
-
I've had mine for a long time now, around 99-00 ish.
Back in the dark days before Microsoft bought hotmail, and yahoo! was still relevent I went through a few diferent psuedonums, but this one stuck.
At the time I was listening to a cover of the Police song "Man in a Suitcase" by Goldfinger and well Themaninthesuitcase.
The down side is it's a bit long so some places won't accept it so I also use maninsuitcase. Back in my mini days it was a mouthful so I was often called case, or old man case due to my often grumpy behaviour.
It's pretty unique, though I messed up my Xbox live account and managed to orphan it and I some how don't have the yahoo account for it.
-
3
-
ANOVOS First Order TK Preorder Available
in Announcements
Posted
I'm actually rather surprised at the kit. Despite having sworn off them, if I had the money I'd probably have been first in line on this one.