justjoseph63
-
Posts
12,745 -
Joined
-
Last visited
-
Days Won
326


About justjoseph63

Recent Profile Visitors
31,975 profile views


-
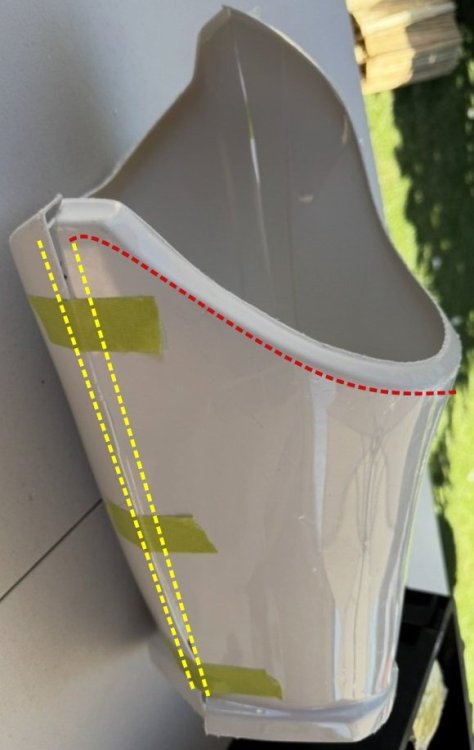
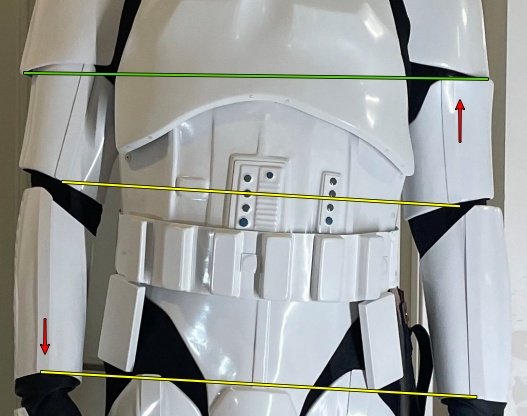
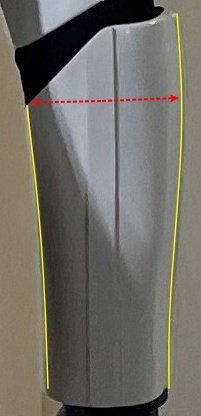
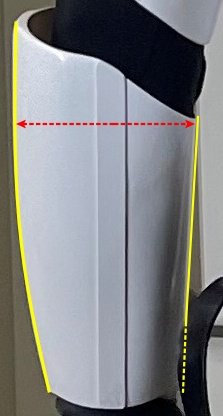
Andrew, First, SUPER stoked to know that you are aiming for Centurion! We are gonna' get you there, brother.... You can trim the tops down as much as you like to make them fit correctly, and as long as you follow the general line of the shape of the top you will be fine for all levels. It looks as if you have put the green tape to hold them in place get the approximate size to fit the top of your thighs, but be aware that once you remove those return edges they will be way too loose. Once you get rid of those pesky return edges , you should trim down the sides as shown below to keep the sides at more of a a vertical angle. A general rule of thumb is that you should be able to fit 4 fingers (or so) in between your thigh pieces and legs. Any less and they can chafe, any more and they may hold you back from Level 3. Keep those photos and questions rolling in, Andrew!
-

Billgrams - the one stop shop
justjoseph63 replied to themaninthesuitcase's topic in Tutorials, Tips and HOWTOs
This is what we do best, Andreas. You have access to the best place on earth to become a TK, and dozens of folks that are ready, willing and able to help you in every way. As I say to many that are on your journey, never EVER be afraid to ask questions! As many as you like (no matter how small)... the more the better! -
Welcome, Jacob, and great to have you here on the boards! You didn't mention if the kit was purchased already built or in kit form. If it is a kit, the dynamics of trimming it are different than if it's already put together. Also, it would help a lot to know the maker. All kit builds are pretty much standard, but some makers (armorers) have their own little nuances. As Glen mentioned, starting your own build thread is the best way to go. That way you can (and should) ask all the questions you want in your own space. One thing that is crucial is to post photos. That way, we can follow your progress and if you have any questions/issues we can better tailor the solutions. I have a lot of help thread links beneath my signature below, but the one for posting pics can be found here. You can do this, and we are here to help every step of the way!
-
Incredible work on this, Bob.. a piece to be truly proud of!
-
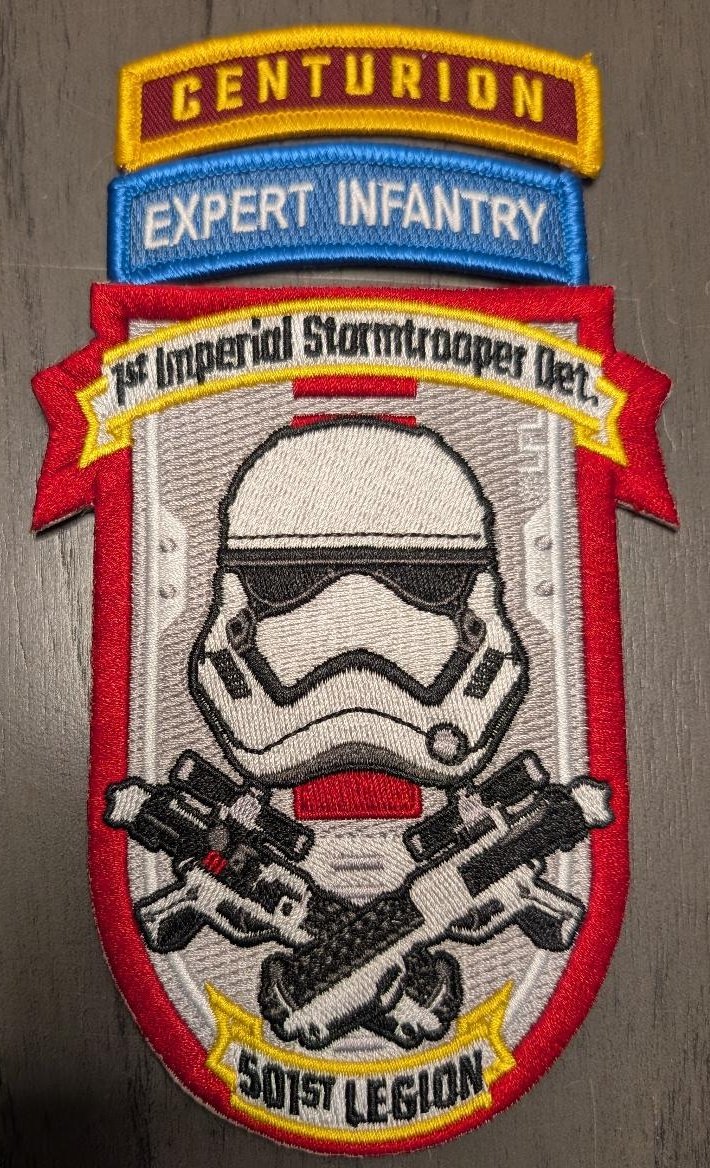
I have some extra patches available, so I am making this offer to the next 5 Troopers to reach Expert Infantry after 9/26/25 (and then hopefully Centurion)! What better way to show off all your hard work than sporting these on your racing shirt, helmet bag or jacket! I have 2 of the FO types available To receive the FISD patch and EI rocker you must be approved at Level 2 (Expert Infantry) after Sept. 26th, 2025. These will be sent to you first. To receive the Centurion rocker you must be approved at Level 3. This one will be sent after you attain Level 3 and be one of those who received the first two from me. Details: 1. Only one set per Trooper. 2. I will pay postage, including international. 3. No, I don't have any extras. (Sorry). 4. You must post up in this thread and shoot me a PM once you are approved and it shows up on your FISD profile. 5. I will get them out the next business day after I receive your shipping info. via PM. 6. They will be sent via regular mail in a standard envelope. Since there is no tracking available I cannot be responsible for anything lost in the mail. 7. First come, first served, so get those applications in and keep our D.O.s busy!


- 1 reply
-
- 11
-

-

-
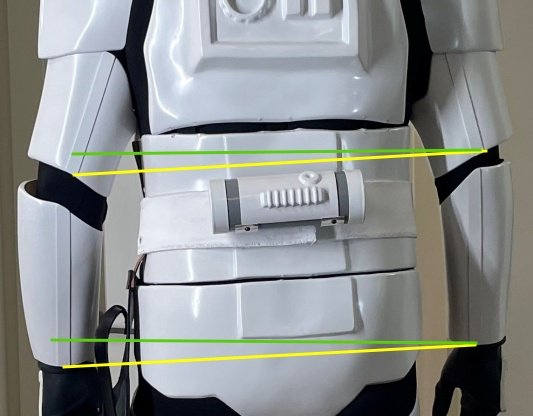
Other than the adding the 2 extra holster rivets I don't see any major issues for Basic approval, Jeremy. As Glen also mentioned it would help your overall look to adjust the TD and bring your helmet down. Adding the rivets is not hard using a rivet gun and should take you less than 10 minutes. If you don't own one I would check with someone in your Garrison. Do you have padding in the top of the helmet? If so, you may want to try removing it to see if that helps. It may also give you a better field of vision. I noticed a couple of other items that will help your overall look: In the front view, your belt is sitting perfectly (just above the bottom of the large ab-button plate). In the side view it seems to be slipping down a bit. Some Velcro behind the canvas belt will keep it in place! To keep things more symmetrical, I would tighten up the strapping between your left shoulder bell and bicep to keep the bicep from sliding out. I would also suggest lowering the right forearm. This would give you the same gap between the bicep and top of the forearm as seen on your left side (which is spot-on). Last up, (and it could very well be the pics) but the circumference of your right forearm (which looks a little tight) appears to be smaller than on the left one. I doubt it would be a deal breaker for Basic, but something to consider for higher levels. Best of luck on your approval, and if you need any help/advice on adjusting anything, just ask!
-
PRAETORIAN BLASTERS - RUBBER BLASTER ESB E-11 BUILD
justjoseph63 replied to postmortem01's topic in ESB Stormtrooper
There were 2 versions used in the film, John, which explains some of the differences. One was a real decommissioned English Sterling L2A3 and the other was the resin cast "Pugman" type. The one in your first pic is the Pugman version, which has the solid scope rail and trigger as well as the extra T-track behind the bayonet lug. It also has the magazine pushed all the way in, no barrel hole and a different front similar to the Sterling Mark V Canadian C1. Sterling Pugman As for the Sony cassette button it doesn't quite match those seen onscreen. Note how the the top is a straight line as opposed to the uneven one shown. I think you did a fantastic job on the rear greeb, though! You might want to scale the buttons down a bit. The photos show them as not being too tall. I would also suggest using a Star head screw on the flat greeb as opposed to a philips head and slotted pan-head screws for the rebar clips. These are available at most ACE hardware stores. Sorry if I shared too much info., lol, but OT weapons are kind of a passion for me. Looking forward to seeing your progress! -
Great to have you aboard, George! 2 pieces of advice I can throw in are: 1. Take.... your.... time. Don't rush your build. Rushing leads to mistakes. If you have an issue, ask us and post up a photo and we will steer you in the right direction. 2. Have all of your build supplies in order before you get started. Having to pause it because you need a particular item can be a pain. I have a thread (link here) which will help. As Andrew mentioned, check out some of the build threads that others have posted. Sometimes it is helpful to find ones that apply to your particular armor maker as each one has it's own little nuances. To get your questions/issues answered faster, I advise starting your own thread in this area. Doing this allows you to post all your queries in one area as well as show off your progress! Best of luck, and never be shy about hitting us up with anything you need!
-
ANH Stunt build (DDD) by TI/SL/IC 93339
justjoseph63 replied to Retroactive's topic in ANH Build Threads
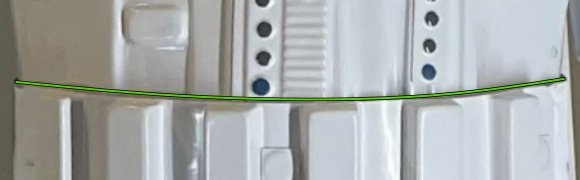
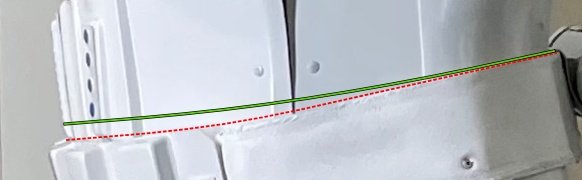
Looking great so far, Dave! I like the fact that you are using interior cover strips (something I always suggest) and that you have removed a lot of the return edges. I know it's early in the game, but I do hope that you will be aiming for Expert Infantry level and then Centurion! As for the return edges, be careful not to remove all of them in some areas, and in some you can remove more. Example- For Centurion level you should remove 100% of the ones around the wrist openings. This includes the front of the "hump". Details like this are easier to do before rather than after. Here are some screen used examples: In some areas you will want to leave them entirely it or do minimal trimming. When in doubt, post up a pic before removing any material and we will help guide you. I have a thread here which will give you a better idea on what I mean. Keep up the awesome job and keep those pics coming!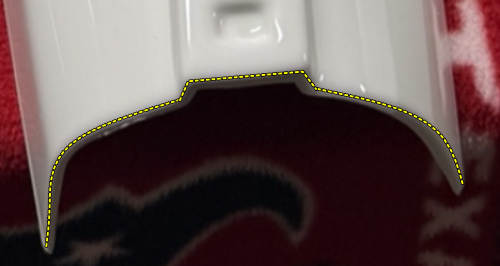
-
DohF4 Requesting Pre-Approval Review (RS Propmasters)
justjoseph63 replied to DohF4's topic in Request TK Pre-Approval
Way to go, Dorian! -
Welcome, Chris! You did the right thing by starting at the home of white armor... you will not find a better source for any and all things TK related. Tons of build threads and photos for reference and folks who are here to help you every step of the way! Just as Glen mentioned, I would highly suggest starting your own build thread here. You can (and are encouraged to) ask as many questions as you like, no matter how small. It's also very helpful to post photos of your progress. Posting pics is especially important if (when) you have an issue. We normally use imgur for this, as it lets you add as many as you want to (link here). Once you get your armor finished, you can apply for "Pre-approval". This peer review is not to replace your GML, but is designed to make your approval easier. More info. can be found here. Looking forward to seeing your build!
-
I don't feel so bad now, lol.
-
WOW, Bob.. phenomenal job on this! I have built quite a few 3D printed (by others) SW weapons but just learned about using graphite to achieve the metallic finish recently. It really does take it above and beyond and I wish I would have known about that on my build! Excessive sanding has always been an issue in the past.. a pain in the backside but well worth the finished product. What was the material/method that was used in this print? It came out really smooth, and anything that saves time makes life easier! Excellent points on using the aluminum rod/tube and rubber stopper not just for easy break-down but for added strength as well. To take it to the next level(s) of screen accuracy I would suggest adding the black wire as Glen mentioned. It's just a few dollars on Amazon (link here), takes about 10 minutes to add but is one of those small details a lot of DLT-19 builders miss and it takes it to the next level. I did the brown bakelite finish on my stock. It can be seen (barely) in my Hero shot below. It takes some time but is also well worth the effort. Thanks for sharing your build, brother!
-
Side story: I had an issue dropping small things (gloves, etc.) while suiting up. Since bending over/kneeling down in full armor can be a pain I bought one of those grab sticks with the clamp on the end to reach anything that fell on the ground. On my next troop, the first thing that fell on the ground was the grab stick.

-
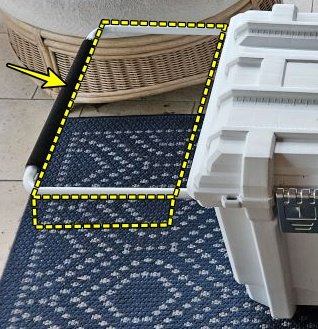
With the Husky bin, the drawer will fit perfectly inside the handle on the side bars, but you can't extend it out all the way. Just make sure that the actual padded handle end is snug up against the outside edge of the tray (yellow arrow) and it should stay in place