

87ninefiveone
-
Posts
93 -
Joined
-
Last visited
Content Type
Profiles
Forums
Gallery
Articles
Everything posted by 87ninefiveone
-
Also, feel free to shoot me any questions you have with the T/MC bucket or kit. I finished mine for Haloween last year and am still tweaking before I apply in the next few weeks. Tray is also super helpful so don't hesitate to ask questions.
-
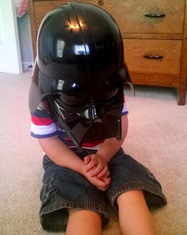
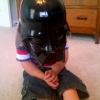
The T/MC bucket should have come with a piece of green acetate that can be used for the lenses. For my lenses I made a paper pattern by tracing the opening then added about a quarter inch all around. I then put the lens over the pattern, made some dots with a non-permanent market and cut two lenses to fit. Mine are just hot glued into place, a single blob on the inside and one each on the top and bottom outside corners. The other option you have is to go the screen used route. Purchase a dark green acetate safety face shield (about $10), cut about a 2-3" wide strip and mount it under tension by drilling a few holes in the face shield which will drop onto the screw posts leftover from bucket assembly. Both options are fine as long as the lenses are flat. Don't worry about having a slight opening between the lenses and mask as it will provide a bit of extra ventilation and is screen accurate. On to the requested photos. ATA bucket is for comparison purposes and painted in ANH style, T/MC kit is partially finished and ESB.
-
I'm finishing up a T/MC bucket in ESB style now, don't have a pic readily available, but the fourth tooth on each side wasn't too bad to pick out on the one I have. I think the T/MC kits are made from 0.090" ABS though which is why they have a bit less detail. I can post up a pic tomorrow if you still need it. Sent from my iPad using Tapatalk
-
The steer I've seen posted before is that the front cover strips should always be 15mm and the rear strips can be whatever thickness is needed to make them fit. During my build I did the biceps first as is so often recommended and what I found was that being fairly tall my initial placement of the biceps was too high (as in the biceps may not necessarily be right on your biceps). If you move the placement down closer to the elbow where they should be on the final build you'll likely find that you can take 5-10mm off of the rear cover strips due to the reduced circumference of your lower biceps. I think I went from a 25mm cover strip in the rear to having 15mm front and 20mm rear with that adjustment.
-
 Very nice. I'm actually looking into a form 1+ myself. How is the print quality in general? I've heard both the form 1 and 1+ can struggle with details on vertical sections, but your output looks pretty nice. Have you tried the black resin yet?
 -
Cover Strips/Finishing Strips
87ninefiveone replied to SkyyDragon's topic in Assembly, Mods, and Painting
Be careful of ordering plastic for cover strips from a random vendor. You may get lucky, but you may also find out there are 421 distinct shades of white. For instance the cover strip material I was supplied with came in two colors of white, one that matched the suit for the outside and one that was more of an off white which was marked for inside cover strips. Sent from my iPad using Tapatalk -
I'm mildy surprised that that photo is of a casting, the lines are super crisp. If it is it makes the doopydoo stuff look pretty bad in comparison.
-
Well, for what it's worth my order ended up arriving after 6-7 weeks. Power cylinders were cracked but it was an easy repair. No communication or response to emails was seen until the order had shipped.
-
Hate to bring a thread back from the grave, but.... Anyone else order a kit from Doopy Doo recently and have issues with the seller being unresponsive? Ordered a Hasbro conversion kit about 2-3 weeks ago and it's never been marked as shipped on eBay and repeated emails haven't produced a response. I don't mind waiting a bit for hand made goodness, but it would be nice to get a reply so I know what's going on at least.
-
I'm 6'2" and have the same issue. Calves are a solid 2-3 inches too short which makes for a lot of black around the knees issues with the boots not staying put under the calves. I did as spycee noted and put some Velcro on the front of the boots with a tab that sticks up and connects to the shin. This minimizes noise from Velcro when walking and seems to work okay but still tends to let the boots slip out when you do a lot of walking.
-
Received this in an email from Angelus. Thought someone here might find it useful if they needed to snag some stuff to paint their boots. One Day, Four Deals! Plus 25% off all Standard Paints for the first 100 customers! Use code: BF2014 Deals go live on Friday at 12am PST 11/28/2014 Www.angelusdirect.com
-
trooper12's RT-Mod ABS ANH Stunt Build
87ninefiveone replied to trooper12's topic in Build Threads Requireing Maintenance
I don't think that notch is a mistake. If the kit is meant for overlap construction rather than butt joints with cover slips those notches would have to be there in order to create the overlap for gluing. Nicely done so far by the way looking forward to the rest of the build! -
Removing Velcro Backing -HELP!
87ninefiveone replied to TK-4202's topic in Assembly, Mods, and Painting
I would try heating or cooling it. Stick it in the freezer for half an hour or so then take it out and immediately try to scrape it off, the cold might make it just brittle enough that it comes off a bit easier. If that doesn't work you might try a blow dryer as heating the material for a bit might make it a bit more pliable and easier to remove. Good luck and be sure to let us know what worked for you! -
Operation: I want to drink too
87ninefiveone replied to Starfox2010's topic in Assembly, Mods, and Painting
Cool idea, bit can you see well enough in your bucket to get the straw into the hole/door? -
Pm tray, he can give you the low down on anything tmc. I got one of their suits off of eBay that included everything but strapping, sourced all of the snaps and elastic myself from Jo Ann fabrics and WalMart.
-
E-11 Blaster Holster
87ninefiveone replied to JoblessPunk's topic in Boots, Soft Parts, and other Accessories
Darman makes some nice holsters as well in the $40 range, I believe you can even choose between a few different material weights. The one I got from him looks the business and I couldn't be happier with it. Check the for sale section for his neck seal/holster thread, and I think he's on eBay as well. -
Interesting topic. Short answer is probably yes...but so what? It might not be socially acceptable to prance around in a costume pretending to be a character from a movie made 30+ years ago, but dammint its fun and kids like it. And in the end that's what its all about, having fun and raising some money for charity while spreading the love for some movies that are universally liked. Sure you'll get some weird looks, but you can't please everyone.
-
Imperial Snowtrooper [TM]
87ninefiveone replied to troopermaster's topic in Build Threads Requireing Maintenance
Very nice, looking forward to the build photos! -
Better yes, but its not always practical to spend another $70-80 and have a months long wait if all you want is basic approval. The ones posted looks a lot like caboots which are fine from what I've read.
-
The general style is right, so they should pass according to the crl. The only time seams should be an issue is with eib/centurion certification.
-
ATA helmet has arrived and Im.....
87ninefiveone replied to Polar's topic in Build Threads Requireing Maintenance
Your tube stripes are amazingly clean! Did you use a stencil? It's difficult to tell because of the angle, but it looks like you might need to paint out a bit more towards the creases on the tears. I'm certainly not an expert, but it might be good to post a better shot of the sides and let those who are give feedback. -
A bit late to the party, but I'm 6'2" ish and 205lbs with a slender build and just finished with a t/mc kit which is screen derived. I'm definitely pushing the boundary of screen used armor as far as height goes and had to add 2" side shims on both sides to get closure. There's also a large gap between the upper chest and shoulders to deal with as well. If I did it again I would have gone for one of the larger kits suggested above. Both the ATA and T/MC helmets fit fine though and don't look out of proportion.
-
I've used automotive paste wax as well as isopropyl alcohol on a cotton ball with good results. Both seem to work well for getting rid of marks from the blaster and holster.
-
Lifesize Star Wars Rebels Stormtrooper
87ninefiveone replied to SorenM's topic in Hard Armor (General Discussion)
I'm surprised there's been no comments on the E11. Looks pretty good minus the huge t tracks, wonder who made it and if they'll be for sale somewhere. -
Can you identify left vs right ears?
87ninefiveone replied to LaserBrain99's topic in Hard Armor (General Discussion)
C and D are left, A and B are right side ears. The curve in the skinny part points to the rear.
