

SorenM
-
Posts
1,134 -
Joined
-
Last visited
Content Type
Profiles
Forums
Gallery
Articles
Everything posted by SorenM
-
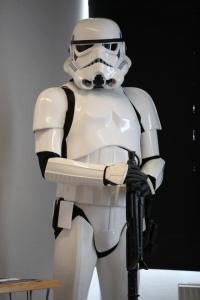
Cannot sit down in the armour..or that is..I cannot at least:-)
-
Do these pass as stormtrooper boots?
SorenM replied to Natt's topic in Boots, Soft Parts, and other Accessories
You are most welcome:-) The boots can be approved, but they are not very accurate.....therefore I recommend some of the others...:-). DoopyDoos is a company, that makes blaster kits. No I did not buy a Hasbro because it will not be approved beyond basic level:-).. -
Do these pass as stormtrooper boots?
SorenM replied to Natt's topic in Boots, Soft Parts, and other Accessories
I would avoid those boots and check out the ones I have listed in my thread on boots, or Bass Amsterdam, or Lands End Chelseas. An E-11 can be purchased various places, I bought a DoopyDoos, and you can check out my build thread on that:-) -
Some pics from my first official troop, where my kid joined as well:-)
-
I used the halves of kinder eggs, with battery driven Christmas lights inside..I can post some pics later.......:-) Thanks :-)
-
SorenM's- TM ANH stunt armour ( not a build).
SorenM replied to SorenM's topic in Hard Armor (General Discussion)
You are in for treat...it is absolutely a gorgeous armour:-) -
Fixed Now painting and weathering:-)
-
Had Alfredo make a fire selection lever, and a rear sight. Arrived yesterday, and I fiddeled with them today. They are both made "functional"... The fire selection lever. A screw into the rear, and the into the blaster....of course painting and weathering will be done later The rear sight has been made functional by drilling out the part where the sight would be attached on a real mg-34, and a wooden dowel has been inserte instead, secured by a screw to the rear. A trench for the screw that holds the sight to the dowel has been dremelled out. I need to find solution where the sight will lie totally flat against the blaster when not in the upright position
-
My New 2013 T-21 Model
SorenM replied to Blaster 8266's topic in MiniMag PTL Missile Launcher, T-21, RT-97C (MG-15)
Received mine last week..it is beyond awesome:-).....as I am a TK only, it will probably just be used for display.....so far :-) -
Cushman Custom Creations MG34
SorenM replied to themacalu's topic in Build Threads Requireing Maintenance
Looks nice agreed, but apparently this company comes with a lot of bad publicity, http://www.milsimempire.com/viewtopic.php?f=43&t=4121 http://thefordreport.com/2012/11/concerning-cushman-custom-creations/ and the quality is supposedly not very good... Tried getting in touch with DoopyDoos? -
Agreed Karin... My favourite piece of classical music by far!.:-) I hummed it for my son when he was an infant and was crying his eyes out...it calmed him down totally:-) I played it for him when he was just 8 months old, and he would jump up and down when on any bodys lap, whenever he heard it:-)
-
SorenM's- TM ANH stunt armour ( not a build).
SorenM replied to SorenM's topic in Hard Armor (General Discussion)
TM makes absolutely fabulous armours, and they fit like they were made at a taylors... And I agree, why not have an expert make your armour for you?..I am so glad that I chose that option:-) Enjoy yours, and may the days pass quickly:-) -
RGR that Mathias:-) ... And ofcourse ( luckily my armour is fully up to the new standards, I still "just" need to loose more weight...15 cm now, and still the gap is too big for Centurion...but I reckon that 6 months in Africa will take care of that little "problem";-)
-
TK6287 Requesting ANH Stunt EIB status [TM] [349]
SorenM replied to TK6287's topic in Request Expert Infantry Status
Those side gaps were my achilles heel as well..:-), what did you do to minimize it?..I lost 12 cm ( now 16cm) off my waistline.....and the gap is still too wide for Centurion clearance......(sigh:-)) -
Goood job all!.:-).. A question: will this affect current EIB holders or Centurions?
-
I wear parade gloves in my rubber gloves. Those are rather thick high quality cotton, and of superior quality compared to cotton liners. They absorb all the moisture from my hands, also on an 8 hour troop, and I wash them afterwards. Not yet had a problem with bad smell. Make sure you hang the rubber gloves to dry after trooping, and ofcourse wash the cotton gloves. Like Mathias I do not see a need for looking anything short of best possible/as accurate as possible when trooping:-) I totally second what Karin said, vinegar takes care of bad smell,:-)... as does Rodalon
-
adding back stripe to loake's 290
SorenM replied to Eddie TK Head's topic in Boots, Soft Parts, and other Accessories
I agree, get them stitched on if at all possible....good man getting the Loakes, those are fabulous boots:-). -
Found these boots at Target of all places...
SorenM replied to Evilboy's topic in Boots, Soft Parts, and other Accessories
I must agree with Vern, why not aim a bit higher, than solely focusing on the price?..:-), and just barely make to the point if basic CRL clearance?:-)... Basically they are not accurate. Yes they are cheap..but I doubt they will last very long, or be that comfortable to wear for that matter. I know that the choice is the individuals prerogative, but should we not try and advocate the highest of standards?:-)... Just my two cents..:-) -
Found these boots at Target of all places...
SorenM replied to Evilboy's topic in Boots, Soft Parts, and other Accessories
Not up to stsndards I am afraid.....the front is not supposed to have more than one layer of leather, or any seams/stitchings.... So how would they work?:-).... -
totally dig it! :-)
-
Ha ha ha yes:-)...I hope there s a special place in hell reserved for the autocorrect;-).. Here to help others, you're welcome:-)... The lettering is easily done. The letters are engraved, and the way to get them coloured is to paint into the letters, making sure that the paint is in all of the letters, and then quickly wiping off the excess paint with your finger, leaving only the paint in the letters. Use paint for miniatures, as this is water solluble, and easily removable....clear enough?:-)...
-
Thanks for the kind Words :-)..you need to build the Scope rail and bracket for the Hengstler counter(ammo counter).. Ãou can add a lot og stuff, convert and "pimp" (like I an others did) but it is not required. the Hengstler counter is not mandatory. Take a look at the different versions in the film. The Hengstler counter is included in the Doopydoos kit.
-
Sorry!. :-)I have not made any videos ( maybe I should..hmmmm). I used three different techniques: Paint the weapon overall satin black in several layers. Shading: water down a dark paint, in this case dark brown/rusty brown and apply it in very small amounts to all the crevises, nooks and crannies, this will create the ilusion of ageing to the metal. Drybrushing: use a light colour, in this case three different "silvers", gradually applying very small amounts of white into the silver. Dip the brush in the paint, and then remove allmost all the paint in a papertowel, and then gently move the brush across the areas that are "metal" and repeat numerous times. The trick is to apply very very subtle layers and build up the metal colour. Too much and it is evident that it has been painted on. This is done to the scope with bronze/copper and gold paint. Highlighting: on select areas apply very small amounts of silvery paint, to pick out for instance screws, nuts and bolts, levers, sights etc. Everything is sprayed with satin varnish, and finally the pistolgrip, and wires are painted with high-gloss varnish to give the illusion of bakelite/plastic. Hope this gives a very basic explanation. If you make "mistakes", cover with black paint, and redo. You can look up the techniques on youtube, for videos. The techniques are primarily used when painting miniatures. Additional questions? Just ask :-)
-
I used (if that is what you ask;-)), Citadel paints called Burnished Gold, mixed with a pinch (really just a very small amount), of Beaten Copper..
-
Thank you so much:-), any questions...just ask:-)