JLight
-
Posts
253 -
Joined
-
Last visited
Content Type
Profiles
Forums
Gallery
Articles
Everything posted by JLight
-
TK-32627 Requesting ANH Hero Centurion Status [NE][125]
JLight replied to JLight's topic in Request Centurion Status
Thanks so much! I will always be tweaking it to make it better. Thanks for all the suggestions! Sent from my iPhone using Tapatalk -
TK70000 Requesting ANH Stunt EIB status [TM][391]
JLight replied to AB70000's topic in Request Expert Infantry Status
Looking good!! Congrats!! Sent from my iPhone using Tapatalk -
TK-32627 Requesting ANH Hero Centurion Status [NE][125]
JLight replied to JLight's topic in Request Centurion Status
I was waiting for that! No, I don't carry my E-11 in that...I carry my boots and gloves! Thanks! Sent from my iPhone using Tapatalk -
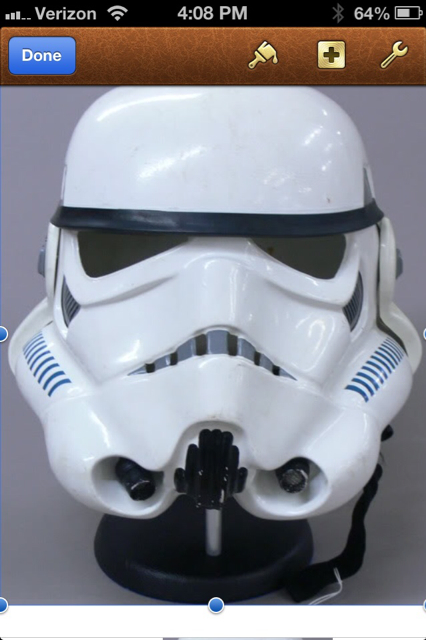
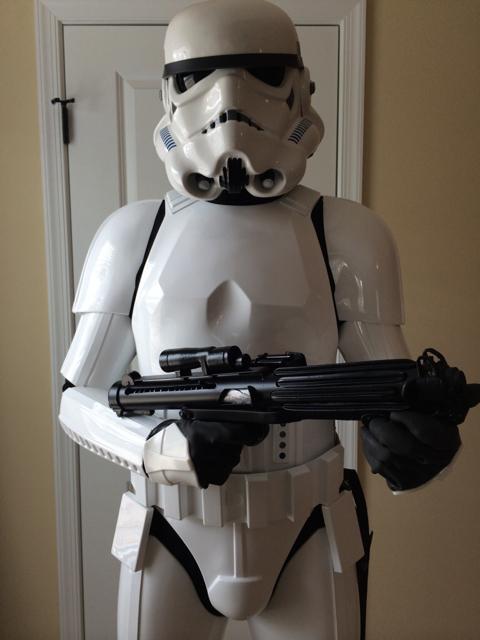
EIB Application: http://www.whitearmor.net/forum/topic/27588-tk-32627-requesting-anh-hero-eib-statusne388/ Name: Jonathan Lighty TK ID: 32627 FISD Forum Name: Lighty2627 Garrison: Garrison Tyranus Armor Maker: NE Helmet Maker: ATA Blaster: Resin kit bought from TD-8266 off boards Height: 6'0" Weight: 175 Boots: Amsterdams I painted white Canvas Belt: TKittell Handplates: Sonnenschein/Karin Neckseal: Veedox Holster: Darman Bucket Off Full Front Full Back Left Arm Raised Left Side Detail (Showing split rivets evenly spaced and 10mm from edge) Right Arm Raised (Showing Male Snap) Right Side Detail Action Shot (Before Hengstler counter was attached) Helmet Front (6 Teeth, Bubble Lenses) Helmet Left (3 Bumps on ears, 2 screws) Helmet Right (3 Bumps on ear, 2 screws) Helmet Back S Trim Bubble Lenses Lens Color Hovi Tips Neckseal (Hero Version) Neckseal (Hero Version) Shoulder Bridges (Attached in front, elastic underneath) Shoulder Bridges (Elastic in back) Ab Details Interior Strapping (Kidney/Butt is joined) Cod/Butt Plate (2 Male Snaps/1 Rivet) Arms Wrists (No return edge) Gloves/Handguards TD TD Belt Front (Holster attached with 4 screws) Belt Back (Holster attached with 4 screws) Right Side Thigh Ammo Pack Left Side Ammo Pack Sniper Plate Right Side Sniper Plate Front Side Sniper Plate Left Side Boots Blaster Left Side Blaster Right Side D Ring Front Again Back Frown (Not a required modification, but it bothered me once pointed out.) Thank you for your consideration!
-
For what it's worth...I have only built one suit, but have not had any problem with E-6000 and the snaps up against ABS. Sent from my iPhone using Tapatalk
-
Awesome job and Congratulations!!! Sent from my iPhone using Tapatalk
-
TK-32627 Requesting ANH Hero EIB Status[NE][388]
JLight replied to JLight's topic in Request Expert Infantry Status
Thank you so much for the feedback! Look forward to serving soon as centurion! Sent from my iPhone using Tapatalk -
Jonathan Lighty 32627 EIB Letter Sent from my iPhone using Tapatalk
-
TK-32627 Requesting ANH Hero EIB Status[NE][388]
JLight replied to JLight's topic in Request Expert Infantry Status
Yeah after looking more closely, it appears the teeth cut outs were slightly smaller. Meaning they don't go all the way to the top and bottom of frown. And so I believe my painting of the frown is spot on, but have cut my teeth too long and so the gray paint and teeth aren't flush across frown. Sent from my iPhone using Tapatalk -
TK-32627 Requesting ANH Hero EIB Status[NE][388]
JLight replied to JLight's topic in Request Expert Infantry Status
Thanks for the feedback. As far as the belt, I have been having issues trying to keep it up in the front to touch the bottom of the an buttons but low enough in the back to come near butt plate. If anyone has suggestions, please let me know. I thought the weight of the holster/blaster and TD would help, but it slides up in the back. As far as helmet frown. I used this hero as a guide... As far as gap, I can always resubmit. I think the belt could have been tighter to close in the gap and plus I could always let out a little on left side because I have a slight overlap. Either way, thank you for the feedback. I have been looking forward to your remarks as I have read many that you have left recently and you have a very good eye. Sent from my iPhone using Tapatalk
-
We will always be "tweaking" our armor. Good mindset to focus on progress versus perfection. Sent from my iPhone using Tapatalk
-
No, no offense taken! I am pretty positive that I took the same distance off all around. Because the top of the bell is so close to your shoulder straps, it automatically is at a slant. Sent from my iPhone using Tapatalk
-
No, no offense taken! I am pretty positive that I took the same distance off all around. Because the top of the bell is so close to your shoulder straps, it automatically is at a slant. Sent from my iPhone using Tapatalk
-
I used my Dremel and sanded a bit at a time and once I got one side perfect, I cut the exact amount off the other side. Take your time. Put on your bicep and tape it to inside of bell with the chest piece on as well to see how it all fits. Sent from my iPhone using Tapatalk
-
TK-32627 Requesting ANH Hero EIB Status[NE][388]
JLight replied to JLight's topic in Request Expert Infantry Status
Thanks, Anthony! I looked a ton at your build threads and EIB/Centurion threads. Not alot of NE out there, but it is growing. Thank you, sir! They are cracked a bit and will continue to do so, but that is more screen accurate anyways. Eventually will have to re-paint. -
I don't know if this link will work or not. First time I have tried doing so in Tapatalk. If not, check out Redforce's Centurion app. The large shoulder bells with NE armor is specifically mentioned and then also just to size the armor to your body. http://www.whitearmor.net/forum/index.php?/topic/24319-TK-10666-Requesting-ANH-stunt-Centurion-Status-%5B89%5D-%5BNE%5D Sent from my iPhone using Tapatalk
-
Oh and the only "trimming" I did to the bottom of the bells was to make the return edge consistent with the return edges on the rest of my armor, but I don't remember sanding much. Sent from my iPhone using Tapatalk
-
I mean the front, top and back that is facing your body. Definitely not the length. Not sure how tall you are but I needed the length. Trimming the front, top, and back makes the bell sit better on your shoulder. Just like trimming any other part to suit you. For me, I believe I trimmed a good 1/2 inch on both bells and all around but not the bottom. Hope that makes sense and helps more. Sent from my iPhone using Tapatalk
-
Certainly there is variance. However, I like how the trooper in the last picture has his bells flush with the bicep. Meaning the bottom of it doesn't stick out. You have great references of some that did. The one trooper appears to be missing the bottom elastic since his bell is sticking way out and looks funny. I just prefer a more trimmed to trooper look. As far as "overlap", there is going to be some. But the contour of the bells can and should really match the shape of the chestplate. I know I wasn't in the movie, but here is my NE armor... Sent from my iPhone using Tapatalk
-
Might need to wear your biceps to tell for sure, but the bell looks large to me. Don't want the bottom of it sticking out or overlapping with your chest plate. I had to trim my shoulder bells down a bit. The spacing from shoulder bridge to bell is good. Should almost be touching. The elastic on the bottom of the bell around the arm should not be loose. It helps keep the bell wrapped around your arm and in place then you can add the hook on bicep to keep biceps in proper place. Sent from my iPhone using Tapatalk
-
Name: Jonathan Lighty TK ID: 32627 FISD Forum Name: Lighty2627 Garrison: Garrison Tyranus Armor Maker: NE Helmet Maker: ATA Blaster: Resin kit bought from TD-8266 off boards Height: 6'0" Weight: 175 Boots: Amsterdams I painted white Canvas Belt: TKittell Handplates: Sonnenschein/Karin Neckseal: Veedox Holster: Darman Bucket Off Full Front Full Back Left Arm Raised Left Side Detail (Showing split rivets evenly spaced and 10mm from edge) Right Arm Raised (Showing Male Snap) Right Side Detail Action Shot (Before Hengstler counter was attached) Helmet Front (6 Teeth, Bubble Lenses) Helmet Left (3 Bumps on ears, 2 screws) Helmet Right (3 Bumps on ear, 2 screws) Helmet Back S Trim Bubble Lenses Lens Color Hovi Tips Neckseal (Hero Version) Neckseal (Hero Version) Shoulder Bridges (Attached in front, elastic underneath) Shoulder Bridges (Elastic in back) Ab Details Interior Strapping (Kidney/Butt is joined) Cod/Butt Plate (2 Male Snaps/1 Rivet) Arms Wrists (No return edge) Gloves/Handguards TD TD Belt Front (Holster attached with 4 screws) Belt Back (Holster attached with 4 screws) Right Side Thigh Ammo Pack Left Side Ammo Pack Sniper Plate Right Side Sniper Plate Front Side Sniper Plate Left Side Boots Blaster Left Side Blaster Right Side D Ring Thank you for your consideration!
-
Requesting access.... Thanks! http://www.501st.com/members/displaymemberdetails.php?userID=17149
-
Larger thigh armor - the push to Centurion
JLight replied to PhoenixTrooper's topic in Assembly, Mods, and Painting
You can search ABS paste here on the boards to learn how to make it. Sent from my iPhone using Tapatalk -
Larger thigh armor - the push to Centurion
JLight replied to PhoenixTrooper's topic in Assembly, Mods, and Painting
The point Mathias is making is that the points where the shim attaches to original thigh should be completely flush and therefore not have a visible ridge. To do that you would need to use ABS paste and then sand paper starting with a 200 grit and up to a 1000 grit and then polish it. Sent from my iPhone using Tapatalk -
TK-87657 Requesting ANH Stunt EIB Status[RS][384]
JLight replied to flerndip's topic in Request Expert Infantry Status
Congrats! Can't wait to troop with you soon! Sent from my iPhone using Tapatalk