JLight
-
Posts
253 -
Joined
-
Last visited
Content Type
Profiles
Forums
Gallery
Articles
Everything posted by JLight
-
TK-6276 Requesting ANH Stunt Centurion Status[ATA][123]
JLight replied to Vader’s Wingman's topic in Request Centurion Status
Congrats!! Great effort that has paid off! Sent from my iPhone using Tapatalk -
TK-95020 Requesting ANH Stunt EIB Status[RS] [383]
JLight replied to AsBlondeAsLuke's topic in Request Expert Infantry Status
Awesome job!! Great build thread to follow! Sent from my iPhone using Tapatalk -
Great thanks!<br /><br /><br />Sent from my iPhone using Tapatalk
-
I know many of you die-hards love the more screen accurate scuffed look, but I favor the new shiny TK look myself. So I have the Novus 1-2-3 polish/cleaner, but is there is anything else that is really good at polishing armor? Certainly I don't want it to yellow over time from a particular product either. <br /><br />Thanks!<br /><br /><br />Sent from my iPhone using Tapatalk
-
You have your own ventriloquist figure....and no need to keep your lips from moving as you talk!! Sent from my iPad using Tapatalk
-
Not symmetrical. 3 ammo boxes on the inside of your leg and 2 on the outside. Should even up the excess you are referring to. Sent from my iPad using Tapatalk
-
Max, that was what I was referring to earlier in your build when you asked about length of elastics and possibly wasting snaps. Any elastic you use doesn't have to have snaps on both ends. Glue one end and put snaps on the other. I think that will work great for your shoulders and give you the flexibility to make the elastic whatever lengths you would like and not dig into your shoulders. You are looking really good by the way! I have a significant gap between where my chest and back plate meet because I am much taller and needed to close the gap from back to kidney. I am glad you are doing this build thread because it is helping many ppl out! And I am also seeing you provide input to other troopers on their build threads. Just awesome! Sent from my iPad using Tapatalk
-
Yeah 3 boxes on the inside of thigh and 2 on the outside. Sent from my iPhone using Tapatalk
-
Differences between armor styles?
JLight replied to Grimez's topic in Hard Armor (General Discussion)
http://starwarshelmets.com This website explains a lot about the armor types. ANH and ESB are the most similar but there differences. Mostly between helmet, handguards, blaster and holster. ROTJ is really different in placement of shoulder bells and the trim or edging around the armor. You could also just check out the many build threads here listed under the different styles. Or look at the hundreds of screen shots from the movies. ANH is by far the most popular. Sent from my iPhone using Tapatalk -
TK-29066 Requesting ANH Stunt Centurion Status [TM*][117]
JLight replied to SorenM's topic in Request Centurion Status
Beautiful! Shouldn't holster straps be tan though? Sent from my iPad using Tapatalk -
You can always have one half of the straps glued on and the other end utilize the snaps. That way it allows the armor to be broken down for transportation, but if you have too much slack, you could rip up the glued end and tighten it and re glue. No need to have all ends of the straps be held with snaps. I learned that about halfway through. Sent from my iPad using Tapatalk
-
Personally, I see gaps from cover to end of belt in all 3 of those photos. I think what you have now is good. For what it's worth. But now you have created more work for me since I am so OCD and I missed this on my own belt! Great job! As we say, troopers helping troopers! Sent from my iPad using Tapatalk
-
I see a gap on both sides of the cover on Hans belt. Meaning cover to edge of belt and cover to ammo box. It's a very small gap, but a gap. However, Mathias is the pro, not me. Sent from my iPad using Tapatalk
-
Never can be reminded of that enough. Thanks Mathias! Max, have you glued your end rivet covers yet? I would move them closer to ends of belt. Maybe even center them with the last ammo box and end of belt. Then cut the corners. There is a slight gap on either side of the cover which is especially noticeable on Hans belt. Hope that makes sense. Good job trimming the top and bottom of belt! It darn near looks perfect. Sent from my iPad using Tapatalk
-
Interesting. In both the screen shots, you can see a slight gap between rivet cover and end of belt. It's small but it's there. Either way, I went according to Billhags template and his shows 3/4inch from center of rivet cover to end of belt and that now seems like too much of a gap. However, it may need updating. Sent from my iPad using Tapatalk
-
As for your previous post, yeah I did Velcro on shins and that was the only place. I used the hand tool for all my snaps except the ones that were on ab plate for the belt. There I used what you showed because there's not enough room for the hand tool. As posted above, you can decide whether to have the side rivets be functional or not. But if even thinking about EIB (which you should be), the rivets need to be there. Way more accurate--functional or not. Besides, even if you do measure ten times and cut once and mess up, the hole can be patched. It will not be the end of the world. You can do this. Continue to PM me with questions. Sent from my iPad using Tapatalk
-
No don't trim end of belt to be flush with rivet covers! There is a gap. Sent from my iPad using Tapatalk
-
You should be able to feel the crimp on the snap and that's when you know you've pushed enough. I know you don't want to puncture the armor, but you have to step out on faith, measure twice and cut once or else the suit won't look right. I mean I guess you could put the whole thing together with Velcro and the supplied straps, but I wouldn't. Too much variability. You want the suit to look and fit the same everytime. Sent from my iPad using Tapatalk
-
I know you want the instant stormtrooper suit, but you will find joy in the journey. At least I did. So take your time and do things right. If you do get stuck you know where to search, how to search, and who to ask. When I was growing up, knowing was half the battle! Lastly, we at Garrison Tyranus can help if you run into a snag. Sent from my iPad using Tapatalk
-
I just used the booking water method last week on my forearms. Worked great. Once it's boiling, I left the piece in for about 15 seconds maybe then took it out where I had a towel laying on the counter, wrapped the towel around the piece and bent it and held it until it cooled. It allowed me to close my forearms with a cover strip that was fully sealed. Sent from my iPhone using Tapatalk
-
I have not done this. If I see a need to do so, I will because I'm very picky. But with the rivets and snaps it seems to bend pretty easy. Sent from my iPhone using Tapatalk
-
Oh and don't forget to put your drop boxes on before you rivet the ammo boxes to the canvas. They should be attached using 1 inch white elastic looped around the canvas and riveted to the back side drop boxes. Sent from my iPhone using Tapatalk
-
1. Put your belt end to end and put a slight crease in the loop. That will be the middle and where the middle rivet will be placed to go through the plastic and canvas. 2. Your measurements look good. 3. All 3. 4. Not fully understanding but you do want the plastic to be centered on the canvas. Meaning don't line it up from the top of bottom. Center it. Yes the NE belt is slightly larger than the canvas. 5. Put your female snaps on the underside first, then attach the plastic to canvas and glue on rivet covers. Use a grease pencil to go over those female snaps so when you lay your belt on your ab piece, it will leave a ring. Therefore you will know exactly where to drill for your male snap. Sent from my iPhone using Tapatalk
-
Thigh piece a little 'pinchy' on the inner part?
JLight replied to maxsteele's topic in Assembly, Mods, and Painting
Just a bit at a time. The fact that you are worried about screwing it up means you probably won't. You have taken a lot of time to think it through. Thanks for the compliments on how my suit fits. Still have tweaks to do because I don't have a lot of mobility. Sent from my iPhone using Tapatalk -
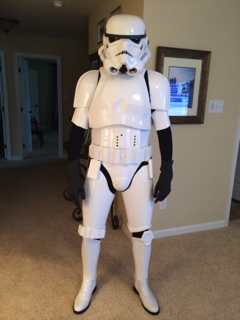
Yeah so I also bought NE armor not knowing it was recast. I did a lot of research and it was never brought up. I too am making it the best I can. Also having issues with thighs and have to slightly turn them. But it's not too bad. Here is a photo of fitting without the forearms and completed gloves. Sent from my iPhone using Tapatalk