

Brent
-
Posts
196 -
Joined
-
Last visited
Content Type
Profiles
Forums
Gallery
Articles
Everything posted by Brent
-
 Amazing work Andy! I'm looking forward to seeing these soon. I'm going to the filming for The Gamers: Hands of Fate Tomorrow. Unfortunately the cylinders haven't arrived yet . The filming goes for three days, so there's still hope I can get them in time for some of the filming. In typical Star Wars fashion, they may appear and disappear between scenes . I also want to give a real big thanks to Andy for pushing up his timeline to get these ready in time for the filming. He has been incredibly helpful, and I'm hoping I get to use this as an opportunity to show off his work. If I get a chance to be on film I want to show the best FISD can offer, and Andy's cylinders are certainly top notch. Fingers are crossed, I really want to get these in there. I'm watching the mailbox, and I'll post as soon as the set arrives.
 -
The trick is to match the helmet quality to the armor, that's what makes it look so natural
-
Be sure to set the standard in your neighborhood!
-
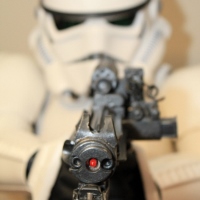
Now I've added the false bolt. Here is the plastic with a strip of aluminum glued to it. After the paint job:
-
I finally worked up the guts to cut down my nice magazine. I used a 6" cutoff wheel to cut down the main magazine. I then ground down the front and back a millimeter or so with a dremel and bent the edges of the top and bottom slightly out so that the end cap would slide back on. I shortened the spring too, so the magazine should still be functional. The end cap won't easily come off anymore, it's pretty solidly pressed on there.
-
Go slow. Try it in front of a mirror first so you can figure out how you need to bend your legs. I cracked my cod a bit sitting, so don't be too surprised if you need to do some repairs.
-
I made a little more progress. I made an L-Bracket for the counter using some additional scope rail material. I put a couple of holes in it that allow me to screw the counter to the bracket. I then J-B welded the bracket to the rail. I also added t-track I got from @Marv. T-track is a bit of a pain to attach since it needs to be cut down and the ends needed to be filed a bit before they fit in the hole. Then I invariably find that It's slightly too long and the track doesn't lie down flat. I figured out that if it fits close, but not completely flat, I can hold it down with leather gloves and apply a little heat to the ends with a heat gun. The track then stays place exactly where you want it. Work still to come: cut down mag, false bolt, cylinders, paint. I have a couple of questions I'm hoping someone can help me with. Was the scope rail painted? When going through screen shots, I seem to see a lot of metal around the rail. I haven't yet found any clear examples of a painted scope rail. I haven't done a very deep search yet, but here are some clips from my initial findings (some of these are the same blaster in a different frame, I wasn't really cataloging my screenshots as I went) All the replicas I've seen have had the rail painted black though. Has this been discussed before, and what have been the conclusions? Was the bolt ever covered by tape? I recently read on parts of Star Wars"The bolt, where it shows through the oval cartridge ejection port on the right side of the gun was then covered with aluminum or chrome tape" This seems to only be confirmed on the "A2" variation, which also has the wires. I haven't been able to spot that one in the movie yet, so the tape may be a similar promo only feature, but it would be very convenient for me of tape was screen accurate. If anyone can point to an example of that in the film I may go that route and it would simplify the work I need to make a false bolt.
-
I think the groove is just the way that the Doopys kit adds on to the Hasbro. The basic Hasbro scope front is pretty bad, so the Doopys mod has you cut it off and cover it with a couple of resin pieces. The Doopys addon comes in two resin parts which are the front detail with the screws and lens, and then that little bridge piece, which is basically an adapter to the Hasbro but give it a bit more of an M38 shape. All-in-all the Doopys kit does a pretty good job of making the Hasbro scope look like an M38 with just a couple easy to attach parts.
-
For EIB, yes. The Hasbro with Doopydoos add-ons is accepted for EIB. There were two basic styles of scope in ANH. What you have on the Hasbro is the same style as the M38 scopes; like the one on the right in this picture. The other style is a bit shorter like the one on the left.
-
You may also want to check with your CPA to see if there is any difference between a function hosted by a charity (Children's Hospital) and a function that benefits a charity (comic book store that makes a donation in your name). It seems like it would be pretty easy to fall in to a grey area so be careful.
-
TK-6726 Requesting ANH Stunt Centurion Status[ATA*][60]
Brent replied to JEDISTAR's topic in Request Centurion Status
There are some great reference pictures for the sniper plate here: http://www.whitearmo...nee-a-new-hope/ The plate just goes down straight against the knee without bending back in. -
ANH E-11 Build: Real Parts
Brent replied to mr_sparkle's topic in Build Threads Requireing Maintenance
If you are looking for cylinders start here: http://www.whitearmor.net/forum/topic/17306-3-central-fuses-on-e11-blaster-cylinders Andy doesn't have a sale thread yet, but he's getting close. -
TK-6726 Requesting ANH Stunt Centurion Status[ATA*][60]
Brent replied to JEDISTAR's topic in Request Centurion Status
Nice job! Try posting the pictures to photobucket and linking them using [img=http://path/to.jpg] -
No. We are a 501c7.
-
If you can't find one you can try making your own. This is from the Best Sterling Templates Ever thread. I got a piece of scrap plastic from a local plastics store and cut out the shape with a dremel. Then I heated the plastic in a stove and formed it with some leather gloves over some wood and bent metal that I cobbled in to the right shape. It's a bit of work, but it's doable.
-
I found this while looking for TK soundbites: -------- I'm wondering if anyone knows the origin of the trooper image they have? Handguards are ANH, and the helmet looks like ANH hero. Holster position is ANH. You can see the screw mounting brackets in the chest plate, but the chest plate has a bottom curve that I didn't think was in ANH (correct me if I'm wrong but I thought the curve changed on some armor in ESB like in the left vs. right trooper here:----------- It's a pretty good quality picture, so if it looks like those are pieces from the archive it might be a good reference.
-
Now that I've practiced a bit I will sit down carefully. Sometimes you just need to rest your feet
-
Get untrimmed. Trimming is probably not for everyone, but if you can work your way around woodworking projects, you can certainly handle plastic. It's different to be sure, but you already sound like you will be more then careful enough to be comfortable. It's a good learning experience, and you will be a lot more familiar with your armor and comfortable with what it can handle and how to do repairs if you spend the time to trim it yourself. When I started out every cut was terrifying and I would shave it down just a millimeter at a time. By the time I was done trimming I was ready to eyeball my trimming and moving fast. For tools: lexan scissors and sandpaper were my primary tools. I also used the sanding wheel of my dremel when I needed to trim back stuff that was too thin to cut and too thick to manually sand down. Lots of people also "score and snap" with an exacto knife.
-
TK-5981 Requesting ANH EIB Status [ATA]
Brent replied to dcr5595's topic in Request Expert Infantry Status
First off: welcome to FISD! You've got a good looking suit These aren't EIB requirements, but I have a couple of suggestions for you: 1. Your belt looks to be rotated a few inches off center to your left. 2. I had the same issue with the sniper plate going up in the thigh. A little padding in the back of the thigh made a big difference in keeping the plate on the outside. 3. Your drop boxes look like they have a bit of edge in the back that could be trimmed tighter. 4. It looks like you occasionally have your bicep overlapping your right shoulder bell. Maybe bringing the right bell a little closer to your shoulder would help? 5. If you really want to get picky, your forearms could probably be cut down to be a bit narrower. Great job, and good luck with EIB. It looks like you already have some Centurion details ready too if you want to go there. -
There was a pretty good thread investigating the iPhone earlier: www.whitearmor.net/forum/index.php?showtopic=18998 I use a Windows Phone rather then an iPhone, but they basically have the same problems: 1) Audio routing to a private headphone and a public loudspeaker simultaneously is not generally supported 2) Bluetooth introduces significant latency (ok for remote calls, but very awkward for a loudspeaker) 3) Input options for external buttons (ab plate/glove) are limited and may not be exposed to an app 4) Output for fan controls is also limited 5) You would still need custom hardware for FRS 6) Camera position is fixed relative to the phone making it hard to keep hidden and still use the camera That said, I still think using a smart phone for at least some of the functions is a great idea. If anyone can figure out how to overcome those hurdles a phone is probably the easiest path to a compact and reliable platform.
-
Possible: absolutely. There's really nothing in that list that can't be done by a modern smart phone. It's just a matter of investment. I've been thinking of this for a while and I've broken out the problem in to a few stages where I think I can get this pretty cost effectively. I'm planning on using a platform approach where features can be added gradually. I'm hoping to have stage 1 prototyped in the next week or so. (hopefully by Star Wars Reads day, although I may be a bit overly optimistic) Stage 1 components: a) Aker amp. Chest mounted Microphone. I'm using a throat mic, but it could be anything c) Earpiece. For private communications and system sounds d) CPU. I'm using a Raspberry Pi ARM based Linux computer. e) Input button. I'm planning on an in glove button initially, but this may expand to ab buttons. f) Rechargeable power. I'm using an 8000 mAh mobile phone charger Stage 2 components: a) Real Time Clock. For spoken time and alarms Wireless Button. The plan is to use a torn down wireless mouse c) Fan power supply d) FRS/Cell switch Stage 3 components: a) HD USB webcam Video HUD For Stage 1 the microphone will be directly connected to the amp. The CPU will have two audio channels, a private one to the earpiece and a loudspeaker channel to the amp. Double tapping button presses will cycle through menu items, and the current menu item will be announced to the earpiece. Single tapping the button will select a menu item, which will either go deeper in to the menu structure, or will cause an action. For Stage 1 actions are just playing MP3s over the loudspeaker, and possibly also changing volume. Stage 2 would allow additional actions like reading the time and toggling fans. The wireless button could be installed in a blaster for trigger driven sound effects (or photos as you suggested). A custom daughter board for the Raspberry pi would probably be the best route to enable clock, FRS, cell phone, and fan controls. Those features may need to all be batched together to make that work, but since it will probably need a custom board those will take more time to put together. Video/Image recording can be accomplished by using a USB webcam, although I'm not yet sure what frame rates/resolution can be achieved with the limited compute capability. The trick here is hiding the camera in a way that still allows it to be connected via USB. The Raspberry Pi has video output as well so a modified Heads Up Display could be used for previewing webcam images. I haven't found a good source for cheap displays that I could mod in to a helmet yet. I've seen some that people have hacked together that would work, it's just about availability and price. I'm looking for good ideas on getting a wire from the chest to the helmet. I agree that no cable is best, but I'm not sure if it is feasible to have all of this in the bucket, so it would be best to have an easy connect/disconnect cable that can be operated in gloves. So far my plans are relatively cheap since I'm using mostly off the shelf components. Paul, if you are interested in working with me on this let me know. I'm willing to give building the ultimate TK-CPU a shot. The biggest stumbling block is just how much time it will take to get going.
-
For fan control I was thinking of what type of connector to use going in to the helmet. I would want it to be easy to attach/detach with gloves on. Does anyone know if you can get a magnetic connector like Apple uses for power supplies? Ideally you would want to run enough pins for at least fan power control + mic audio. Any other ideas?
-
Have fun building your blaster. It's a great way to spend the wait. The sky is the limit on the mods you can do to your Hasbro. I used Bondo when I needed to fill gaps like the screw holes. You will also want sandpaper to smooth out the Bondo after drying and to scrape off the logos and warning text on the Hasbro. I also found that in addition to E6000 some CA Glue (super glue) is handy for some of the small parts. E6000 is great, but it takes a really long time to cure which means you need to have the parts held in place for 24 hours. CA glue is almost instant but it is more permanent. You should definitely have it on hand for repairs. E6000 is probably more important for the armor where you will have potential adjustments in the future. On your blaster, once you have something set in place you will probably not need to move it. I used both, and it if you have never used it before it's good to try it a bit before you build your armor.
-
I used it in the living room and the smell passed pretty quickly. I found that it would squeeze out from under my coverstrips a bit when clamping. After clamping I found it necissary to wipe up the stuff that squeezed out with a paper towel while it was still wet. Once dried the excess is a bit rubbery like hotglue. The long dry time gives you plenty of time to clean everything up before it sets. I am very glad I used E-6000 though. For the most part everything went together well, but after a few troops I'm already ripping some of it up to make adjustments.
-
I've only sat on a chair in front of a mirror with my bucket off so far. This was good practice, so I think I could do it without falling over and hurting myself on a troop. On the downside my cod developed a small crack which is probably related . It's relatively minor damage, good thing for me to learn how to patch my armor on.