

Brent
-
Posts
196 -
Joined
-
Last visited
Content Type
Profiles
Forums
Gallery
Articles
Everything posted by Brent
-
I think that will be my preference. I'm still trying to work out how to form the top Bondo and drill the holes and still let it split in half for painting and reassembly. I'm thinking of separating the two halves with some thin strips of plastic. Perhaps I can take two strips of plastic glued together lightly with E-6000 and put them in the middle, and fill the Bondo around it. Then after creating the top row of holes I can snap the plastic pieces apart with an exacto knife making a clean split down the middle. I could then paint both halves separately and reassemble. It would be very nice to be able to open this thing up in the future as well, especially if I include custom electronics I had heard about the scotch tape before and I test fitted it before annihilating my scope end piece. That looks like a great solution. Femtrooper Julie mentioned using a magnifying glass from Radio Shack with the scotch tape roll. I picked up a magnifying glass set that looks like it will do the job. I'm not sure how I will put it all together yet, but I'll post more when I get to the reassembly stage.
-
Sunday, day 2 of my Hasbro work. I still needed to sand down the newly Bondo'd right side. This time I used a ruler wrapped in sandpaper once I got the big chunks off with the dremel. It came out a lot cleaner. As expected the two sides did not fit cleanly together. I just mashed them up against each other and sanded down the thick parts until it started fitting. Unfortunately a peice chipped off in this process. On the plus side, it's just Bondo and is easily replaced. I'll take care of it the next time I have the need to mix up some more. Lighting Experiment I was a little disappointed with the lights and sounds on the Hasbro after I discovered that it only had one LED at the tip. It seemed like the red side pieces should light up through the holes. I thought about adding a few more red LEDs in parallel with the tip LED to provide a little more effect, but I'm pretty sure they won't be very visible. Especially since most of the holes will be covered in t-track. So if I wanted any light to shine through at all, it's got to be brighter. In the immortal words of Tim Allen/Taylor "More Power!" I went to my local Fred Meyer in search of something that could light up the inside of the tube. They had some LED road flares the looked about right, but they weren't very bright in the daylight. I then found this thing: It's some sort of flash light that contains a fairly bright array of 24 white LEDs and it runs on 4 AAA batteries. I split it apart by hand and worked on wiring it in to the electronics. The power to the tip LED wasn't enough to drive it. I found a place on the circuit board that was enabled at the same time as the tip LED, but had a bit more voltage. I think there is a current limiting resistor between that point and the LED. I couldn't remember enough electronics to sort this out myself without doing a bit more research then I wanted to spend time on so I enlisted the aid of a friend of mine who helped me prototype out a switching mechanism using a resistor and a discrete PNP transistor. I tapped the point on the board I had noticed earlier and used the transistor to run power straight from the battery to the LED array. It works great and the lights come on at full brightness. To fit the lights in the barrel I split the LED array up by scoring and snapping it in the middle, and using the dremel to cut off the ends. (Do not breath the dust coming off of this thing) I'm thinking of mounting them similar to how I show above. I'm not entirely decided yet. They are bright, and as they are I think you will see a flash coming out of the holes and along the t-tracks. It might be good to cover them in a red film of some sort to alter the color. I'm not sure if that's necessary or not and it might get in the way and reduce the brightness. One big puzzle I have to work out is how I am going to close this up exactly. My plan so far is this, although it is obviously not ideal and may need some tweaking: 1) Spray paint the interior with a metallic base coat. 2) Mount electronics 3) Fill in top gap with Bondo and seal the gun up 4) Sand down Bondo from outside 5) Drill top row of holes * this is where it gets a bit weird, but I'm not sure of another way to spray paint the newly finished exterior without painting the electronics reflective paint on the interior * 6) Put a thin balloon in the holes and inflate to fill the interior of the chamber 7) Paint exterior with base coat and final coat 8) Pop and extract the balloon I'm open for suggestions. Experimenting with using Bondo for the top of the tube, and trying to fill the tube with electronics may be a bit at odds with each other. But it's all about learning. Even if I do a custom build I may have an instance where I want to mask the interior of the tube while painting the exterior around the holes, so it would be good to find out if this trick works. This concludes day 2. I probably won't have much time to work on it until next weekend, so until then I'll just try to plan what I'll do next.
-
Starting out. Initial gun, right out of packaging with screws removed. First thing to do was apply the dremel to take off the orange muzzle. Since I have some things I want to do in the guts I needed to split it open. I tried the screwdriver technique to get the scope cap off, but my Hasbro wasn't having any of that. I gave up and dremmeled the scope cap off, and it looks like there was no way that glue would have given to the screwdriver. The thing was fused on there solid. Once getting the scope cap off I discovered that the scope rail and top t-track fin were also glued. The scope rail came apart with a little prying with a thin knife blade, but the t-track did not give so easily. When I attempted to separate it cracks formed along the edge of the track, and I was worried they would extend in to the body of the barrel. I eventually gave up on being ginger with it and forced it open. There was a little damage, but it wasn't excessive. I probably could have got away with sealing it back up that way, but I had another idea. I had already been tempted to remove the built in t-track and put in new holes and t-track for a somewhat more detailed effect, so I decided to commit and strip away the built in t-tracks. In that last picture you can see where I got a little too agressive with the sander and put a hole in the body. This was my first time using the dremel for sanding, and it's easy to get carried away. For these long straight sections I think I will refrain from the dremel in the future and stick with a block and sand paper. The dremel does make quick work of the t-tracks though. It might be a bit hard to see in this last picture, but my next problem was that under the top t-track the plastic is slightly recessed. If I simply sanded it off I would end up with a long hole going down the length of the barrel. To fix this I am attempting to fill the gap with bondo. I'm not sure if this will end up working since it is on a seam and I will want to have a row of holes in it, but I figured it is worth a shot. The worst that can happen is I botch the barrel so badly I need to replace it altogether, which while unpleasant, I'm pretty sure is doable (and I could get a correct length barrel as a bonus). While the Bondo was setting on the left side, I took to sanding down and prepping right side. After getting it to pretty much the same state, I started drilling holes. I used a hand drill with a small bit to start pilot holes. The problem here was that my surface was round and not very even (I need to work on my sanding). You can see that while I tried getting straight lines, the bit would shift when I started the drill and I couldn't get them to line up very well. I decided to scrap this approach and try dremeling with a template. I printed out the tube template from The Best Sterling Templates EVER! (Thanks ZeroRoom!). I lined up the template with a light and attached it with a little spray glue. I roughly dremeled out the holes with a cutting bit and then filed them out with a round file. They didn't turn out too bad. I've gradually been touching them up with a file every time I notice any lopsidedness. Once the Bondo had dried on the other peice I was ready to cut down the rest of the top t-track. I Bondo'd up the right hand side and let that harden while working on the left now. You'll notice a little more Bondo where I had patched that sanding hole from earlier. There are a few bubles in the Bondo as well as a pretty uneven edge. I'll have to apply more when I seal it up. I'm just hoping the Bondo will be strong enough to withstand drilling/sanding out the holes. We'll just have to wait and see! Next step was to do the same template cut and sand procedure to put holes on the left side. I left the third hole small. I'm not sure if I want to widen it out or put a bayonette bolt here. This concludes what I did on Saturday. I did more on Sunday, but I'll split that in to another post.
-
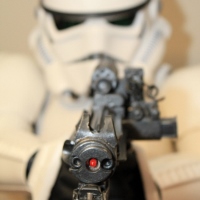
So I'm doing a Hasbro mod. My goals are to make an ANH EIB acceptable blaster, and learn as much as I can about building a blaster so I can do a scratch built or more accurate kit later. I'm new to most of the tools and techniques I will be using for this build so to a large degree this is a learning experience. I'll post what I've tried in this build thread so I can get some feedback from those that have done this before, and provide another reference to those that still want to try. Thanks to everyone who's posted build threads. I've looked at a bunch of build threads and every one has been an invaluable help for someone who's never done this before. A lot of the stuff on this forum is pretty inspirational and it's got me real excited to get in and start trying things. What I am using: Base: Hasbro blaster Add-ons: Doopydoos Hasbro modification kit (these have apparently changed over time, so I'll point out this one was bought in Jan 2012) Other changes I'm considering: Basic Doopydoos conversion Full set of barrel holes with a better t-track (I've already started cutting so I'm committed to this one now) Hollowed scope rail and sight Reshaping the trigger More lights in the barrel Metal hex screws in the front Some sort of improved rear scope end Helstringer wires Counter decal Reshaping other parts? Extending the barrel? Tools I'm using: Dremel 4000 E-6000 Bondo Sand Paper Spray Paint Exacto Knife Soldering Iron Misc. other (if you see that I'm using something interesting let me know and I'll add it to this list)
-
Hasbro must be watching the forums and improving their processes
-
Thanks guys. I've seen a few where people opened them up and others where they hadn't. Mostly this project is a learning experience for me, so my plan was to open it up and see about modifying the trigger, possibly modding the electronics, and figure out whatever other changes I might want to undertake. I had seen a lot of discussion about getting the back of the scope off, but nobody had mentioned having trouble with the other glued parts so I was mostly curious about whether others had hit the same issue or if some guns come more glued then others. Nice job on the weathering, lmr. Having never done a prop like this before weathering kind of scares me, but I'm working on overcoming that fear by trying some paint on some scrap plastic. A good weathering job makes these things so much more convincing. I just need to remind myself that dents in dings in the assembly process may add to the final effect. I'm with you Pandatrooper. My plan has always been to do the Hasbro and upgrade to a custom built later after learning some lessons, but the more I play with this thing the more I wish I had gone straight to a pipe build or full resin. Not that the Hasbro is bad, but I catch myself debating about how much time to spend on the Hasbro, when I really want to finish it off before my armor kit arrives. I've committed myself to doing completely custom t-track by completely removing the existing Hasbro track. I'll start a separate build thread with my progress so far.
-
I gave it another shot from the other end, but I couldn't find a way of opening it without damaging the t-track. You can see in the picture where the splits start forming as I try prying it open. I pushed through and finally got it apart. I'm not happy with the torn ends on the track. I had considered removing it and adding some other t-track anyhow, so perhaps this will force the choice for me.
-
Hello all, I'm starting off with my first Hasbro mod using a Doopydoos kit. I'm attempting to open it up and it is being a little more difficult than anticipated. I knew I would have trouble with the rear of the scope, and after hitting on it with a screw driver for a long time I gave up and attacked it with my Dremel. I would like to congratulate the adhesives engineer at Hasbro that put together that part, it was rock solid. Now I'm having trouble just splitting the thing apart. Along the rail in the rear I was able to use a knife to break the glue there. But I'm not having as much luck in the front. It seems to have some pretty solid glue here too, and it is starting to crack along the side of the T-Track when I try separating it apart. I can't seem to make much progress with the knife here. Has anyone else noticed that much problem with glue? Any tricks for splitting the front without damaging the body? Where it was glued on the rail in the rear, both sides of the plastic came up flat against each other. It looks like the majority of the rest body has a little alignment lip that would make it impossible to separate with a knife. I can't tell for sure if there is a lip along this top t-track piece or not.
