dashrazor
-
Posts
3,109 -
Joined
-
Last visited
Content Type
Profiles
Forums
Gallery
Articles
Everything posted by dashrazor
-
technical drawings

-
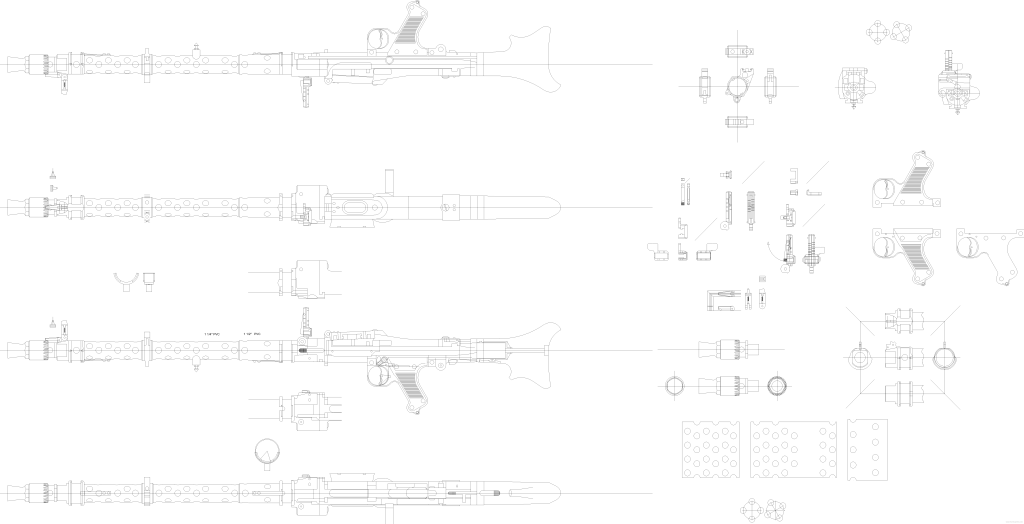
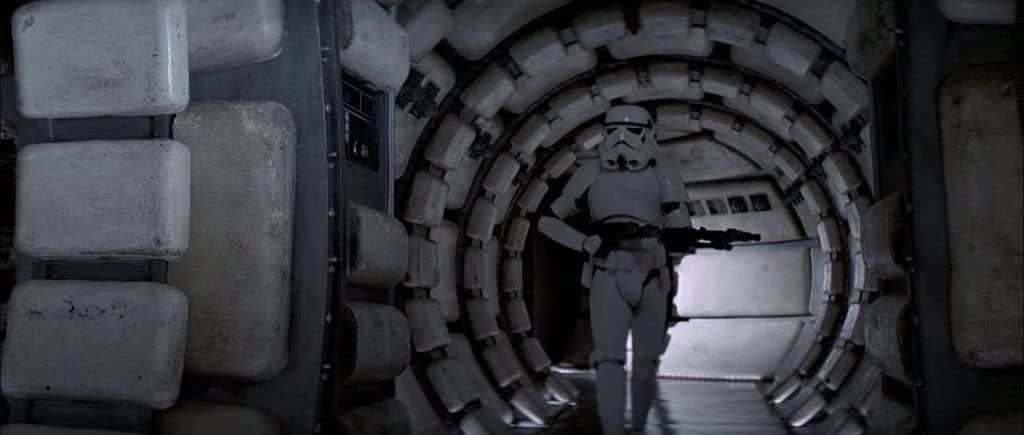
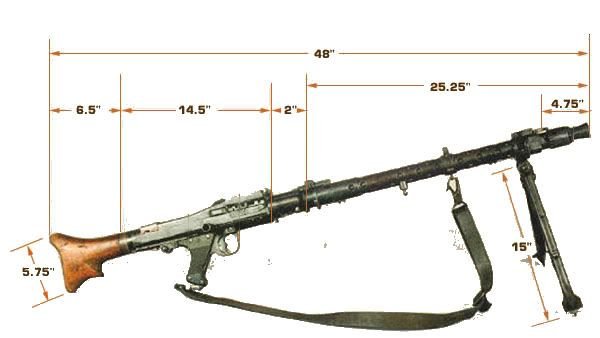
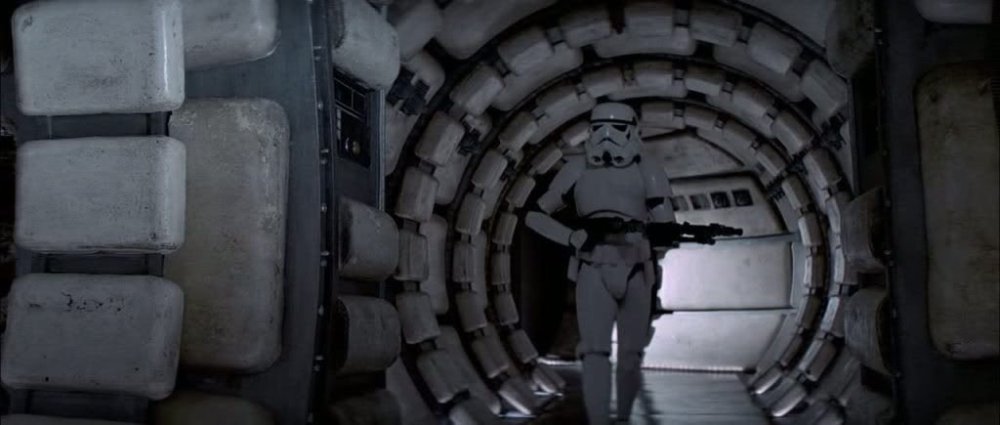
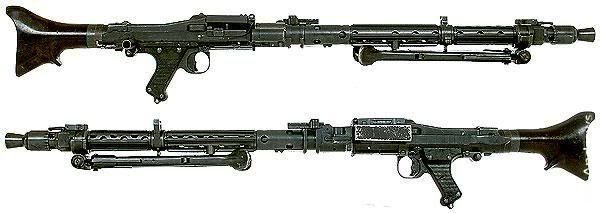
The ANH DLT-19 blaster prop was built from a The Maschinengewehr 34, or MG 34, was a German machine gun that was first produced and accepted into service in 1934, and first issued to units in 1935. in this advanced weaponry section i will provide references and blueprints on the original props base and components ANH DLT-19 heavy blaster rifle the DLT-19 is more commonly known for being used by sandtroopers, but it was also used by stormtroopers on the death star ANH stunt (MR no stripes) death star gun rack ANH hero with DLT-19 the main features the distinguish the ANH DLT-19 prop from a stock MG-34 are a conical disk on the handle, a metal box covering the ejection port and T-tracks on the barrel shroud. but first i will provide references and data for a original MG-34 machine gun


-
Shoulder Pouch Strapping
dashrazor replied to BananoPower22's topic in Build Threads Requireing Maintenance
thanks!! great video tutorial -
Frenchie Incinerator
dashrazor replied to stevechewbacca's topic in Build Threads Requireing Maintenance
i use tin snips as well for some trimming they come in sets of 3. LEFT, RIGHT and STRAIGHT cuts . i have a video of this as well but it is still on my camcorder <_< -
some clear images of screen used ANH blasters
-
the cylinders and wires are also unique to ANH blasters (also note the wooden block in the magazine) Approximate size of each cylinder: Length - 1 7/8" Diameter - 7/16"
-
the hengstler counter attaches to the side of some of the blaster seen in ANH replica blaster screen used blaster authentic counters many stormtroopers in ANH were missing there boxes and cylinders as well
-
the scope There different tank style scopes used in the OT. The numbers only indicate the scope style used, since there is no definite way to read the model numbers * M32 (matching model: M19) * M38 1942 (matching model: M40 1942) * M38 1943 (matching model: M40 1943)
-
-
-
-
here are some various blueprints and technical specifications
-
The ANH E-11 blaster prop was built from a British-made Sterling L2A3 sub-machine gun. in this advanced weaponry section i will provide references and blueprints on the original props base and components ANH E-11 blaster rifle the main features the separate the ANH E-11 from props seen in the other films is the Hengstler box and cylinders and wires on the magazine housing.. first i will provide references and data for a original sterling L2A3 machine gun the current base CRL states "BlasTech E-11 Blaster: Based on a real or replica Sterling sub-machine gun" for centerion requirements all major external details should be present as on a sterling or sterling replica (the parts do not need to function) all images were pulled from google image search and my personal collection
-
i was cleaning my furnace witch is next to my armor shop and i accidentally got some soot on my back plate when touching it with my sooty hands.. well the soot looked like really good scorched weathering so i grabbed my furnace cleaning brush and went to town on my armor... i have to say i was most pleased with the results so i made it permanent i sealed the black soot into the armors finish with a clear acrylic and this is the finished result i made a vid that shows how quick and easy this method of weathering is crushed up charcoal should give a similar result perhaps i plan to add this to the rest of my armor
-
Frenchie Incinerator
dashrazor replied to stevechewbacca's topic in Build Threads Requireing Maintenance
keep up the good work Steve!! -
ATA ABS vs. TE2 HIPS - wanna see?
dashrazor replied to Daetrin's topic in Hard Armor (General Discussion)
why do you tease us like this!!! ----------- -
Frenchie Incinerator
dashrazor replied to stevechewbacca's topic in Build Threads Requireing Maintenance
ahh!! you need a diamond bit for your dremel -
Gold Metal Socket Eagle Henstler
dashrazor replied to TK bondservnt's topic in Build Threads Requireing Maintenance
good work so far Vern, i was waiting for the rest to comment. it is cool to see the internals of the counter,, now i really need to get me one of those by chance does your camera have a macro setting? it could improve the blurred close up shots -
What is the official number od tube stripes?
dashrazor replied to budspencer1971's topic in Assembly, Mods, and Painting
you really should refer to the CRL for this kind of info from the ANH stunt CRL Blue tube stripes, matching what was used on screen - navy blue and black are not acceptable. There must be at least 9 and a maximum of 15. The curve must bend backwards. There does not need to be an equal amount per side. ----- -
Frenchie Incinerator
dashrazor replied to stevechewbacca's topic in Build Threads Requireing Maintenance
here is a pic of your armor. you need to remove the side edges before adding the trim -
Frenchie Incinerator
dashrazor replied to stevechewbacca's topic in Build Threads Requireing Maintenance
you need to cut the edges off at the bend,, my armor was like yours before i cut it.. -
if you can find the outdoor use acrylics you don't need to seal them.. just the regular acrilics should be sealed
-
well its my personal opinion and it is preferred because of my location and harsh weather prevent outdoor airbrushing.. i could order testors or humbrol offline but i hate to wait plus if i spill it or forget to put the top on im boned myself i try to work with materials i can find locally, unless there is no viable alternative
-
i use the craft acrylics like this ------------ you can get them in gloss for outdoor use as well.. i cannot get model paints in my area so i use what i can get locally.. if you are worried about the weather effecting it lust use a acrylic craft sealer i also use them because i can paint/airbrush indoors without the fumes you can also apply automotive wax after it dries to seal it more..
-
Frenchie Incinerator
dashrazor replied to stevechewbacca's topic in Build Threads Requireing Maintenance
i made this fast so don't laugh lol