gazmosis
-
Posts
4,043 -
Joined
-
Last visited
-
Days Won
23
Content Type
Profiles
Forums
Gallery
Articles
Everything posted by gazmosis
-
 Troop on with your bucket held high!!!
 -
nice!!
-
Hot water dipping these parts may distort the boxes themselves. That is just my thinking so if someone has manipulated these with hot water and had no problems, please say so!!!! You can bend both these parts specific to your armor. Place them on the armor and mark where the bend should occur. I have used this method with great precision and success: Hit is lightly on the inside with a propane torch set on LOW. just wave the flame over the bend point. This will heat up and distort fast if you are not careful!!
-
Supply list for your OT TK build....
gazmosis replied to justjoseph63's topic in Getting Started - Read this First!
Nice list!! Very informative and helpful. I would ad and consider a couple things: Although we promote film accuracy, it is not a requirement. The rivets should be moved to the optional section. You may also add that for ultimate accuracy, 2 speed rivets should be used on the thigh pack. 7 split rivets, 2 speed rivets. Many american companies advertise the snaps we use as "line 24 snaps with 5/16 inch post" There are other line 24 snaps with shorter posts that are not long enough for what we do. This may avoid confusion. If you are going to mention plasti-dip, you might want to add the brush on kind as well for those who might want a thicker coating. -
so cool! You look just like one of the two hosts!! OH!!! That's you in the TK????? My bad........
-
Don't be sorry. It's is not a photo requirement. IT is just an aspect of your armor that needs to be installed and if it is not visible, I just need to verify it's there. Thank you and congratulations!!!
-
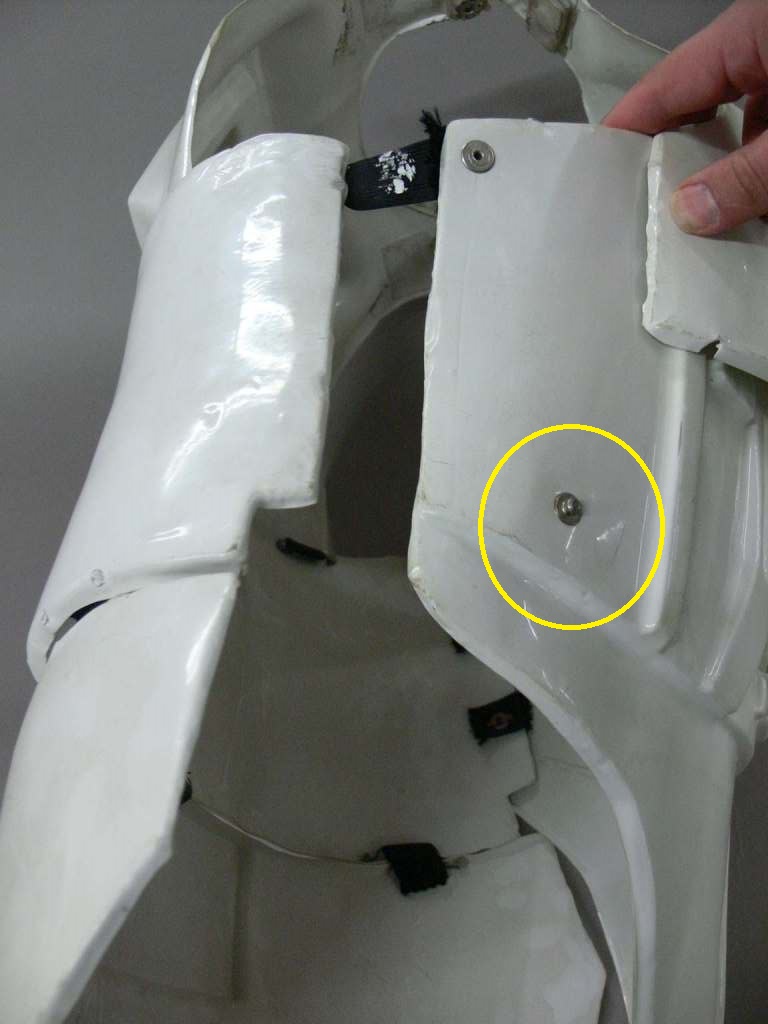
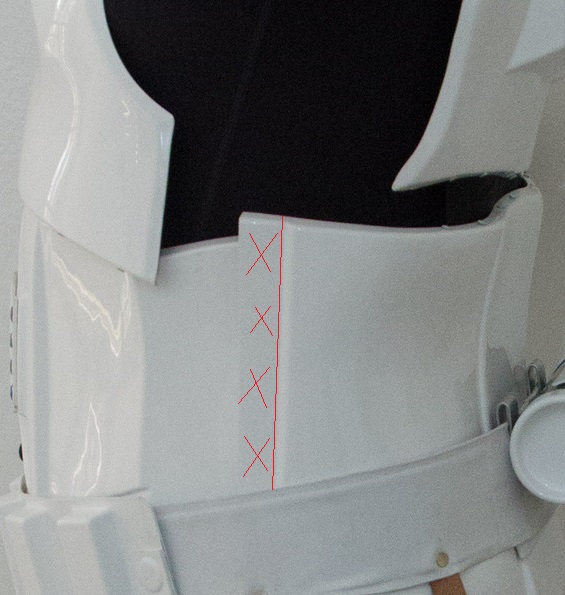
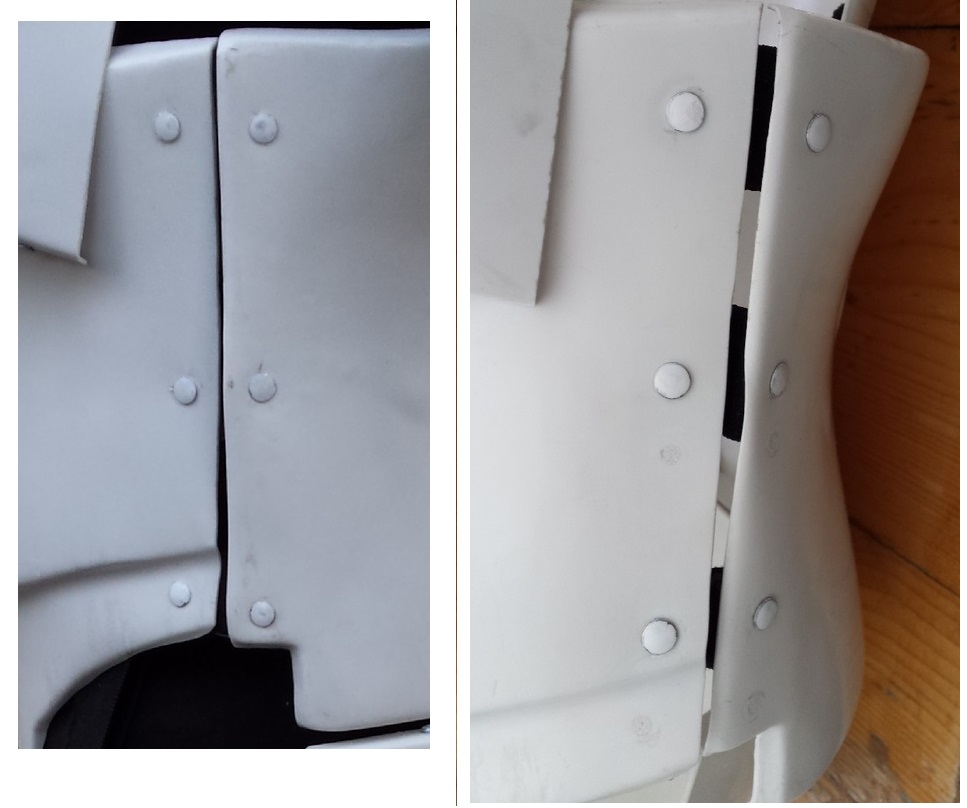
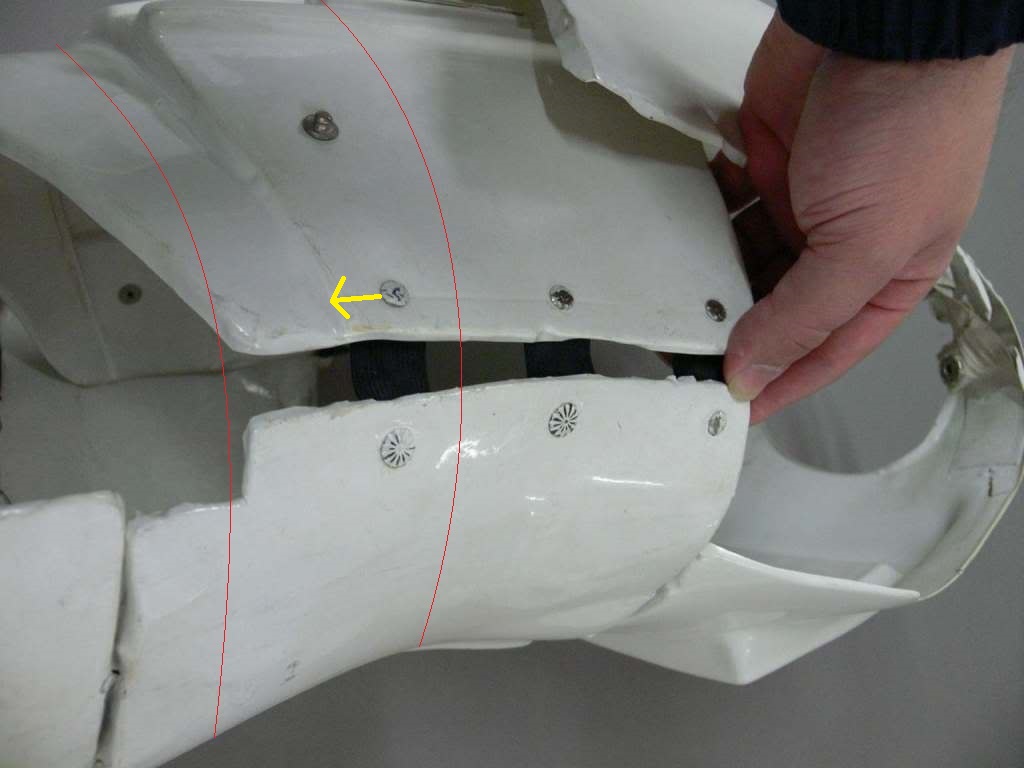
Hey there Ruben! Thank you for your application for EIB! Let's have a look at your armor!! CRL and EIB Application Requirements: All required photos have been submitted. As for the EIB requirements, there is one thing I cannot see and need confirmation of. Please post a picture of the straps on your shoulder bells that go around your biceps. If those are there, the badge is yours! If not, install that elastic, and the badge is yours! Other-Armor Fit/Assembly: In this section, I will discuss observations made bu your fellow troopers as well as my observations. Suggestions made here are to improve the overall look of your armor and will not affect any application. If they would, they would be stated in the sections above and below this one. You have a good, clean overall build. I am not sure regarding Tusken (Scott)'s suggestion about the rank stripe. You have them positioned correctly. Anyway, For your comfort, I would strongly suggest installing snaps to attach your belt to your ab. In one picture, your belt is falling way low. It should be positioned so that the top edge of the belt rests against or slightly overlaps the bottom of the button plates on your ab. I will touch more on this subject below in "Centurion Suggestions". You have the strapping brackets installed on your chest and ab. Why your chest is lifting up I don;t know. Perhaps the straps that connect the brackets need to be shortened? I will touch on this, too, in the section below. I don;t know if they can, but it would look soo much better if your thighs could be raised up about an inch. This might actually give you better mobility, too. The sizes of your ab buttons is good. They are just a bit rough around the edges. You can clean this up by rounding them off with fresh paint, or massaging the edges with a paint brush slightly moistened with paint thinner or a tooth pick. Centurion Suggestions: Centurion applications require a much more detailed set of photos. I try my best cover these suggestions based on the photos provided here, but ultimately, the accuracy is the responsibility of the trooper. It looks very much like you have Centurion in mind! You already have many of the specific details already installed. If you do apply, however, there are a few additional things you will need. Rubber chemical gloves Latex painted/ flexible handplates Make sure all the return edge that curves into the wrist opening of the forearms are removed. This includes the square indent ridge. A split rivet will need to be installed on the bottom of the cod. You will need to install an inward facing, male snap to the top, right corner of your ab. I said I would touch further on your waist belt. For Centurion, I like to see the belt in its proper position. To keep the top edge against the bottom of the button plates and KEEP it there, snaps are suggested. This pic shows the typical snap location in the yellow circle. It also shows the proper position of the male snap in the upper right corner of the ab. You will need to install 6 split rivets to your left side on either side of the ab/kidney plate side seam like this: I said I would mention your chest position one more time here. The proper position for your chest should be overlapping the ab even in the slightest bit. It should NOT be on top showing any gap. Adjusting that strap should be done to prevent that. On you blaster, Your Hengstler counter is mounted a bit high. I'd like to see it lowered so it rests on the side of the receiver body like this: Lastly, If this can be done, it really should be for a proper look to your sides. I understand you need the extra plastic that the NE kits provides. Many do! Most however, do not need the extra that is left on the kidney. I see a little overlap on your sides. I'd like to have you suit up and have a helper really tighten your belt. If the extra part of the ab can touch the cut line of the kidney seen here: Then that extra marked with re "x's" should be removed. Use the pic above for proper split rivet placements. Please don't hesitate to contact me if you have any questions. Post up that pic of your should strap for the bicep and that EIB badge is yours!

-
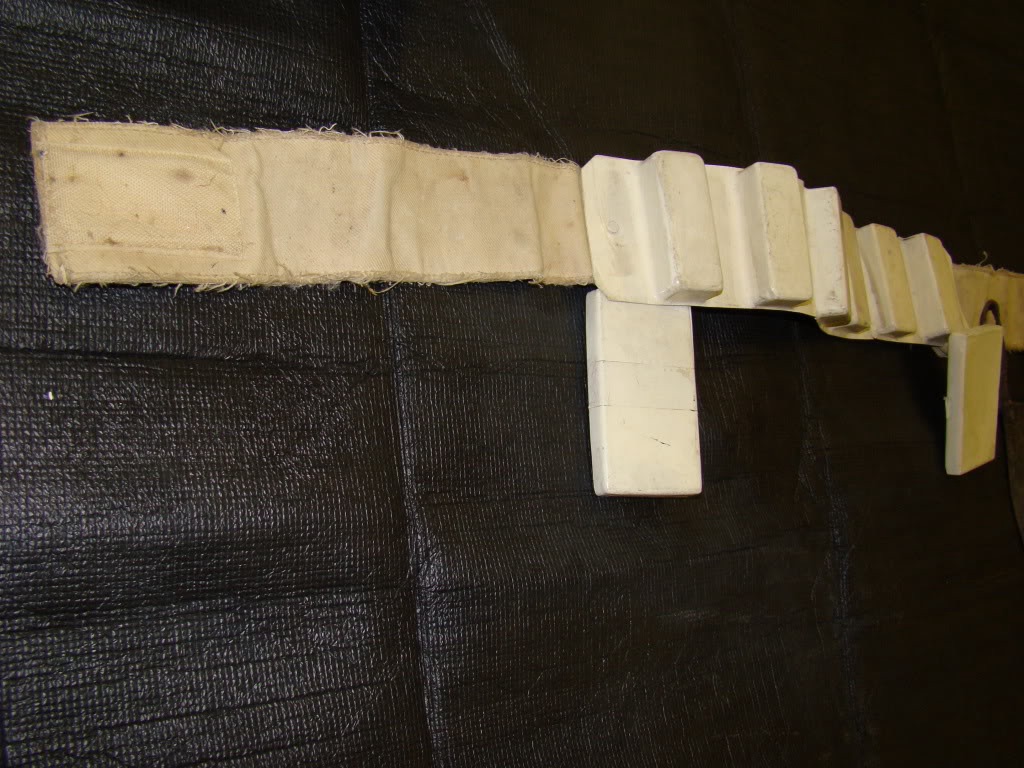
If they are using identical halves on both inside and outside shin halves, just assemble accordingly. They were different at one time.
-
Ok Marc!!!! This was a great application to be part of!!! I must say, you did some incredible work here!!! I do need to clarify a couple things regarding your left side rivets. First, it was correctly mentioned that the rivets ARE NOT something that is applicable to EIB applications. However, if they do appear and are featured in shots like the interior strapping, they are able to be mentioned in the "Centurion Suggestions" section if a repair is needed. Secondly, regarding the rivet placements mentioned in the CRL. Aside from the approximate 10 MM from the kidney/ab seam, the top to bottom placements are not mentioned. There are a number of other aspects of the Centurion armor that are not mentioned either. If EVERY SINGLE point, curve, return edge and color was to be mentioned, the Centurion CRL would be 20 pages long and close to impossible to follow. This is why we have as many photo reference pages available as we do and why we have all the Centurion threads to go back and reference. The pages featuring the archive photos of the original screen used suits leave little doubt how the suits should be properly built down to the last rivet or snap placement. The rivet placements as you first had them, were something I have not seen before. But what this is REALLY about, is your incredible recovery! Let's look!!! CRL and Centurion Application Requirements: All required submission photos have been posted, Your armor represents all required elements to qualify for Centurion. With that, I would like to congratulate you on this well deserved Centurion award!! Other-Armor Fit/Assembly: There is little I have to comment on regarding the overall construction of your armor! Thank you for getting on the corrections regarding your recessed rivet covers on the waist belt, your total re-work of your thermal detonator, your home made strapping brackets, but most of all, that side rivet location. This was a necessary change for one real reason: If your waist belt came up at all, the lowest rivet would show. this was NEVER seen. Not only did you accomplish this, but made the repair look smooth and clean. Almost like it never happened. Anyone would be proud of that!! Congratulations again!!

-
Hey Michel! LTB? What am I missing? http://www.whitearmor.net/forum/topic/11538-the-various-types-of-armor-and-where-to-find-them/ As for sizing and prices, It is HIGHLY suggested to read through that link. Take a measurement around the middle of your body around your belly button. You can contact the armor makers to find out their prices. Your body type can make a difference which armor you buy.
-
HAving a spring is actually not a Centurion requirement. It is cool you are going for that level of accuracy, though. Anywhere close to 10 coils is fine. I wouldn;t go higher than 12 like you have have it...it might look too bunched.
-
http://www.zackwhite.com/ Has anyone ordered from here??? Tandy leather sells 100 pack, 5/16" post, line 24 snaps for $65...this site has the same for $14??????????????????? $3/dozen compared to Tandy at $7 for 10???????
-
Correct white adhesive for elastics
gazmosis replied to Stig's topic in Assembly, Mods, and Painting
do you have a picture of those straps you cannot ID? -
IMHO, using two different finishes on the trap/tear and rank bar areas would look distracting. If the main area is gloss gray, why do the vents and outlines in flat? Satin (semi-gloss) black for both vocoder and hovi tips
-
TK - 99988 Requesting ANH Stunt EIB Status [ATA][465]
gazmosis replied to YESSRAM's topic in Request Expert Infantry Status
Take your time. I am way more interested in the best look for your armor rather than how fast you complete it. We aren't going anywhere! -
I just want to cover the other other side of what some might refer to as "perks". So far what we receive and are limited to are emotional perks. These have already been expressed with poetic precision(thank you Paul). As for physical perks ( gifts, free stuff) this should never be expected. Sometimes a host will be kind enough and insist that we stay for the rest of the game, or have something off the snack table, or grab a t shirt on your way out. These small scale gestures of appreciation are fine but should never be expected. Our rewards come from feelings we take home...... Not items
- 17 replies
-
- 13
-

-
TK - 99988 Requesting ANH Stunt EIB Status [ATA][465]
gazmosis replied to YESSRAM's topic in Request Expert Infantry Status
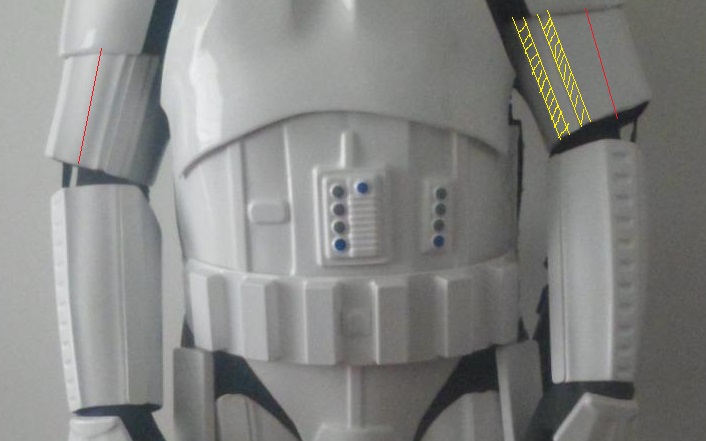
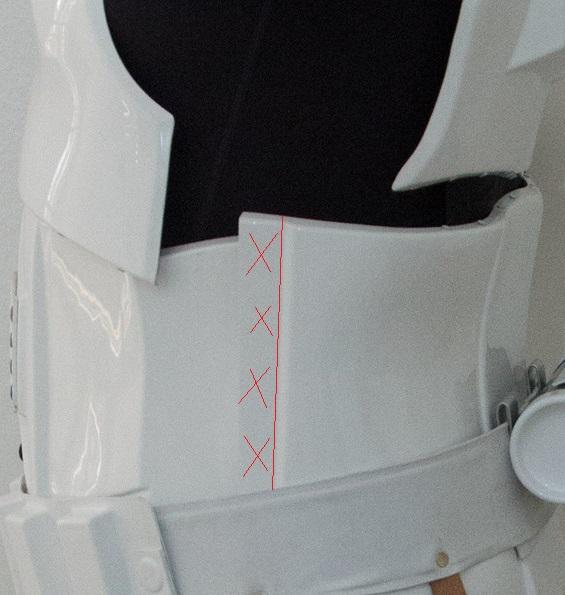
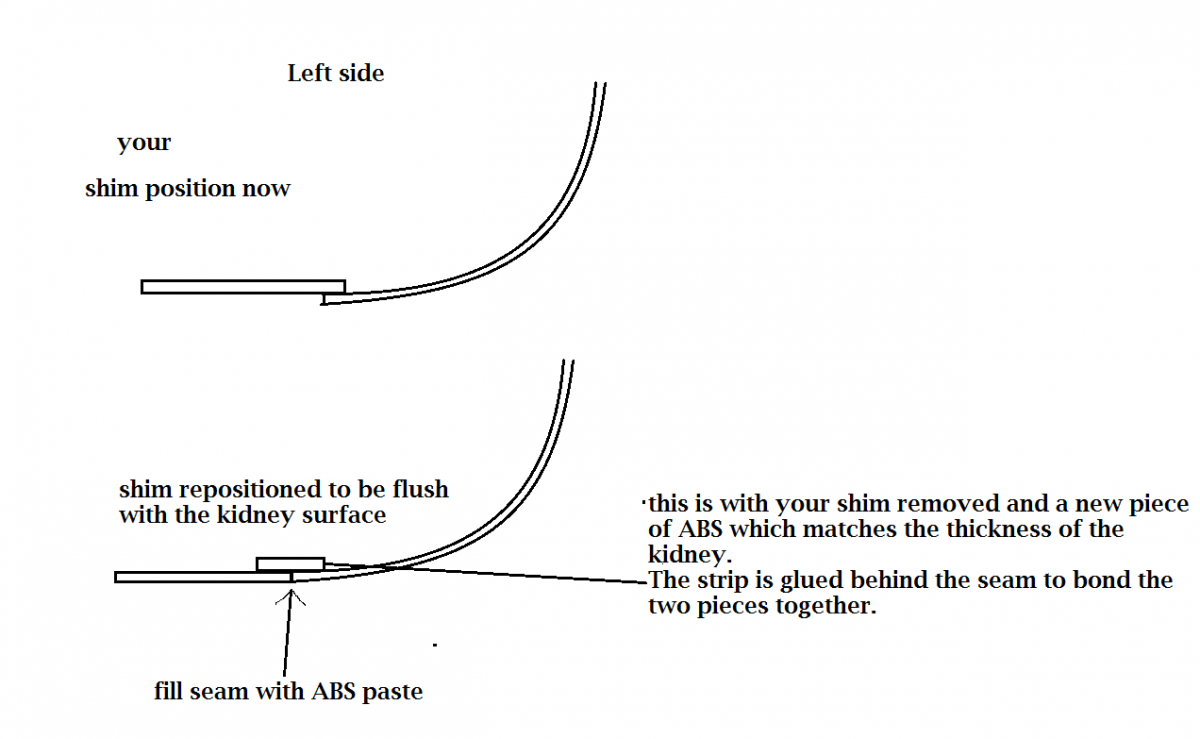
Hey there, Yessid!! Thank you very much for your application for EIB. Let's look at your armor and application! CRL and EIB Application Requirements: There are two pictures missing. The interior strapping and the cod to butt plate attachment. Please add those as soon as possible. As for the requirements for EIB, There are two main issues that need to be addressed. #1 are the gaps on your sides. These gaps should be no larger than 1/2 inch (12 mm). You should still have some ABS left from your build that would be enough to create shims. However, if this approach is taken, the rivets on your left side will need to be moved to the shim so the rivets are close to the seam and the holes repaired/filled with ABS paste. #2 are the calf openings in the back of your shins. You have them opening outward and they should open inward. This is actually a basic approval requirement so you got lucky by passing the first step. But as Scott mentioned, this is easy to fix by just moving the cover strip to the opposite half. Please see "Centurion Suggestions" for further discussion of your side shims. Other-Armor Fit/Assembly: In this section, I will discuss observations by both your fellow troopers and myself. If these suggestions require immediate attention, repair, or will affect any application, it will be specifically noted. Overall, you have done a very nice build. Aside from the enlarged opening at the front of the folding stock, your blaster is nicely done as well! I already mentioned your side seams, but the only other thing that really sticks out to me are the size of your biceps. You can really cut these down on both the front and the rear so that they are more proportionate to your body. I drew in red what I believe to be your arm. In yellow marks what can be trimmed on either side of the cover strip in the center. I didn;t mark the other arm so you can see it without markings. Again, this can be done on the back as well. There was a mention of how large your forearms were. You have them built on the right lines. ATA forearms are big to begin with. If they are huge on you, I have seen troopers cut material off the bottom so they fit better. This was the way the original ones were. But TE lineage armor has molded ridges on the bottom that weren't on the originals so it makes it more challenging. But if they are so big, perhaps you can remove all the ridge??? Although your tube stipes on the left side (looking at the helmet) are a bit uneven, they are positioned well on the helmet and aren't too distracting. Nice work on your ab button painting!!! You came very close to over-trimming the corners of your waist belt. There are still 1 or 2 millimeters of material along the top and bottom edges of your belt that if trimmed, might reduce the angles a bit. Lastly, I would install some kind of strap between your ab and chest to keep the ab from popping out from under the chest. You don't want that happening when dancing to "YMCA"!! Centurion Suggestions: Although I try my best to note everything I see, a Centurion application requires a much more specific set of photos that may show something not seen here, The trooper is responsible for the armor's final accuracy. I mentioned I would discuss your side shims further here. If you are to apply for Centurion, you will need to attempt to blend the seam of your shim to make it look like part of the existing armor. Rather than glued from under, a scrap piece of ABS is glued to connect the shim with the art making the surface flush. See pic: ABS paste can be mixed to fill the seam to make it look almost invisible. You will need to get latex/flexible handplates. I would like to see the top of your shoulders moved a bit closer to your ribbed shoulder bridges. These might be getting pushed outward by the oversized biceps. If those are sized properly, it might help the shoulders sit closer. If you remove your belt to take that little extra off the top and bottom, I'd like you to re position it so the top sits against or slightly overlaps the bottom of the button plates. This leads me to my next concern. Your rivet placements. There should only be two rivets on that side visible. Raising your belt MIGHT fix this. However, Proper placement may also be needed. This picture is of a screen used torso with the proper rivet locations. I placed marks in red to show approximately the belt location if it was attached. You can see how it covers the bottom rivet. I also show the bottom rivet placement compared to the molded ridge(yellow arrow points to it) on the ab. Is your in this location or much higher? Please don;t hesitate to contact me should you have any questions!!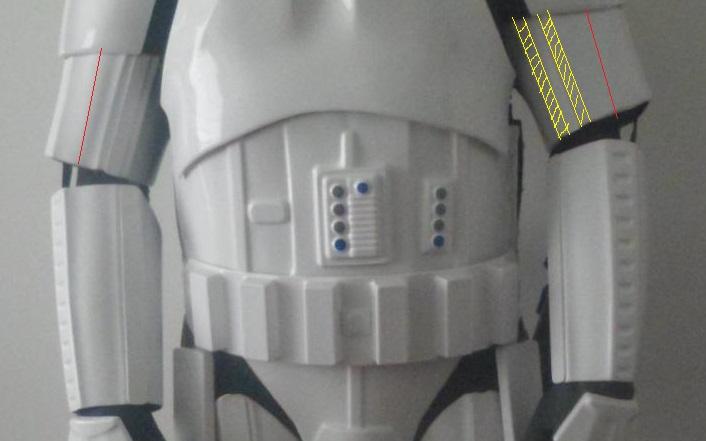

-
This wasn't missed, it never appeared on the EIB application photos to bring it up. I will do a complete review very soon!
-
It's not necessarily about your weight, it's about where you carry it. If the measurement around your belly button is 38 inches or less, you can fit into one of the other sets of armor like ATA or MTK or even RS if they left the sides extended.
-
Congrats on your successful acceptance!!! An official welcome to the 501st! A couple things concern me. First, your biceps and forearms look distractingly big. Are your guns really that loaded or were they built a little too roomy? Second is your waist belt. The vertical ends of the belt should be the same or just SLIGHTLY larger than the canvas belt width. This in mind it seems you have trimmed quite a bit off the corners.....maybe enough to consider a replacement. Note in this pic how little is actually trimmed off the corners By the way....many of your pics can't be seen. Is this just my Ipad????
-
What is your Kit?
-
Question about making centurion and a THG E11 Blaster?
gazmosis replied to Geektechlive's topic in ANH BlasTech E11
Just keep in mind, whether or not something "works" is a two part equation.....#1, does the base kit contain all the necessary parts that are shaped/molded properly? #2, has that same kit been assembled and painted properly? -
Use a spring from the inside of a click pen
-
Can you provide the link?
-
This is getting better and better!