Leaderboard




Popular Content
Showing content with the highest reputation on 06/14/2026 in all areas
-
Been working on this a couple of evenings a week, I'm not a fast worker and easily distracted. But as my niece is over for the next week and likes to touch all this is being packed up so I may as well write it up instead. Hopefully out of sight out of mind doesn't kick in again. I got some Novus polish and after a 1st pass realised I need to start again on filling the forearms. I have now done 2-3 passes and am slowly inching closer to flat. Don't think it will ever be actually flat but closer. ABS filling is an art, and one I am not great at. Getting better but I suspect this is going to be the weak point on this build. I seem to flip between too thin and too thick and completely miss just right on the slurry. Slowly getting there. I have now also built the abdomen up. When testing the fit I saw there was a pretty substantial step once the sides where in place so decided to add a shim to lift the sides up and get closer to a flush plane. Using some 1.5mm ABS from Amazon I added a layer along the length of the lip and the box. This was attached using pure acetone, I simply painted it onto both surfaces and then clamped in place. This welded it on solidly. I also drilled through the holes on the side panels before I glued them on. The pull is a little soft there and hard to see where to drill from the front once mounted. Shims done I glued the sides on more typically using E6000. I don't anticipate needing to remove it later but the chance to re do before filling was something I wanted. I did toy with welding these on but I don't trust my self just yet. Maybe on the shoulders. The seam is now more or less flush, vs a big lip to fill and deal with. A 2mm shim would probably have been better still but probably not worth worrying about. Need to clean up the remaining glue before ABS paste. This done I drilled out all of the holes for the resin boxes. I started at 2mm then offered up the boxed to check the marks lined up, bar one they did. This done I opened them up to 4mm with a step bit. For the boxes them selves I didn't really want to use the supplied self tapping screws. Instead I am using M4 threaded inserts. Using some calipers I measured how deep the resin was to not drill too deep. Then using a 6mm drill bit, to match the OD of the inserts, and a 3d printed depth stop I drilled them all out. And of course blew through on 2 holes This was filled with Milliput (epoxy putty) and I used the butt end of the drill as a form to stop it filling the whole thing, basically this meant I didn't need to drill again. Now they are sanded you will never know once painted. All holes drilled I dropped in the inserts. A couple holes needed a little more depth, blew through on the big #5 where the recessed rectangle is so that was also filled. For that there wasn't enough meat where the hole is designed to be so I filled the whole thing. I might drill 10mm or so in where there's a little more meat, see how well 3 work. The #5 box is a lot thinner so rather than buy some more shorter inserts I used some coarse sandpaper to sand off about 2mm. This proved to be faster than trying to use a file. To hold them whilst sanding I printed a quick holder with a grub screw where about 3mm stuck out so was easy to rub on the paper. The inserts are glued in with CA, applied using a wick tip to help with precision when applying. This wicks down the side and so holds it solid. I've offered up these to the ab and checked for alignment. About half are spot on, about half have wondered in the drilling processes. Not like I am doing this on a drill press with it all clamped up. Opening up the holes to 5mm fixed a few, but for a couple I'll screw the box into place mark the drift then use a dremmel to nudge the hole in the right direction. I am also going to be using some 3d printed ASA washers which will spread the load over the enlarged holes. On ones that I feel need it I'll use some ABS sheet to weld on some reinforcement. I also have some thicker washers where the shape of the armour curves mean the screw will hit weirdly. Finally, at least for the amour, I was looking at the resin drop boxes. I decided I didn't like how heavy they were so replicated them in Fusion and 3D printed some in a ASA. These will also use M4 inserts on 40mm centres. I was originally matching the templates until I realised the templates, like all of them it seams, didn't match the actual parts. The smaller box was printed solid in 1 part, the larger one I made as a box and a lid to make sanding the groove easier. All of this printed with no support, even the little slot for the lid to line up on. This shows the larger box: The slot in the lid allows you to line it up perfectly easily when glueing. Not glued yet, I want to prime them and sand that first. Will glue before colour I expect. I used ASA which was fine on the lid but there was a small amount of warping on the small, and large box. A brim helped a bit but there's still some there. That said if you get close enough to notice you're too close, get your head out of my groin. If you've read this far and want to know the weight saving: Resin: 370g, ASA printed: 118g (3 walls, 10% grid infill) so almost a 70% saving before I add the inserts. I have also resin printed the forearm rails in Elegoo ABS like which seems pretty tough from some other parts I've made, and dropped. I've also been working on the blasters but basically sanding, sanding and more sanding. Might need to re do a few parts I messed up gluing but there's amount of no one other than me would notice but I know.3 points
-
With huge thanks to @gmrhodes13 I started making my belt pouches. They aren't perfect, but it is a step in the right direction. Cardboard templates. Then pinning to make sure things line up. Then sown together. Sent from my SM-S938U using Tapatalk2 points
-
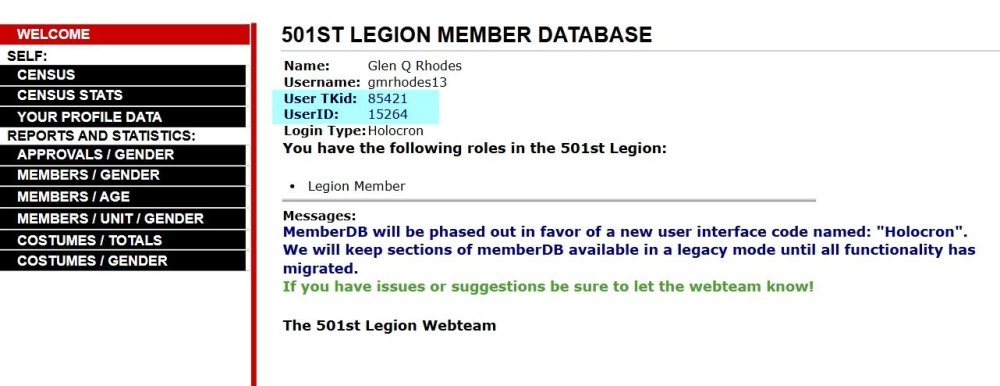
Please add both TKID and the User ID to your request, you can find this in the legion Holocron
 1 point
 -
Captains Dry Dock also did some, I need to make some as one DN ones is the wrong size for the plate. Not sure he posted them here, but the are on the First order build group on Facebook in the files section.1 point
-
Blocks and bungee cords, just like all the rest :)1 point
-
That's the way, give it a go, I'm generally surprised when I try something new and succeed, it's a great feeling1 point
-
The chest plate is finally done! I’ll be honest—I’m ridiculously proud of this piece. This thing has haunted my dreams for nearly 2 months. I’ve reworked it more times than I’d like to admit, and while I know “perfect” is an impossible standard, this is probably the closest I’ve come to achieving what I originally pictured in my head when I started this project. It’s been painted in Behr #52 Gloss White, which will ultimately serve as the finish coat for the rest of the armor as well. And that brings us to wrapping up the thighs… This has single-handedly been the biggest pain point of the entire build, and truthfully, it’s the reason I started modeling my own parts in the first place. There are some good files available, but after printing and comparing several different versions, I kept running into the same issues: the front and rear cover strips weren’t quite right (or in the right orientation), the assembly methods varied wildly, and the overall construction didn’t seem to match what I was seeing in the reference material. After far more research than any sane person should devote to thigh armor, I think I’ve finally landed on a solution I’m happy with. I’ve had some great conversations with several members of the community, and after digging through reference photos from Celebration 2022, behind-the-scenes images, and various screen captures, I’ve come to the conclusion that the thighs appear to be assembled almost identically to the shins. Shocking, right? More specifically, the front seam appears to utilize a lap joint hidden beneath the cover strip, while the rear "underlap" tucks behind the cover strip to conceal the excess material (presumably for a "one size fits most" methodology). Looking at the Celebration photos, you can clearly see evidence of that front overlap construction: One particularly interesting photo shared with me from the Rogue One armor production process suggests there may have originally been some form of buckle system used on the rear closure. However, by the time we reach productions like The Mandalorian and Andor, that method appears to have either changed or been simplified considerably. My personal suspicion is that some variation of a nylon retention system may have existed internally, similar to what we see on other armor components (like the biceps), but I don’t personally have enough evidence to confidently make that claim. So for now, I’m sticking to what can actually be clearly supported by the reference materials available; plus the fact that the CRL is now framed as "non-saga" opposed to the original Rogue One-specific verbiage. I still want to make a few *minor* tweaks before committing to a full-scale print (like adding some magnets for suiting up), but hopefully I’ll have a physical test piece in hand within the next week or so—assuming I stop finding excuses to order more filament. For the more immediate future, my focus is shifting back toward finishing the existing armor components while also wrapping up the lower right thigh ammo boxes (currently "in progress"). After that comes the cod armor and posterior plate… Which shouldn’t be too hard, right? (I’m sure future me will regret writing that.)1 point
-
We are up to 51 members that have donated, Thank you to everyone that is pitching in! We still need to raise about $340 to meet our goal. Thank you again!1 point
-
Welcome to the FISD! 3D-printed armor can definitely be a bit cumbersome, but it is entirely doable with enough patience and effort. Akira’s files are great, and while you might encounter a few minor hiccups with certain parts, those have been deeply detailed and troubleshoot right here on the forums. I haven’t personally heard of any mods to Akira’s files yet, so I’m curious to see what you found—I wouldn’t be surprised at all if they exist! When it comes to smoothing out your pieces, UV resin is an excellent approach because it coats well and sands down pretty easily. A lot of us also rely heavily on spot putty, specifically the 3M or Bondo brands. Other builders have found plenty of success with plastic wood filler from the local home improvement store, too. I’ve tried both and personally had better odds with the spot putty, but it really comes down to individual preference. As others have already mentioned, Nico’s helmet files are pretty much the community gold standard, especially when you pair them with Greg’s mods. The helmet is easily the most time-intensive part of the entire build, so it makes total sense that you're saving the best for last. Doing it this way gives you a great opportunity to practice various techniques on the rest of the armor first so you can figure out what you like and dislike before tackling the bucket. With Akira’s armor files and Nico’s base helmet, you should have no problem earning basic Legion approval, provided you follow the minimum requirements outlined in the CRL and really take your time with the prep work before painting. As PlatinumLex mentioned, never hesitate to ask if you run into questions. There are some awesome resources and incredibly helpful members here, and I can’t wait to watch your build progress!1 point
-
Donation on its way.1 point
-
Eat your heart out.1 point