Leaderboard



Popular Content
Showing content with the highest reputation on 06/13/2026 in all areas
-
The chest plate is finally done! I’ll be honest—I’m ridiculously proud of this piece. This thing has haunted my dreams for nearly 2 months. I’ve reworked it more times than I’d like to admit, and while I know “perfect” is an impossible standard, this is probably the closest I’ve come to achieving what I originally pictured in my head when I started this project. It’s been painted in Behr #52 Gloss White, which will ultimately serve as the finish coat for the rest of the armor as well. And that brings us to wrapping up the thighs… This has single-handedly been the biggest pain point of the entire build, and truthfully, it’s the reason I started modeling my own parts in the first place. There are some good files available, but after printing and comparing several different versions, I kept running into the same issues: the front and rear cover strips weren’t quite right (or in the right orientation), the assembly methods varied wildly, and the overall construction didn’t seem to match what I was seeing in the reference material. After far more research than any sane person should devote to thigh armor, I think I’ve finally landed on a solution I’m happy with. I’ve had some great conversations with several members of the community, and after digging through reference photos from Celebration 2022, behind-the-scenes images, and various screen captures, I’ve come to the conclusion that the thighs appear to be assembled almost identically to the shins. Shocking, right? More specifically, the front seam appears to utilize a lap joint hidden beneath the cover strip, while the rear "underlap" tucks behind the cover strip to conceal the excess material (presumably for a "one size fits most" methodology). Looking at the Celebration photos, you can clearly see evidence of that front overlap construction: One particularly interesting photo shared with me from the Rogue One armor production process suggests there may have originally been some form of buckle system used on the rear closure. However, by the time we reach productions like The Mandalorian and Andor, that method appears to have either changed or been simplified considerably. My personal suspicion is that some variation of a nylon retention system may have existed internally, similar to what we see on other armor components (like the biceps), but I don’t personally have enough evidence to confidently make that claim. So for now, I’m sticking to what can actually be clearly supported by the reference materials available; plus the fact that the CRL is now framed as "non-saga" opposed to the original Rogue One-specific verbiage. I still want to make a few *minor* tweaks before committing to a full-scale print (like adding some magnets for suiting up), but hopefully I’ll have a physical test piece in hand within the next week or so—assuming I stop finding excuses to order more filament. For the more immediate future, my focus is shifting back toward finishing the existing armor components while also wrapping up the lower right thigh ammo boxes (currently "in progress"). After that comes the cod armor and posterior plate… Which shouldn’t be too hard, right? (I’m sure future me will regret writing that.)2 points
-
Thanks! Looks to me around the eyes and both traps (raised and flat) are glossy, and the rest is satin?2 points
-
This may help A little different to the way I made mine Sorry no measurements, I was making these back in 2015 until someone undercut my pricing.
 1 point
 -
Thanks @gmrhodes13 for the info. Totally get the business of life part! Sent from my iPhone using Tapatalk1 point
-
Really depends on their staff availability, people can get busy in real life. If you still have not luck you could send a DM to the Detachment Leader, username Vf21121 point
-
Thank you! That is extremely helpful.1 point
-
The Denuo Novo armor is meant to be built as TLJ, as that is the cod piece it has, which is the most noticeable difference. Old Anovos armor that was never sold directly to the public was TFA. You'll want at minimum to replace the forearm rails that are included (they're more TFA style) and likely want to replace the thermal detonator with a lighter, printed 2-piece one from Jesse_M. Do NOT cut the forearms at the elbow how they say to - that 90* shape is incorrect and should be a gentle curve downward instead for TL J. If it's a plastic Standard TLJ helmet, you'll want to replace the TFA-style clips, if it's premium fiberglass, you should be good to go. Check out some of the EIB threads and my build thread here for more info and good luck!1 point
-
Three small updates for today: 1. I ordered a pauldron from Katarra8 on eBay and it's really good, it does feel just a tad large but it's alright. It's decently comfy with the white underside so it should be approvable if I choose to troop with it in the future as just a pauldron is considered an approvable accessory, even though I don't think I've seen it being worn alone aside from a Hot Toys or Black Series figure. 2. I talked with Sayless and BigJasoni about the lip that's seen in the backplate that isn't present on Akira's files. Sayless very kindly gave me the files for his modified Akira backplate while I'm waiting to see if BigJasoni would happen to still have his, although it was around 6 years ago and I wouldn't be surprised or upset if he didn't have it on hand anymore. 3. I kinda forgot, there was something I wanted to write but I got a bad review for no reason and I got really sad so I'll update this when I remember.1 point
-
Welcome Seth.1 point
-
Screen armor, yes, except the traps, I think those are glossy also. Take a closer look at the photos, it's bad lighting, I think.1 point
-
I have no plans to make a R1TK but I love this build thread. The very definition of "well that escalated..." :)1 point
-
Alright, let’s get this build back on track! I had a couple of obstacles I wanted to overcome—and I think I finally made some real progress. The biggest one being the dreaded thighs (yes, these again). After picking up Modsuhels’ files, I quickly realized (once again) that my pursuit of screen accuracy… was still a bit off. While the clamshell design actually works this time (unlike Akira’s, at least for me), the cover strips themselves weren’t quite right. I probably spent a solid four hours staring at reference photos and comparison shots (fronts, backs… all mixed together) before finally coming to the conclusion: I’ll just make my own. And honestly? They’re still not 100% accurate—but they’re close enough that I can live with it. Let’s call it high 90%. To get there, I separated the original strips from the files in Meshmixer (don’t ask how long that took), printed those as a reference and took some measurements as I scaled these to fit me, and finally I designed my own revised versions of the cover strips themselves. From everything I’ve researched, Paul’s kit seems to be one of the most accurate out there currently for a lot of this bits, so I used his parts as a general reference—especially since I’m already incorporating a good portion of the Shoretrooper kit into this build anyway. This, unfortunately, took a couple of tries to get my measurements dialed in. How's that saying go? Print twice, measure once? But, after a few (emphasis on "few") failed attempts, I was met with success! It only took me 3 attempts to get it right the first time. I had planned to chemically weld the pieces together using acetone… but between the curved surfaces and underestimating how long it actually takes to properly set, that didn’t quite pan out. So instead, I pivoted to using a good 'ole plastic epoxy, which has been much more reliable. I’ve also gotten a bit better with timing my vapor smoothing… and by “gotten better,” I mean I now set alarms on my phone or watch so I don’t accidentally melt parts into abstract art overnight. I'm hopeful this will make my post-processing a *bit* quicker. Which more or less wraps up the thighs—which means… We’re back to everyone’s favorite stage: sand → putty → primer → repeat → eventually paint. This go around, I'll skip sharing the boring parts, and we can just fast forward to paint. You might've even caught some peeks at some parts I've been slowly painting for the next build update/entry. While I’m working through that, I’ve also got my printers queued up for the next project: the E11 blaster, which I’m planning to fully print in black ABS. (Sneak peak of the assembled barrel) I’m cautiously optimistic that sanding the blaster will be slightly less miserable than the armor has been… but we’ll see. That said, it’s almost fully printed, so expect to see that here shortly. On top of that, a strong majority of the materials for my strapping system have finally arrived—which is exciting, because it means I’m getting very close to actually wearing the armor I’ve spent the last 4½ months building. I’m finally starting to get the hang of this whole “armor building” thing… now let’s just hope it’s as accurate as I keep telling myself it is.1 point
-
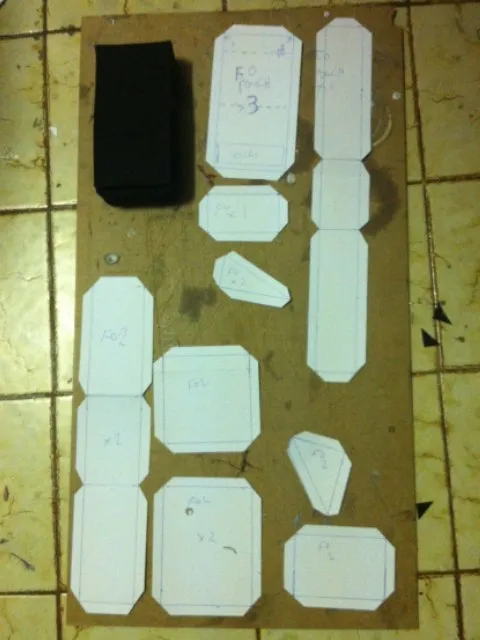
Not a pattern but here’s a picture of my home made ones. The sides are noted in cm. The. You can see it cut out with flaps, a bit remensient of paper models flaps Sent from my iPhone using Tapatalk1 point



.thumb.JPEG.090a51d263498dd94183c8dca58c9ff4.JPEG)