Leaderboard

Popular Content
Showing content with the highest reputation on 05/09/2024 in all areas
-
If you look at those before you at their profile you will see they have not been upgraded as yet. A.C. has not been online to process these requests as yet, he will be along in due course, please stand by. Also note those wanting access for merchandise, both current runs don't end until the end of May so there is plenty of time2 points
-
If you can request material, the Siraya Tech 80/20 mixture of Fast ABS-like (80) and Tenacious (20) is outstanding. Things printed that way are not brittle and will take accidental floor impact. That's how my R1 Nico bucket is printed.2 points
-
After multiple attempts to print, build and finish the helmet myself on my CR-10 and Elegloo Neptune 3, I've commissioned a resin version from a recommendation made by @TheRascalKing, so we'll see how that turns out. I'm looking to order soft goods still. I've reached out to @Soulart with Geeky Pink's Phantastic Gaskets as Teresa aways does amazing work. So I be working with her for at least the under suit. I did just buy a "new to me" Elegloo Saturn 4k, so I'm looking forward to being able to print some smaller parts in resin once I figure out how the resin printer works vs my FDM printers.2 points
-
Here are some pictures on the suit with lights on , taken on a mostly cloudy day (not much reflectivity showing of the gloss white). Thought I would add some backgrounds2 points
-
Hello there fellow empire citizens and supports, the name is Luke and no I am not the Luke you are searching for. Im from Riverside California and have been interested in joining the 501st for awhile now as well it has been a family members dream as well to join and support. As a rookie to these sort of things you will probably see me around asking questions and such on how to get my armor correctly made and my updates on how my journey is going. Looking forward to working hard on my armor and meeting/talking to all you lovely people out there.1 point
-
New shed to work in!1 point
-
Firstly congratulations trooper and welcome to the ranks You should be fine for higher levels with your ears, note the CRL mentions "ideally" and that's for L3 Centurion but even then I've seen straighter approved: OPTIONAL Level three certification (if applicable): Ideally, placement of ears (and screws) should closely follow the rear angle of the trap above them Personally I'd say your screws are a little large and too close to the end of the brackets, comparison below. Would also pay to check your measurements and the gap between the end caps and control panel. Ultimately it's up to our @Deployment Officer Team who should chime in soon
 1 point
 -
That looks absolutely incredible!1 point
-
Thank you very much I appreciate it.1 point
-
Happy Star Wars Day everyone! This seems like a good day to start posting about my little project. I am making a set of 3D printed Rogue One Stormtrooper armour. Once it's ready I hope to join the 501st UK garrison. I've studied every thread on this forum on the subject of 3D printing and R1TK armour (including all thirty pages of discussion on the CRL). This ain't my first rodeo: during lockdown I sculpted, moulded, cast and painted a full-size wearable Boba Fett helmet: Work In Progress Boba Fett helmet gallery Fnished Boba Fett helmet The next year I did a Mando helmet: Mando WIP Mando Final Last year I 3D printed a Rogue One Stormtrooper helmet from Nico Henderson's files: I enjoyed that project so much that I just decided to keep on going, so here we are! After looking at lots of files on CGTrader and other sites, I settled on a set of files by Alain Rivard. These looked more accurate than the Akira Yuming files which everyone uses. Turns out, they are but they have their own problems which I may get into later. To supplement these files I also used tk421jag's Thermal Detonator from Thingiverse Plus the sniper knee from the Akira-Yuming set as it is much better than the Alain Rivard piece. Also, Big Jasoni's Belt boxes: I also plan to print out the excellent Hovi-Mix parts from chrioboy: Finally, I obtained the updated Nico helmet files from TKModder421 and printed a second helmet: Since the start of February, I have 1) Printed out all the pieces 2) Filled, sanded and primed the abdominal section. I have a long way to go, and I expect this project to keep me busy for the rest of the year! Unfortunately it's been raining Loth-cats and banthas here in the UK recently, which has slowed me down a bit: it's hard to work up enthuiasm for shed time when it's as wet and muddy as Mimban outside. However, today was nice and sunny, so I got some photos. Everything: Abdomen piece (nearly finished!) Helmet: Chest and Back: Belts and Butts: Arms: Legs (big pieces): Legs (small pieces): More to follow!1 point
-
I have Yuming and PewPewCrafts as well. I'm also looking at Alain Rivard / SciFiHeaven's Files via @DavidF's build. I'll also probably buy Galactic Armory's set as I'm a fan anyways. Anyways, I'm starting with Mr. Paul's Abdomen, I'll also likely use his arms and shins.1 point
-
Another image showing the strap
 1 point
 -
Welcome, Luke. I would also encourage you to join the SoCal Garrison forums as a new recruit as well as you’ll be in IE Squad: http://www.southerncaliforniagarrison.com/forums/index.php1 point
-
Hello and welcome to the forum, a great page full of info for the first timer1 point
-
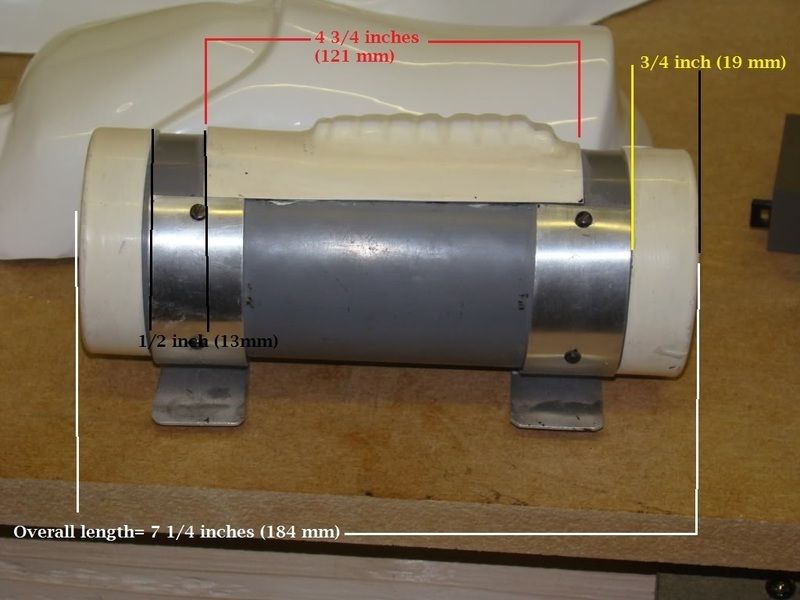
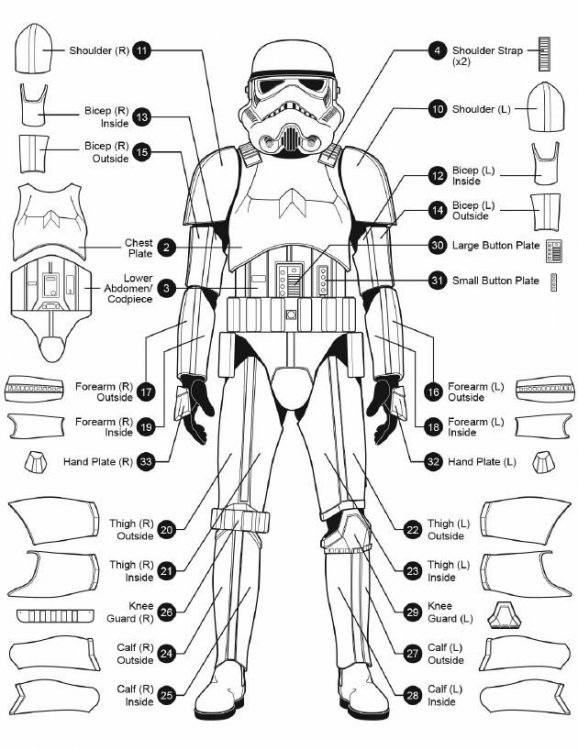
In this tutorial I'll be building the ANOVOS TK armor as ANH Stunt. Though the kit appears to have all the necessary components for 501st basic approval I'll be changing a few things in hopes of making it Centurion (L3) level acceptable. Materials, Strapping & Other used in this build will be highlighted in BLUE Areas that will be changed: NOTE: These changes are NOT required for 501st basic approval A. The kit includes velcro and snaps for the internal strapping which I'll be switching out for brackets and straps provided by Mr. No Stripes. My choice to use brackets is just a matter of preference. Note: The included velcro and snaps appear to be Centurion acceptable except for the chest to back connections which are required to be white. B. The kit includes black elastic for the chest to back connection which I'll be switching out for white, a Centurion requirement. C. The kit includes velcro to connect the shoulder bell strap to the chest to back strap. I'll be using a Dritz #10 sew in snap. Accuracy update but NOT a Centurion requirement D. The kit includes philips head screws for the TD brackets which I'll be replacing with slotted pan head screws, Accuracy update but NOT a Centurion requirement but recommended E. The kit includes velcro for the rear calf connection which I'll be replacing with the elastic and bra hooks set up, Accuracy update but NOT a Centurion requirement F. The kit includes ABS hand guards which will be switched out for Latex style, a Centurion requirement G. Waist belt accuracy modifications - Remove upper holster mounting screws, Repair holes to fabric, Replace line 24 snaps with "Popper" snaps, Correct elastic to drop box connection, Glue drop box elastic to belt. I'm sure this list will build, stay tuned Tools: Pencil Exacto knives, large & small Scissors Steel straight ruler (metric) Dremel with sanding wheel or sand paper. Small carbide bit for helmet teeth or small file. 3M scotch brite pad (any color, gradient) Drill 5/32" & 1/8" drill bits Hammer Screwdriver (blade) Spring clamps (set or 12 or more in various sizes) Earth magnets 1/2" x 1/8" (12.7mm x 3.1mm), 20 to 40 magnets Painters tape PPE (Personal Protective Equipment): I can't stress enough how important it is to wear PPE, especially when working with some of the tools listed above. Wear it! Safety glasses - Hardware store Cut resistant gloves - Hardware store 1/2 Respirator. Sanding releases small carcinogens into the air. Protect your lungs. - Hardware store or http://www.amazon.co...ailpage_o05_s00 Materials: E6000 - two to three+ 2oz tubes, or two+ 3oz tubes Zap-A-Gap & Zip Kicker Elastic (Chest to Back plate) - White 2" x 2' in length recommended) Elastic (Drop Boxes) - White 3/4" x 20" Elastic (Bells to Shoulder Strapping) - Black 1" x 12", ANOVOS supplied Elastic (Bicep to Bicep around arm) - Black 1" x 20" Elastic (Bicep to Forearm) - Black, 2" x 6", ANOVOS supplied Elastic (Thigh to waist belt) - Black, 3" x 24" Elastic (Kidney to Ab right side) - Black, 1" x 8" Elastic (Posterior to Cod) - Black, 1" x 12" Nylon Webbing (Kidney to Ab, left side 6 rivets) - 1" x 6", ANOVOS supplied Single cap rivets (Waist belt drop boxes and thigh ammo belt) 7.4mm or 5/16" Paint: Gloss White: Testers Gloss black: Humbrol #21 Testors # 1747 Gray (Ab plate), Humbrol #5 Testors # 1138 -http://www.humbrol.com/us-en/shop/paints/enamel-paints/5-dark-admiralty-grey-gloss-14ml-enamel-paint.html French Blue (Ab plate & Tube stripes), Humbrol #14 Testors # 2715 - http://www.humbrol.com/us-en/shop/paints/enamel-paints/14-french-blue-gloss-14ml-enamel-paint.html Gunship Grey (TD tube), Testor #1923 (spray paint) NOTE: Painting the TD tube is NOT required for any level of approval Internal Strapping: A. ANOVOS supplied B. Internal Strapping Brackets - http://www.whitearmor.net/forum/topic/20859-accurate-anh-stormtrooper-strapping-brackets-v-20-now-available/. Alternative lock nuts to replace the nuts that come with the bracket kit - http://www.amazon.com/gp/product/B000NBKLOQ C. Snaps: 1) Ab - "S" snaps "poppers" (Used on the following locations: Ab to belt, Ab to Kidney right side, Cod to Posterior, Shoulder to Back plate strapping right/front) 15mm, (bag of 15 is the smallest)- http://www.ebay.com/...=STRK:MEBIDX:IT 2) Ab - "S" Snap die punch and set tool 15-17mm, (1x) - http://www.ebay.com/...=item5413a405e2 NOTE: For the "S" snaps and set tool kit you may need to contact the seller who is in the UK and have him set up a auction with US shipping. The original sales did not have a ship to US option at the time I purchased the items. 3) Thigh Ammo Belt - Single Cap Rivets - 7.4mm or 5/16", Ebay - https://www.ebay.com/itm/Solid-brass-nickel-plated-single-cap-rapid-rivets-7-mm-cap-100-pair/222251554883?hash=item33bf399843:g:zTsAAOSwLnBX2zzO:sc:USPSPriorityFlatRateEnvelope!94513!US!-1 4) Thigh Ammo Belt - Double Cap rivet tool (1x) - http://www.ebay.com/...=item463922315d, or Hobby/Craft store 5) Ab/Kidney - Split rivets (bag) - ANOVOS supplied 7) Inner strapping - Line 24 snaps, nickle, 100ct (recommended), Tandy - https://www.tandylea...ts/1263-12.aspx. Fasnap - http://fasteners.fas...nap-fasteners? 7a) Inner strapping (canon brackets) Not illustrated in this build. For informational purposes only - http://www.whitearmo...-now-available/ 8) Shoulder to Bicep - Dritz Sew in Snaps, Nickle, Size #10 -http://www.amazon.co...YH1DNAAPPP1R3H1 9) COD split rivet - ANOVOS supplied D. Calf closure 1) Elastic - http://www.amazon.com/Dritz-9506W-Non-Roll-Elastic-4-Inch/dp/B004ALO9CK/ref=sr_1_2?ie=UTF8&qid=1454439839&sr=8-2&keywords=3%2F4%22+white+elastic 2) Bra hooks - http://www.amazon.com/Dritz-Hooks-Eyes-Nickel-Size/dp/B005S7FA28/ref=sr_1_10?ie=UTF8&qid=1454440102&sr=8-10&keywords=dritz+bra+hooks 3) Velcro - ANOVOS supplied Other: Thigh Garter belt - http://www.whitearmor.net/forum/topic/29991-thigh-garter-system/ Gloves (ANOVOS supplied) or - https://trooperbay.com/flexible-hand-guards-in-white-black-or-plain.html Rubber hand guards (Joseph) - http://www.whitearmor.net/forum/topic/35702-latex-hand-guards-for-centurion-level-anh/ Boots - Totally killer Boots - http://www.tkboots.com/, Imperial Boots - http://www.imperialboots.com/ Undersuit (ANOVOS supplied) or - Shirt, Pant Waist Belt - ANOVOS modified Waist Belt other - Kittle's belts) - http://www.whitearmor.net/forum/topic/19803-fs-white-canvas-belts/ ANOVOS assembly instructions (if anyone wants them) - https://cdn.shopify.com/s/files/1/0346/5761/files/SWTROOPER001-KIT_V1.pdf?18334450603693831912 UKS Assembly instructions - PDF - https://drive.google.com/file/d/0B-d8yBFyd0CgWGtmSWx6ZHRjbFE/view Sections, Navigation & Check List: 1. Forearms: 1a. Forearm trimming 1b. Forearms Pre- assembly 1c. Assembly (front) 1d. Assembly cont (rear) 2. Biceps: 2a. Bicep trimming right 2b. Bicep trimming left 2c. Bicep Pre-assembly 2d. Assembly 3. Calves/Shins (lower leg): 3a. Shins trimming left & right 3b. Shin Sniper Knee trimming 3c. Shin Pre-assembly 3d. Assembly (front) 3e. Sniper knee Pre-assembly 3f. Rear Closure (Straps and Bra hooks) 3g. Sniper knee, rear cover strip and calf closure elastic system installation 4. Ab: 4a Ab trimming 4b. Ab Button Panel trimming 4c. Ab Button Pre-assembly 4d. Ab & Kidney Split Rivet Pre-assembly 4e. Ab Waist Belt Mount assembly 4f. Ab Right side rivet assembly 4g. Ab Cod Rivet Pre-assembly 4h. Ab Button plates - Painting and Installation 5. Posterior: 5a. Posterior trimming 5b. Posterior rivet assembly 5b. Posterior to Cod connecting strap assembly - Under "Strapping" section 5c. Assembly - Under "Strapping" section 6. Strapping: 6a. Bracket System Pre-assembly 6b. Bicep to Forearm strapping 6c. Chest to Back strapping assembly 6d. Ab to Kidney left side strapping 6e. Ab to kidney Right side strapping 6f. Posterior to Cod 6g. Bracket System final assembly 6h. Bracket system support pads 7g. Thigh Support System (part 1) 7h. Thigh Support System (part 2) 7. Thighs: 7a. Thighs trimming left & right 7b. Thigh Ammo Pack trimming 7c. Thigh Pre-assembly 7d. Assembly (front) 7e. Assembly (rear) 7f. Thigh Ammo Pack installation 7g. Thigh Support System (part 1) 7h. Thigh Support System (part 2) 8. Chest and Shoulders: 8a. Chest trimming 8b. Chest Shoulder Covers trimming 8c. Chest strap to Shoulder Bell connection (Shoulder side) 8d. (6c) Chest to Back strapping assembly 8e. Shoulder Cover assembly 8f. Shoulder Cover Retaining Strap 9. Shoulder Bells: 9a. Shoulder Bell trimming 9b. Chest strap to Shoulder Bell connection (Bell side). 9c. Shoulder Bell strap installation cont. 10. Thermal Detonator: 10a. Pre-assembly 10b. Paint (not required) 10c. Assembly Final 11. Waist Belt: 3/3/16 NOTE: New information regarding the Anovos waist belt, PLEASE READ. The official word is the waist belt is accepted at the EIB (L2) with the previously mention belt modifications however, it is NOT acceptable at Centurion (L3) regardless of the modifications. The cloth portion of the belt assembly will need to be replaced for Centurion approval. You can either skip the following belt modification tutorial and replace the cloth portion of the belt all together, or continue on if EIB is as far as you plan on going. A tutorial on how to change out the cloth portion of the belt is in the works. 11a. Waist belt EIB (ONLY) Accuracy update 11b. Waist belt Centurion Update 12. Back Plate: 12a. Back plate trimming 12b. Assembly - Refer to "Bracket system final assembly" 12c. Upper connection point modification 13. Kidney: 13a. Kidney trimming 13b. Kidney to Ab right side connecting strap - Refer to "Strapping" "Ab to kidney strapping right side" 13c. Kidney to Ab left side connection strapping - Refer to "Strapping" Ab to kidney strapping left side" 13d. Assembly - Refer to Bracket System Final Assembly" 14. Hand Guards: 14a Hand Guard trimming 14b. Hand Guard, Centurion Update 15. Helmet Accuracy modifications: 15a. Helmet Modifications for Centurion and accuracy (Part 1) 15b. Helmet Modifications for Centurion and Accuracy (part 2) 15c. Hovi Tip Mod 16. Fitment Alterations (if any): N/A 17. Final Pictures: 17a. 501st Submission and completed armor pictures 18. Additional information: 18a. Making and install support pads for Mr. NoStripes bracket system (Not a requirement) 19. Helmet Electronics: 19a. Installation of Ukswrath's Hovi Audio system, SHA (hearing assist) and Cooling system Out of the Box
 1 point