Leaderboard


Popular Content
Showing content with the highest reputation on 04/15/2024 in Posts
-
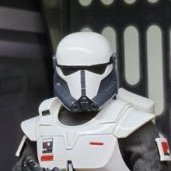
Here is the complete build thread from my armor which is now the CRL reference. Below are the images of the final build along with individual parts in high definition so you can capture the details. In the next threads below, I will explain how I did end up with this final result. I will also try to share the tips and tricks for you guys to make your life easier. I based all the design and parts on the reference document I have put together (you can find it in the reference section in my post). Here's the build vendors I used : - Boots from Crowprops - Leather gloves from Crowprops - Abs section made out of urethane foam rubber molded, per screen reference. I designed the mold and it is available on https://millenniummaker.com/product-category/imperial-armored-commando/ - Suit from Keeptrooping, tailored and internal elbow stitches removed per CRL requirement. - The hard armor is mostly parts I designed myself, as current vendors were not accurate enough to meet all screen accuracy to a CRL level and most importantly not designed for trooping). A few other parts are from Big Fred Custom (only vendor that was accurate/ very close). I have/will continue to place my designed parts on https://millenniummaker.com/product-category/imperial-armored-commando/ *******update from 2025: if some parts or not on our Website, just PM me as I will be adding the whole armor this year**** more details in sections below. I do this mostly for fun so be patient to have 501st / CRL grade armor. I intend to have the full armor designed and offered in the upcoming weeks on Esty, PM me if you need them sooner. Soft goods made by my girlfriend (MW11271)- belt and holster, velcros, harness,...!) I have posted the build process of these parts in the following threads. I will show how everything was printed/ prepared, painted, assembled. Goal is to provide you info on how to build a suit that is designed by a guy who knows the pain of wearing the armor (my Sithtrooper is a though one to troop... ) Front top to bottom:1 point
-
Perfect thank you! Now I can get started on this, it was one of the last things I wanted to finish.1 point
-
Thanks Bart just found how to do it in this thread you posted. Thanks for the help!1 point
-
No how to, I posted it in a few threads previously, it's been shared across a lot of builds and EIB threads With a heat gun or oven you bend strips of ABS plastic into the shape of a V, only glue one side and the other remains free to allow movement when you bend. Just helps stop the butt plate from pushing back from the back plate.1 point
-
This is the one I used. Don't overthink this fix. It's pretty easy to do. So easy that even I managed it! Bart1 point
-
Man, this is FANTASTIC! Well done! Still working on my helmets (v1.0 is GA and v2.0 is 850/Big Fred’s). V2.0 will be the final and the first will be the fun one. thanks for putting together surcharge a great resource!!!1 point
-
That’s what I did, three days ago. Still waiting for a reply.1 point
-
Hi, Here are proposal for other armor components, trying to list details that are referenced in the reference picture document available. Chest armor The chest armor is white and is comprised of 4 distinct sections: - The lower section - The upper section - The left and right winglets The lower section extends down to overlap the abdomen armor and is attached to the upper section. It also extends to the rear under the arm pit, joining to the back section with a minimal vertical seam on each side There is a recessed medium grey section in the center of the lower section matching the medium grey color of the rest of the armor. A white raised rectangular shape with bevels is present in the middle of the grey recess A dark red oblong shape is present on the left side of the lower section A raised rectangular shape containing the ranking of the commando is present on the left side of the lower section and has the following characteristics: - A raised white contour - A medium grey ranking rectangle that matches the medium grey color of the armor, inside the white raised contour - On the grey ranking rectangle, is present from top to bottom: - A white rectangle - 4 squares evenly spaced horizontally on a single row with these colors from left to right: black, dark red, light grey, dark grey - 2 rectangles each having two circular shapes on them. The left rectangle has 2 large white circular shapes, the right rectangle has two smaller black circular shapes under the ranking box is a red rectangle The upper section is a single piece with no visible seam and extend from the lower section to the back section There is V-shape in the front center of the upper section, on which is attached a raised v-shape white box On each side of the upper section are attached two raised shapes that gives the appearance of jetpack straps Over the wearer’s right jetpack strap is a rounded shape box. There is a medium grey grid at the front of the box that closely match the color of the rest of the medium grey of the armor. The left and right winglets are white and symmetrical. They are attached on each side of the upper section Level 2 The 4 sections (lower section, upper section and 2 winglets) and shoulder box are visibly separate parts The ranking box components have thickness and are visibly separate parts The red light is functional under the ranking box The raised box over the right shoulder is visibly a separate part and has two semi-circular recessed line on the outer side and a recessed on the inner side. The raised box grid has exactly 5 vertical rectangular grey shapes and is visibly a separate part Back armor The back is white and attaches to the upper portion of the chest armor with minimal joint. It also attaches to the lower section of the chest armor under the arm pit forming a minimal vertical joint The back armor also attaches the jetpack to the armor with a removable mechanism The back plate extends down approximately to the height of the jetpack reactors tips Level 2 The jetpack has 3 attachment points that are visibly separate parts and are metallic finish. The two upper attachment points are circular T-shaped and anchored to the back plate with a circular plate The lower attachment point to the jetpack is cylindrical with a taper at the tip and is anchored to the back plate with a rectangular plate Upper arm piece left The upper arm piece left is white and fixed to the suit without any visible means of attachment The upper arm piece left is rectangular and has the following features from top to bottom - A large recessed rectangular shape with dark red color - A raised white square at the lower right of the inside of the red colored rectangle - A raised medium grey box matching the same color as the rest of the armor medium grey - A recessed line Level 2 The box has a rectangular recess at the back Upper arm piece right The upper arm piece right is white and fixed to the suit without any visible means of attachment The upper arm piece right is rectangular and has the following features from top to bottom - A large recessed rectangular shape with dark red color - A raised white square at the upper left of the inside of the red colored rectangle - A raised medium grey box matching the same color as the rest of the armor medium grey - A recessed line Level 2 The box has a rectangular recess at the back running horizontally Gloves Gloves are made of plain soft black leather or similar material and worn tucked into the gauntlets. Logos, designs and any other non-canon details are not visible when worn. No visible stiches are present on the top of the gloves Level 2 Gloves are made of leather Glove armor Glove armor is white and has three facets. Left and right glove armor are symmetrical A thick border is present all around the glove armor with a recessed rectangle in the middle section The glove armor is attached to the glove back Abdomen armor The abdomen armor is grey and span from the belt to the inside of the chest armor, hiding the wearers suit There is a seam on the right side of the wearer that closes the two parts without a visible gap. A seam can also be present on the left side but without any visible gap. There is the appearance of 4 straps seamlessly attached to the armor There is one raised shape at the back of the abdomen armor in between the 2 rear straps There are multiple raised boxes and shapes present on the front side of the armor Level2 The abdomen armor is made of flexible material Only one seam is present on the right side of the wearer’s side The 4 straps are all identical in width and geometry There is the appearance of a clip on the straps approximately at the middle of the abdomen armor Belt Belt strap is made of white coton like material and has the appearance of being made with thick material stitched with 5 horizontal lines creating 4 wider section in the middle and two narrow ones at bottom and top The belt is attached to the abdomen armor with no visible mean of attachment and conceal the edge of the lower abdomen armor The buckle of the belt is visibly two separate parts white in color. The male portion of the buckle has a visible link to the female buckle that is trapezoidal with metal color There are boxes on each side of the buckle attached to the belt strap. All boxes are white and are attached as on reference pictures order There are 7 identical rectangular boxes with a visible recess on the front vertical edges and a small chamfer on the top 4 of the 7 boxes are attached to the wearer’s right and 3 on wearer’s left starting from the buckle and are evenly spaced There is a larger pouch on wearer’s left following the first 3 boxes. The pouch has the appearance of having an overlapping rounded cover. The top cover has two horizontal chamfer on each side and the lower edges are chamfered vertically. There are two cylindrical boxes aligned with the abdominal rear straps on each side of the wearer’s back. The cylindrical boxes have an angled top and a fin protruding on the lower portion Level 2 The push release button of the female buckle is visibly a separate component There is a rectangular recessed line on the metal portion of the male buckle The metal portion of the male buckle is followed by a black section entering the female buckle Cod plate The cod plate is white and is made of a triangular shape that curves inward in the lower extremity The main triangular section is completed by two small vertical sections curving inward on each side The cod plate has not visible attachment method and disappear under the belt and abdominal armor. There is no attachment of the lower portion of the cod to the suit Level 2 There is a visible trapezoidal raised section on the top of main triangular section Thigh plates The thigh plates are white with a dark red insert and wrap around the wearer’s thigh with no visible mean of attachmentThe left and right thigh plates are symmetrical. They have a top rectangular section that is aligned with wearer’s side. The thigh plates are curved to fit the leg shape and have rounded corners There is recessed shape that creates a contour along the periphery and leaves a rectangular shape in the center The red insert is trapezoidal Level 2 The main section is asymmetric and is larger at the rear of the wearer’s thigh than at the front. the front top section is rectangular and the rear top section is at a downward angle Knee plates The knee plates are white and fitted over the wearer’s knee with no visible mean of attachment The left and right knee plates are symmetrical and comprise 4 sections (top, inner, outer, lower) There is a recessed trapezoidal shape in the lower section There is a trapezoidal winglet attached on the outer section Greaves The greaves are white and have the spat seamlessly attached to it. The left and right greaves are symmetrical. There is a flat face at the front and at the rear the rear running from the spat all the way up to the top of the greaves If seams are present, they must be minimal and be located on the edge of front and rear flat portions A raised lip is present around the top of the greave A rectangular box is seamlessly attached to the outer top side of the greave. The top and bottom of the box are angled A smaller box, aligned vertically with the top box is attached to the spat A rectangular box is attached at the rear of the spat and finishes at an angle on the greave Level 2 The greave is a single piece construction with a seam only present at the rear and overlaps to the inside of the greave The rear spat box has a recess edge on the outside creating a smaller shape The spat overlaps the boot with minimal gap Boots FO style boot Sole is black rubber with no visible heel No visible buckles or laces The instep has stiches that run across and creates multiple sections Level 2 There are 3 stitches lines that run across the instep The instep is made of thick material and the stitches create obvious raised sections There is a vertical zipper on the inside that spans the height of the boot Hope this will be helpful!1 point
-
awesome brother! thank you so much!1 point
-
I don't use the app, I prefer to open a mobile internet browser and upload, copy/paste from that. Joseph's tutorial should cover mobile uploading. If on computer (or mobile browser) once you've uploaded to Imgur you can just right click select copy and paste the image link directly into your post/thread. Normally there are a few options for links to your images I find the "direct link" works best for me.1 point
-
Well, here we go. Looks like it is all here. There are a couple of pieces that I don't have a clue what they are, so I'm hoping that some of the build threads will be able to help me figure it out. But the first step is lots of flashing removal. Sent from my SM-N981U1 using Tapatalk1 point
-
Thanks Rudi. That's a big help! Im off to a slow start. Trying figure out how to send pics of the othet parts but having issues with file size.1 point
-
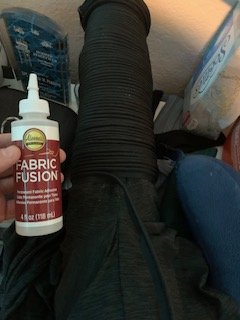
This is the link for the piping i am using i bought on amazon: https://www.amazon.com/dp/B07LDWWWTH?ref=ppx_yo2ov_dt_b_product_details&th=1 Here is the link for the fabric glue i am using: https://www.amazon.com/Aleenes-32140-Fabric-Fusion-3-Pack/dp/B00KD6YW2I/ref=sr_1_1?crid=HQBJIML3Q6KU&dib=eyJ2IjoiMSJ9.nNYLn7gS5nYdtMXwU60-zxRFUChtFcZCksKK95m5fNokb0PaSIXEPTIVLkAE53LywdyVf_nRkhvrLgqEjrF2t5D2koePuddCpUGX2qv12lMH-e0xEhzOLuKJiHVnFpo43LFRQV89jfAMzJT64Wt87WxVRIN4yIGIWKlhX1LY_axAx9iAfwHkVgD0t3IYaQSBkXtybX7CIltXbVGmon45bwt91skxrRO_wf_FffJwvnNSPdXDS7d3FuuzwpFOA_c_ia-EEy22NuglJa0hi2lwezCXgKkQuerZ5LCZwtXeb3o.fNbMWEvRElyPaadax81Ye98aTV2vED5NhgLwQVgp5IE&dib_tag=se&keywords=fabric+fusion&qid=1712977598&s=home-garden&sprefix=fabric+fusion%2Cgarden%2C191&sr=1-1 I am using a bigger bottle that's left over from another project but i purchased this pack just in case that doesn't make it all the way through the project. The long sleeve shirt you will have to find on you own. lol1 point
-
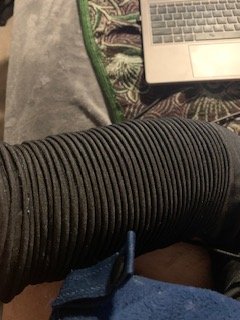
So i started sewing it but running into bunching issues and not getting the spacing i wanted with it correctly so I changed it up. after i sewed up the first couple lines it created a nice flare I'm going to use to tuck in the forearm pieces and took the cord and apply a nice thin layer of fabric glue and lay the cording over it and just wrap. Place more glue down and wrap and repeat but this way there is no breaks in the cording that is wrapped around the shirt. I am using a neck pillow wrapped with some newspaper on the inside (newspaper is so I don't ruin the neck pillow, my wife would kill me lmao). I use the neck pillow for a nice snug fit. I do sections at a time, about 4-6 inch sections. Wait for the glue to dry, then shimmy adjust the paper and glue and wrap. I also plan to sew along the seam lines and opposite of the seam lines to create a nice stable sewn structure as well for it so it shouldn't come undone. This will minimize sewing and hold it all together. That's the plan anyway. I've spent about 20$ on these gaskets so far. It is rather time consuming but i watch some tv while doing it. I'm loving the way its turning out, the ridges are nice and defined and its made of cloth so i wont die out in the AZ heat. I will keep sharing as I go. I will also continue to post results as I go and I'm taking pictures of my full First order build from 850 armor works so i can post my steps for others along the way as well.
 1 point
 -
Thank you for all your hard work on this project. Your costume looks amazing, and now we can get the CRL built and hopefully green lit in the very near future.1 point
.thumb.png.623307dd64aa621de7a1f62fd77c6d7c.png)