Leaderboard


Popular Content
Showing content with the highest reputation on 10/31/2021 in Posts
-
THIS IS NOT A BUILD THREAD... per se. Now that resin E-11 kits have all but disappeared, many are going to the 3D printed version. 3D printing has some advantages over resin builds, especially the fact that you can have MUCH more accurate finished product. This tutorial will show you how to get all those print lines out for a smooth-as-glass finish before assembly without as much work as you would think, especially if you are aiming for Centurion level approval as there can be no print lines on your blaster. I spent a total of 3-4 hours (not including drying time) on this project, so it's a lot faster that you may expect! This tutorial is for a classic E-11, but the process will work for any 3D printed weapon. For this purpose, I am using a kit made with Bryan's (trooper96) awesome files (link). Know in advance that it contains basically every single part of a real Sterling, down to the nuts and bolts... literally, and is in my opinion the most accurate ANH blaster kit out there. The fully functioning folding stock is a nice touch! When it comes time to put it together all those little parts can get confusing, so I suggest checking out Glen's @gmrhodes13 thread here. I couldn't have done this build without it! IMPORTANT! Printing the kit (or having it printed) in PETG will decrease the time you spend sanding dramatically compared to PLA. Trust me. You can also have it printed in resin, but that can be a costlier option. Another advantage to PETG is that it contains minimal "threads" as opposed to some PLA prints. NOTE: I did not include the power cylinders or Hengstler counter. I am using a real counter and making my own cylinders/assembly, but the same process would apply to the printed ones. More on that at a later date. LET'S GET STARTED! To begin, you will need the following supplies: 1. Filler Primer- This is a great option for filling super fine lines but requires a lot more fine sanding prior to use. I didn't use it on this build, but I have in the past. 2. Bondo Glazing & Spot putty- This is miracle stuff. Unlike regular Bondo which requires mixing, it is a paste that you can simply apply with your fingers or a craft stick. It fills fine to medium lines like magic, dries hard in less than 20-30 minutes or less and is SUPER easy to sand! 3. XTC 3D epoxy coating- Since this was the first time I had used this, it took some experimenting but the final results speak for themselves. It also provides some additional strength to the pieces. IMPORTANT: Mix this in very small batches. I can not stress this enough, as it sets up fast. Be SURE to read all instructions before using. 4 1" (2-3cm) Foam brushes- These are used with the XTC coating. You will need at least 5 or 6, as the epoxy only lasts a few minutes after mixing so you cannot re-use them. Link here. 5. Sandpaper- 80, 150 and 220 grit. 320 grit optional. (No photo... we all know what sandpaper looks like). 6. Spray paint- I suggest Krylon Fusion. You will need flat black, gloss black (for the grip). Silver is not needed if you plan on painting all areas black. 7. Super glue gel- Get the gel type. It doesn't run. 8. Super glue accelerator- Optional. 9. Mask (PPE)- I strongly suggest wearing a mask. Dust from sanding and the fumes from the XTC can be harmful. 10. Small plastic medicine cups- The ones that show the exact measurements work best. These are only good for ONE use for each batch of XTC epoxy and are good if you don't have a precise scale. Link here. 11. Wood craft sticks- For mixing the epoxy. Can be found at your local hobby store 1 2 3 4 6 7 8 10 11 I am not including photos of me sanding down the parts. That would be pointless, and I did NOT sand down the interior parts as they will not be seen. I started with 80 grit to get the larger print lines down. After that, 150 and then 220. There is no need to go crazy with the sanding, as it does NOT have to be perfectly smooth. For the T-tracks I used a foam sanding block wrapped in the various grits to get into the crevices. Like I mentioned PETG sands down FAST and EASY. Hints: Do NOT use any filler on the bottoms of the T-tracks, just sand them down fairly smooth. Sand the interiors of the holes using sandpaper wrapped around a pencil to remove burrs. Do this BEFORE gluing the 2 parts of the barrel together. The more you sand down the parts with the 220 the less filling you will have do. After wiping down ALL surfaces with a damp paper towel to remove residual dust and letting them dry, I applied the Bondo paste pretty liberally. Like I said, this stuff sands VERY easily so you can go fairly heavy when applying it Dry time is less than 30 minutes or so, but make SURE it's completely dry. It already looks/feels a lot smoother, but after that I went back to the 220 grit sandpaper. After final sanding: (Only some parts shown) Note original print lines Special notes- 1. In order to keep the details in the interior part of the grip, after the Bondo I used a dental pick to clean them out. When using the XTC later I went VERY lightly as not to fill them in. 2. The textured part of the grip was actually perfect and required no sanding. filler or epoxy coating so I left it as is. 1. 2. Due to the fact that most 3D printers cannot print long objects some parts will need to be glued prior to applying the paste/filler. The folding stock comes with 2 tabs which I glued to the U shaped stock part and then filled. NOTE: The arms have distinct curves- there is a left and right so make sure you have them on the correct side before gluing. Finished look Real Sterling The barrel jacket/exterior also comes in two parts. The print came with tabs to help line them up, but before making them one piece I added/glued in extra plastic tabs for increased strength. I suggest that you do this as well, but be SURE the added tabs are flexible and conform to the interior as seen in the last image below. Sanding the added tabs down before gluing will help with adhesion. The main body has not been epoxy coated or primed, just some Bondo paste where needed. Being a PETG print it came out ultra smooth with just sandpaper, and I didn't want the epoxy dripping through the holes and puddling. Be VERY careful when handling the assembled barrel. Until you get the T-tracks glued on it can be somewhat fragile at the joined seam, so use minimal pressure when sanding after you apply the Bondo. NOTE: Because of the added tabs and because it fits flush you will need to sand down the rear end of the interior barrel insert in order to get it to slide all the way in. DO NOT FORCE IT, or you can knock off the tabs. (Sorry, I forgot to take a picture beforehand). For even MORE added stability, the T-tracks should have a bit more glue on those seams when doing your final assembly. OK, time for the messy part, lol. HINT: Don't try to coat too many pieces at one time! After your first batch you will be able to tell how long you have before it starts to set up. As mentioned, the XTC epoxy filler dries fast. Really fast. You should figure on about 5 minutes (or less) of working time per batch, so plan accordingly. You can mix this by volume or weight. If you have a scale that measures grams that is what I would highly suggest using. The mixture needs to be precise. IMPORTANT: The fumes are harmful. Use a mask and apply/let dry outdoors. I suggest doing this in an area where there will be no dust/insects/debris that can stick to it while curing. After wiping all parts down with damp paper towels and letting them dry, I added the first coat of the XTC. Since I hadn't used this product before I went light, applying a very thin coat. You can see a big difference immediately! HINT: Always go in one direction when applying. If you apply it too fast you may get bubbles. If you go too heavy, you can end up with "puddling" of the epoxy as it not viscous and will settle quickly while drying in the flat areas/crevices. I wiped out as much as I could with the sponge brush immediately, and in the end they came out pretty nice. Again, GO LIGHT! After 4 hours I hit some of them again a bit heavier as needed. No need to sand between coats. Cure time depends on heat and humidity. Read the instructions for details. After drying... smooth as glass. Yes, there are a few miniscule bubbles, but they won't be noticeable and can be lightly sanded out. To ensure paint adhesion, you will need to sand everything down. I used the 220 grit. You can go with a finer grit but in looking at the finished product below I don't think you need to. When applying the XTC to the breach block I did not coat the numbers to keep them from being filled in. These pieces have been painted. A few notes on painting- To make sure you have proper adhesion for the glue, before painting apply blue tape over the areas where you will be attaching the various components. An easy way to do this is to put the piece where it goes on the body and draw a line around it with a thin Sharpie marker. When applying the tape, keep it about 1/8 inch INSIDE the lines. Although the paint may SEEM dry after a few hours, be aware that it takes a lot longer for it to completely CURE. I know it's tempting, but after final assemble try to let it sit in a dry place for 5-7 days for a much more durable finish before you run around the house with it yelling PEW PEW at your pets. Assembled product I am adding the scope rail, Hengstler counter and power cylinders later, but I wanted to show how smooth the parts came out. I forgot to cover this area before painting, so it will be sanded down prior to gluing on the power cylinder assembly. Finished! Final notes Yes, you will notice that some areas I have left silver/metallic. I may paint these black at a later date, but as seen below on these screen used blasters some were left "au naturale" (or the paint rubbed off during filming). It's a matter of choice. I will add some light weathering as soon as I attach all the various components. If you have any questions about anything included here (including assembly) always feel free to ask.3 points
-
Thanks for the shout out Glen. I think a little weather makes it look more realistic instead of straight flat black. It also shows off some of the details. They “pop”, so it doesn’t look flat.2 points
-
Hi Matt and James. I had more or less the same problems with my forearms. My joins we’re actually a lot worse. My arms are so thin that by the time I trimmed the excess off and butted the joints, the arms were oval and the cover strips just wouldn’t sit flush across the joints. In the end I had to apply the glue but put some heavy weights on top the arms in order for the drips to contact both sides of the joints. Left them for 72 hours and then reinforced with strips on the insides too. Did work though. Sent from my iPhone using Tapatalk2 points
-
I just found the greatest set of Stirling SMG scratch build templates I've ever seen. They are leagues ahead of the BBC ones and produce an exact 1:1 scale replica. Best of all they don't just rely on you to print the sheets out correctly, they include all the measurements taken from a real Sterling right down to the length and diameter of the cocking handle, as you can see in these preview shots: These things are so detailed, they also include the full interior parts and you can actually build a functioning Airsoft gun from them if you are so inclined. I purchased them from an Airsoft replica site, but since $8 (while cheap) is a bit of a rip to have a PDF file emailed to you, what's a fella to do except post them up here for all my TK brothers to download for free. Attached here: SterlingSMGPlansApr09.zip1 point
-
Thanks for the encouragement gang! I am debating on the best place to order my ANH Stunt kit and it seems that RP Propmasters is going to be the likely winner as the site I have been to, it is the most clear on what you get and visible pricing.1 point
-
I ordered another shoulder bell from Ross at RWA. It’s just easier to swap it out when needed. Sent from my iPhone using Tapatalk1 point
-
I've been a bit quiet of late (sorry). Life stuff. Did a bit of last minute adjustment to make the drop boxes removable, and did an unofficial kit up (in my street) for Samhain, sorry, I mean Halloween. Everything together now except weathering (still very nervous about this) and the helmet is still ESB. Have contacted RWA about ordering an ANH stunt lid, but they're having issues getting white abs at the mo. Pack fits fine. Feels physically odd holding such a short blaster. Pretty sure the shoulder pouch is sitting wrong. Other than all the above I think it's all there. Will try and get some pics taken this week for review here and on my local garrison WIP.1 point
-
Make sure you rough up the glove and hand guards with some rough sandpaper to give the glue something to grip too. As I mentioned in the post above yours it depends on the make of glove and hand guards, I've had to use all different glues at times.1 point
-
Always best to size the legs while you have boots and the rest of the armor on, you can make initial cuts but for fine tuning it's a must. Shin trimming from the bottom is correct and the top for thighs.1 point
-
Awesome feedback! Thanks guys! vr Mike1 point
-
I worked on the shins today. I got the left unit all glued up.1 point
-
I feel so lucky to have received mine. I so hate that this has happened to more people than I ever realized. This is just ridiculous! So sorry to all of those who have held up to their end of honesty and integrity, just wanting to make fair trade. As far as Hellhounds Props, LLC, I don’t have any patience or respect for people who operate this way. This is no way to treat people! I think it’s time we officially regard him as a high risk vendor and recommend for our group to seek business elsewhere. What say the leadership? Sent from my iPhone using Tapatalk1 point
-
Another person chiming in who is out $370 and no communication. I paid in June. I’m a patient person and don’t mind (too much) about the wait, but I’m afraid I’ll never see my money or the E11. And I’m now past the deadline for PayPal intervention and possibly credit card chargeback. Ugh. All he has to do is respond and say “So sorry, I’ll get to it in (x) months”. Sent from my iPhone using Tapatalk1 point
-
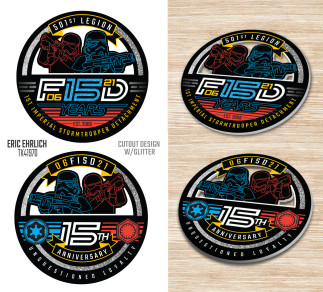
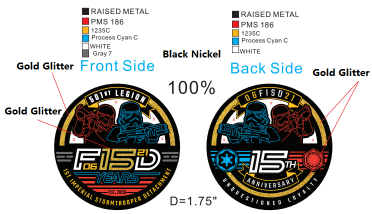
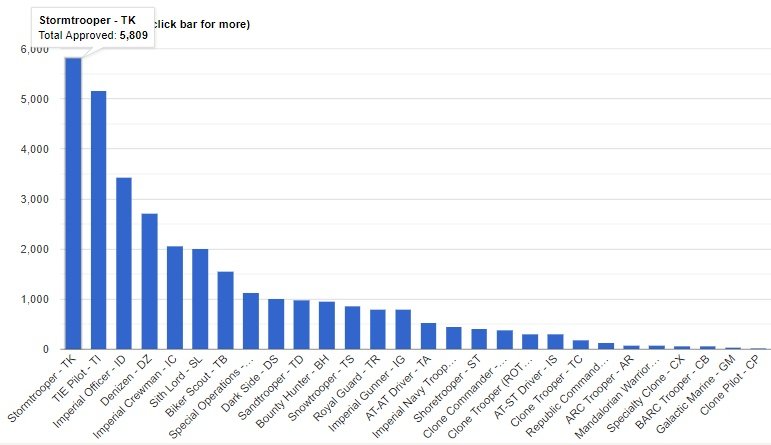
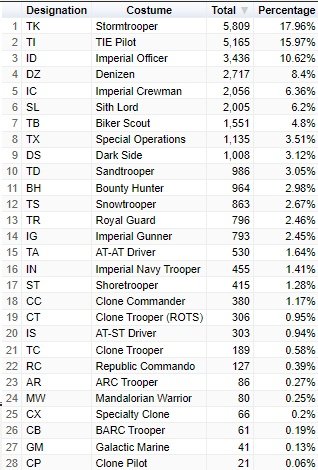
NEW In Memoriam Detachment Leader Census 2021 Merchandise Hall of Fame Just For Laughs Around the Detachment Costume Totals Update Your Build Threads INFORMATION & AWARD PROGRAMS Common FISD Acronyms and TK Glossary Pre Approval Forum 3D Section Field Exercise Award Imperial Attaché Program Fire Teams EIB & Centurion: What do these terms mean? Advanced Tactics Awards Public Relations Staff List 2020 Follow FISD Günter Hense (ID-22247) passed on 9 December 2020. He loved life, was a healthy, active and happy person and he was always grateful for the people around him and the happiness he felt as a result. He always took that as a gift and never for granted. He greatly enjoyed being out and about with his Garrison at events, philosophizing about costuming and life in general during regular meetups, and seeing all the wonderful places that were open to troopers, through his beloved hobby. Many visited him and his family at home in the bicycle workshop, had good conversations with him and, above all, laughed a lot. He was very grateful for all of that. And he was incredibly happy when he was accepted into the German Garrison, and was "officially" allowed to take part in the outreach programs in costume. Since it was he who introduced his son (ID 55255) to Star Wars as a child, it was clear that this was also a family activity for him. Our condolences go out to his family, friends. "Buckets Off" Tessek and Mon Calamari Officer Gerald Home Dies, Aged 70 Just days before his 71 birthday, sad news Gerald Home has passed away following an illness with cancer. He will be remembered by Star Wars fans for his roles in Return of the Jedi as Tessek and a Mon Calamari Officer, and to many others as Mr Muscle. He was a popular face at numerous conventions all over the world. Our condolences go out to his family, friends. "Buckets Off" Greetings fellow members, and welcome to the October edition. In last months newsletter we discussed the forum work that has been taking place and an update was coming soon. I shall now expand on what that entails but stop short of divulging the entire scope of works until launch time. We understand the importance of keeping the forums up to date, relevant, exciting and ultimately the most welcoming and friendly forums in the legion. One of the more critical areas of our vast forums is the New Recruit section. It is generally the landing point for anyone new to FISD, non 501st, and Legion members starting their TK journey. There is a mass of information just in that block of forums alone, making it an important sector of focus. We have completed a clean up sweep of the area already, so now we move on to rearranging and revamping,, pinning and corralling more of what could be considered, the more important posts for ease of use and location. There will also be renaming of some forums and consolidation of others taking place, again to streamline the entire section aiming to make it all easier for new comers to find the information they need quickly. Along with this work, we are looking to create a new staff position so there will be someone to drive and participate in discussions, and develop a new section we are planning. Hopefully the next time we are talking about this section, it is to launch the changes and introduce you to a new staff member. IPM news. Imperial Propaganda Machine It gives me great pleasure to announce a new member of the IPM team. Since he has arrived on FISD's doorstep, he has been enthusiastic, helpful, goes out of his way to not only greet new members, but offer as much help and advice as he can. He quickly became an attaché, and hasn't looked back. Please join me in congratulating TK46116 CallMeMrTibbles, Richard Tibbetts! Good work sir, your ethics and dedication has not gone unnoticed. Attaché Outstanding Achievement Award I have been informed that TK-12953 (jsilvius) James Silvius has sent the last shipment of coins out this past week, and I would like to personally thank him for the monumental and at times stressful service he has has performed for the detachment. As we have in the past, I would like to officially award James the Attaché outstanding achievement award for exceptional service to the detachment for undertaking a large scale merch run. He not only helmed the Anniversary coin run, but did it efficiently and shipped all coins out in record time. Brilliant job James, the staff are truly grateful, as I am sure the membership are also. You are a credit to FISD. With Unquestioned Loyalty Andrew Franke TK11469 "Sly11" Detachment Lead 501st Legion 2020 Census has begun, it is the responsibility of all 501st approved members to fill out the census each year which you can find here You must be registered on the main forums to participate in the census:here I didn’t’ troop because of Covid-19 Due to Covid-19 many didn’t get the opportunity to troop during this census period, Legion Command has advised that GCO’s will determine how they want to proceed in regards to a members trooping activity and status, as such check in with your local garrison command. Here's what the charter says about activity definitions: Operations Protocol/Membership An Active Member is defined as a member in good standing who meets the following requirements: Meets all 501st Membership Requirements (i.e. ownership of an approved costume, is over 18 years of age, etc). Has an approved membership record in the 501st Legion Membership Database Maintains active contact with their Garrison CO or GML. Active contact and participation will be confirmed during the annual Legion Census held each year during the month of October. Maintains contact information/membership record in the 501st Legion database either through their Garrison CO or GML. Participates in at least one Garrison or Legion activity per year while wearing an approved 501st costume owned by said member as recorded in the Legion Census. (One year is defined as the period from Legion Census to Legion Census). Examples of an activity include, but are not limited to conventions, charity events, or any activity designated as an official event by a coordinating administrative unit of the Legion. Members who serve in military branches are exempt from activity level requirements if their service renders them unable to meet these requirements. These Minimum Activity Level Requirements should be administered as justly and with as much common sense as possible. A member may retain active status, even if they do not meet all of the requirements listed above at the discretion of their unit Commanding Officer or Legion Command. Filling out the census only takes a few minutes and you also have the opportunity to update your contact information ie: address, email, phone and so on. THE LAST EVENT TROOPED is the most important piece of data. Because our trooping year was cut short due to Corona-virus, Legion Command has recommended membership status changes are left to the discretion of the Unit Commander so please check in with your local command prior to filling out your census. NOTE: members who were not able to troop should enter "COVID-19" as their last troop. Any questions you have in regards to the census please contact either your GCO (garrison commanding officer) or your GML (garrison membership liaison) Census form layout With the last forum update the viewable area of the census may not be full page, as such change your page magnification to 75% and you should be able to see the whole page. Note: make sure you tick the box "Is the above information correct?" please tick YES If you have any problems with the logging in please contact the LWM team here: [email protected] So stand up and be counted troopers, you have until 31st October. FISD 15th Anniversary Coin CLOSED Run is now CLOSED, coins have been shipped, please note shipping can take some time depending on your location. For more info head to the sales thread here Expert Infantry Coin (15th Anniversary Version) OPEN (Only 20 Coins Remaining) The time has come for the new run of EIB gold challenge coins! The 15th Anniversary gold EIB coins are available now. PLEASE NOTE: You must be an Expert Infantry member to purchase one of these coins. If you've ever purchased an Expert Infantry gold coin before, from any run, you cannot purchase another one. These are once per EI! You can find the sales thread here Please join me in welcoming TK - 54185 Georgia to the Stormtrooper Hall of Fame!Well done Trooper!https://www.whitearmor.net/forum/topic/51226-3-tk-54815-troop-log/ With Unquestioned Loyalty Aaron Gibson TK-99725 "Pyrates" Curator Hall of Fame "Morgi's Memes" Thank you to Luca "Morgi" TK66744 for starting a FISD specific meme thread, hope to see more of these in the future not only by you but by others as well. You can find the thread here "ANH Stormtroopers are all left-handed" myth busted. A great comparison of left and right handed troopers put together by Colin TK25622 "OddViking327", you can find the thread here Currently (as of 9th October 2021) there are 32,344 approved costumes in the legion, out of these homed under FISD there are 5,809. Interestingly the larger the legion costume totals grows the smaller amount of TK's there are with now only 17.96% of all approved 501st costumes, this is the first time this number has dropped below the 18%. WE NEED YOU TO UPDATE YOUR BUILD THREADS As most would be aware we are diligently working through the forums updating watermarked images, missing images and broken links, this has taken over a year so far and has been a monumental task but there is still a lot of work ahead of us. Members build threads are one of the biggest areas of watermarked/missing images and we are asking you the membership to help and update your build threads yourselves as this is just too big a task for staff. Build threads requiring updates are being moved over to this area https://www.whitearmor.net/forum/forum/241-build-threads-requireing-maintenance/ Thank you in advance for your cooperation. INFORMATION & AWARD PROGRAMS For a full list of FISD awards head here Are you new to the FISD and wondering what the heck all those abbreviations and strange sounding terms mean? To help you @justjoseph63 has started a list of the most commonly used ones that will give you some insight. If you have ANY questions about a particular term that is not listed or suggestions for new ones please contact Joseph. You can find the list here Pre Approval Forum allows future Troopers the opportunity to submit photos of their completed build to be reviewed by the Staff, Imperial Attaches and others in preparation for forwarding it to their GML for approval. Any and all advice/suggestions given will be specific, constructive, helpful and respectful. Please note that this program will NOT take the place of your local GML, as Detachments are not chartered for costume approval and can not override a GMLs decision, but is instead a peer review program designed to help you look your best and offer guidance and positive feedback. For more information on this program, please visit the link here Don't forget to visit our 3D section when next surfing the FISD forums, there is plenty of useful information to potentially help you on your next TK adventure. You might be feeling may generous and share with our community a new TK related 3D file and maybe win yourself a 3D contributors award so check out the details below and be part of the in house 3D community. Here is a link to the FISD 3D Contributor program. Don't forget to create a troop log here on FISD and get awarded for your adventures The list of accomplished troopers keeps growing, so get on board and register your troops today Simply start (or update!) your troop log, keep the running total in the title, and post (at least!) a date and name for the official 501st event where you wore your TK! Once you've hit a milestone count, go over to the "Field Exercise Awards -- Post your milestones here" thread to request your profile be updated! Simple, right? Award Recipients September - October TK20466 "Alay" Sarah - TK36036 "MrGrave" Grave - Are you an approved TK that spends more time on the boards than the average Trooper? Do you enjoy using your knowledge to help out future and existing Troopers? If so, we would like to invite you to join the Imperial Attaché program! Members of the I.A. team are chosen to help out not only those here on the boards, but on a local level as well. Our aim is to have at least one in each and every Garrison, Squad and Outpost in the entire legion to be the eyes and ears of the FISD on a local level. For a complete list of Imperial Attaches, go here Some of the benefits: Access to exclusive Attaché merch., including patches, IA patch , IA Rocker For a complete list of Imperial Attaches, go here You may also be in the running for an Imperial Attaché Award Imperial Attaché Award for those attaché's who have gone above and beyond [minimum 1 year of service]. You can find a list of prior recipients here Want to setup a "Fire Team? the Fire Team program is completely optional, and is intended to help form a common identity and spirit of camaraderie among 501st Legion Stormtroopers in the same geographic area/garrison that troop together. Fire Teams are not officially recognized by the 501st Legion nor the FISD, although they will be able to access a Fire Team sub-forum on the detachment website. You can find more information here So what exactly are and levels? These programs were designed for those who choose to take their armor above and beyond the minimum requirements for basic 501st Legion approval. It gives you the chance to show a level of dedication and pride that takes your armor closer to being as "screen accurate" as possible, without as much extra work as you may realize! You can find more information on the programs here This area lists all those who have gone above and beyond basic approval toward screen accuracy and obtained EIB or Centurion or both. FOR September - October the 1st Imperial Stormtrooper Detachment would like to congratulate: Expert Infantry Badge Award: Jacob "Pistolsheets" TK86267 EIB HWT - 2nd Award Kris "Crampeat" TK23410 EIB 1032 Glen "gmrhodes13" TK85421 EIB HWT - 9th Award GREAT job on your approval, now on to Level 3! Request your free EIB certificate here You can find a list of multiple award recipients here --------------------------------------------------------------- Centurion Badge Award: Brett "Cleantrooper" TK9593 Centurion ESB - 2nd Award Jacob "Pistolsheets" TK86267 Centurion HWT - 2nd Award Glen "gmrhodes13" TK85421 Centurion HWT - 9th Award Outstanding job on reaching Centurion, Troopers! Request your free Centurion certificate here You can find a list of multiple award recipients here If you see any of these Troopers around your Garrison or Squad, be sure to congratulate them! Newsletter If you have any interesting stories or photos or something you think newsworthy please send them to me via pm. For anyone interested in having a look through any of the older newsletter they have now been moved to a new archive sub forum which you can find Here With Unquestioned Loyalty Glen "Q" Rhodes TK-85421 "gmrhodes13" PRO Newsletter Staff List 2021 Detachment Leader (DL): Andrew Franke (Sly11) TK11469 Executive Officer (DXO): Tim Waychoff (Dark CMF) Chief Deployment Officer (DCA): Joseph Pedigo (justjoseph63) TK-10963 Deployment Officer: (DCA): Mario E RT (TKSpartan) TK-48117 Deployment Officer: (DCA): Jose Maria Sanchez (Chemi) TK-30173 Lead Provost Marshal (DCOG): Steven Sheades (starsaber25) TK-10466 Provost Marshal (DCOG): Chris Pearson (themaninthesuitcase) TK-10911 Provost Marshal (DCOG): Dan Branton (CableGuy) TK-42911 Personnel Officer (PER): AC (Novatie) TK-5597 Fire Team Relations (PRO): Mark Ryner (Captsafe66) TK-4584 Content Editor At Large (PRO): Christoph (Danny) Lauber (Ripper_L) TK-55550 Content Editor Support (PRO): Tony Jobe (ukswrath) TK-10116 Content Editor Awards (PRO): This will be handled by the XO Newsletter Publisher (PRO): Glen Rhodes (gmrhodes13) TK-85421 HOF Director (PRO): Aaron (Bronx) Gibson (Pyrates) TK-99725 Attaché Ambassador (PRO) Frank Peranteau (Frank75139) TK-75139 Social Media Relations (PRO): Teresa Nuthall (Soulart) TK-41307 Social Media Relations (PRO): Jim Ferrell (Rat) TK-95970 Systems Administrator (DWM): Eric Brager (Darth Aloha) TK-9674 Systems Administrator (DWM): Mathias (Locitus) TK-2959 Detachment Founder (DF): Paul (Daetrin) TK-8020 Trading Cards Content Support (IPM): Eric Ho (Hoda) TK 77520 Imperial Propaganda Machine (IPM): Brien Edick (Harbinger) TK 92802 Imperial Propaganda Machine (IPM): Jeff Salt (wingnut) TK 50297 Imperial Propaganda Machine (IPM): Richard Tibbitts (CallMeMrTibbles) TK 46116 Facebook: www.facebook.com/whitearmor Facebook Group: 1st Imperial Stormtrooper Detachment (FISD) Official Twitter: www.twitter.com/FISD501st or @FISD501st Instagram: www.instagram.com/fisd501st On behalf of the 1st Imperial Stormtrooper Detachment Command Staff and the Imperial Propaganda Department


 1 point
 -
Thanks Glen, I remember seeing this mentioned elsewhere [emoji106]1 point
-
That would be awesome Brian! Well guys I did a little experiment and got some parts laser cut using the templates. Check out all the rainbow coloured goodness! Hasbro would be proud! The reason for all these wacky colours is that I lecture one day a week at the university here and a friend of mine runs their laser cutter and let me use it for free. It just meant I had to rely on whatever scrap plastics were lying around in the thicknesses I needed, so the colours of the parts are different depending on the thickness of that part. The laser cutter is great - it will run right off the PDF files of the templates and basically cuts sheets of plastic like an inkjet printer prints paper. Here it is in action: The cutting laser looks pretty Star Wars doesn't it? When it's done you just pop the parts out: (it looks like wood in this photo but that's actually the protective paper on this piece of plastic) Here's some of the parts that are already in black plastic. I had both styles of trigger done: You can see here how well the no-functional trigger fits into a resin grip casting - no glue here just a perfect fit: You can also see what an accuracy of fitting the laser cutter gives you in the parts you cut yourself. If the folding stock was open it would sit like this: And look at the level of detail it will cut: (excuse dirty fingernails!) rear sight assembly test: What's even cooler is that the laser cutter doesn't just cut it engraves too! Which meant I was able to get that waffle texture on the relevant parts. It's a little hard to see in the photos but you can get a decent idea: Selector Switch: Stock Clip: The laser cutter cuts very sharp edges so some pieces like the trigger will need sanding down to give that bevelled curve, but other than that it's good to go without you having to do much of anything! Plus you get an accuracy you'd be hard pressed to achieve by hand. I'm loving it!1 point
-
I have a real Sterling (ANH & ESB) and a MGC Sterling (ROTJ) so I could give you exact measurements from the real things If you want? Just let me know what parts you need measurements of.......1 point