Leaderboard


Popular Content
Showing content with the highest reputation on 08/22/2021 in Posts
-
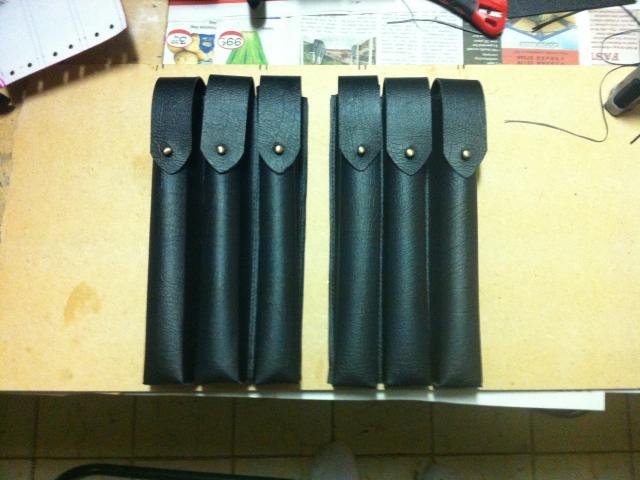
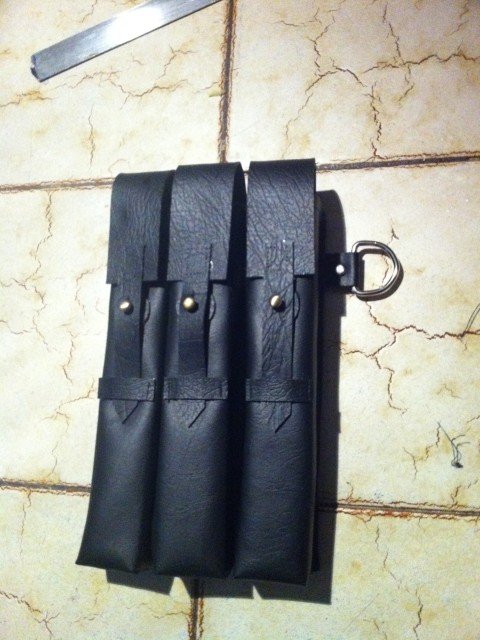
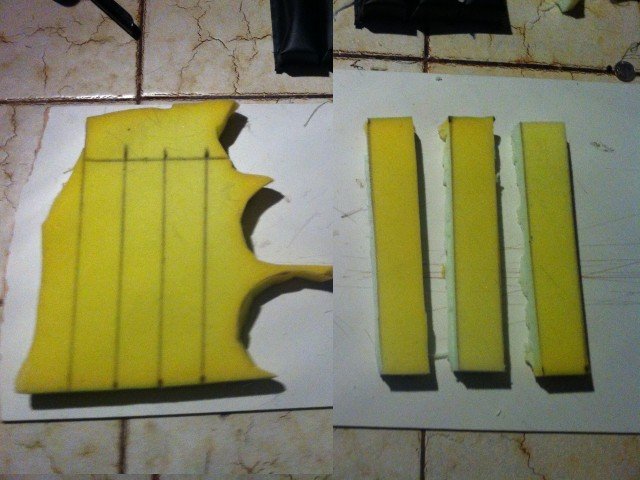
This used to be my go to for pouch templates but unfortunately the website was no longer active, but I saved a backup up to my computer so thought I would share here, thank you again for all of your hard work TK1336. Please note I did not use all the special tools because I used faux leather (vinyl) works out a lot cheaper and much easier to use. For any of the back pieces I did glue two pieces of vinyl together so they have some stiffness to them. Just coat both sides with glue, wait to get tacky, then apply together, add a heavy weight on top and leave overnight to dry. I also found with using vinyl you can sew most of the areas with a sewing machine. Some of my pouches You can use some foam for the insides so they keep their shape. How To Make Sandtrooper Ammo Pouch To Make your Own SandTrooper 3 Pocket Shoulder Or Belt Ammo Pouch First off the Leather thickness needed is up to you. You Can use 5/6oz. or 4/5oz.or the heavy stuff like 7/8oz leather Note: For the Back/ Bottom I use a thicker leather say the 5/6oz and for the front use a 4/5oz. But a 5/6oz will work good too. Also for the securing straps I use the thicker leather. To Make 1 pouch 1 each - 12" x 12" PREMIUM Tooling Leather 4/5 oz or 5/6 oz ( For The Front ) 1 each - 8" x 8" PREMIUM Tooling Leather 4/5 oz (For The Flaps ) 1 each - 18" x 8" PREMIUM Tooling Leather 6/7 oz ( Best is a 7/8 Oz ) ( For The Back ) 1 each - Tandy Leather Craft Tool Spacer Set System with 3 Wheels 3 each - Tandy Leather Sam Browne Button / Washer Solid Brass 1 each - Tandy Leather Craft Tool Sam Browne Button Stud Anvil 1 each - Tandy Leather Craft Waxed Nylon Black Thread 25 Yard 1 each pack - Tandy Leather Medium Antique Nickel Rapid Rivets 100 count 1 each - X-Acto / Ex-Acto Craft Knife with Blades 1 each - 4oz. Bottle of Tandy Leather Craft Fiebings Leather Dye U.S.M.C. Black ( Or 8oz, 32oz Bottle) 1 each 2oz. tube of Barge All Purpose Cement ( For Leather) 1 each - Tandy Leather Craft Stitching Needle (Note : Best to get an assortment) 1 - each Tandy Leather Craft Tool punch 4 tooth #8066 ************************************************* You can find all of the stuff you need at : www.RowensWorld.com OR Just Contact Nina & David Walker at: [email protected] OR Call at (812) 334-8289 ********************************************** Once you have all you need to make one now we need to use the Templates Below Sorry Scanner Broken and have to Clean them up a Bit. NOTE: This is Not 100% Accurate you can adjust this Template to fit your needs I need to adjusted these two templates (v1.0 Front and Back). On the over all width and the width of each pocket smaller. I made this how to using another template so it will not turn out like my pictures it should turn out better though if you use this new updated template. NOTE: Not 100% sure the measurements are the same as the ones used in the movies or a real MP-40 Pouch. (Updated) Template v1.0 Front (Below) The Rivets Holes are 10mm from each side and 10mm from the Fold. The Holes for the studs that secure the flaps are measured down from top edge 60mm x 18 mm Template v1.0 Back & v1.01 Back (Below) This you can make it with Flaps attached or attach them your self, you make your own mind up how you want to do it. I will put the measurements on it soon. Mark and cut the Back of the pouch from the rough side and punch all rivet holes for the straps and flaps see picture below Now we cut out all 3 of the flaps and mark and punch out all holes use template above. I Cut these out of the 5/6oz leather The Above Belt loops I did some at 20 mm to 25 mm wide. Do Them at 25 mm it is better. Draw and Cut The Leather from the Bottom side Like Below From the Bottom side I also scored the area along the line to fold it so I can stitch easier It will also be glued with Barge Cement. This is good if you are using the thicker leather Note: Just don't cut too deep . Also I use a V shaped carving tool to score the areas to fold see picture below. It should look like this. You can see how much I scored it just a real thin line, but when it is folded ....... As you can see when it is folded and secured it should look fine. Now Before you start doing more . We need to cut the stitching lines or holes. So Now we make a line in the center of the are we will be stitching Use A Pencil or Pen here, I just put two small ink marks and used the ruler as my guide. I used this tool the Tandy Leather Craft Tool Spacer Set System with the small tooth wheel I held down the ruler and used the tool. This is what it should look like, and started it at same point on both parts Now I used a Leather Hole punch and made a hole for the rapid rivet and secure the 2 flaps together, try and make them centered, also see the flap and a line that is the fold punch a hole in the fold and secure it with a rivet All 3 should look like the one in the picture above. Or Now we use the Barge Cement to Glue folds over Use on Both sections to Glue Flap over the end with Barge Cement (See Below) Use Claps to hold in place for at least 30 min. All three should look like this picture below. Like this on the other side, See how it is taking Shape. Now for the back side, Finished side up use the Rivets like so to line up holes the straps should be unfinished side up. Apply Barge cement to both parts and hold down and let Dry, keep it strait. (See Picture Below) Then install and secure it with rivets see picture below Then fold strap over and repeat process, Remember keep it strait and when securing the rivet don't hammer the strap it may damage it. The Belt loop is a little over 3" Now it should look like this on the inside with the rapid rivets installed. Back to the Front Now Before you Glue all sides down Cut a Small square 10mm x 10 mm and glue it on the inside to reinforce the holes where the buttons will be installed . You will have to punch the hole out again to install them. Now Install the Tandy Leather Sam Browne Button / Washer Solid Brass using the Tandy Leather Craft Tool Sam Browne Button Stud Anvil and a hammer The Buttons I distressed them with sandpaper to get the shine off them at the end but I now think I should have done that before I installed them. It should look like this. Next Take Front Half and back half and here use the barge cement glue both parts together using rivets to line the holes up. A clamp will work to hold them together. Once it dries about 15 min install the rivet heads on the finished side Do the center one 1st and then the other 2 one at a time. Now all 3 are secured and you finished installing the rivet heads on the other side it should look like this below. Next we now Glue all sides one at a time a long the marks you made inside. Done one side 1st the move to the next one right to left , glue both parts and clamp them together let set for 30 min each time. It should look like this once you have all of them Glued Now We use the Craft Punch 4 tooth tool # 8066 Now punch the pre marked line from the spacer wheel tool. It should look like this Below (note if using vinyl you can just sew by sewing machine) Next we lace the pouch always start from the back and from the lower end and go up then back down. Yes I was off a little on the holes but the lace will hold just fine and you will not see it once it is dyed black. Now we cut the shape of thr flaps out and make a 20mm mark (Line) from the very bottom that is our guide. .Now we punch out the holes and cut the corners off and semi- round the tip. See Picture below Now we use the rivets as a guide and apply the Barge cement to both parts and clamp in place. See Picture below. Once done should look like this on the back side (Ya, holes and lacing off a little ) ( "nag! nag! nag!" ) From the Front side. Now it is time to use the Fiebings Leather Dye U.S.M.C. Black (or use black vinyl from the start) You may need to put several coats on it. While it is still wet I put some wood I cut to size inside the pouches to give it shape and let it dry Once Dyed let it set over night to dry. Picture of My Finished MP40 from the Template Above. Back View Just make sure you get every part that is seen. I did a little of the inside that you can see if the flaps are open. After it Dries check it all over you may find spots that look less black just apply more Dye and then let it dry again. Now after the Dye is Dry use a soft cloth and Buff the whole pouch it will give it a shine and removes all excess dye residue. Now if you want to Protect it after you install the lacing use the Eco Flo Super Shene. Note: Now If you think a SandTrooper had a REAL Shinny Ammo Pouch after being in the Desert for more than a Day You Have Not Been In A Desert. I will Tell you I have and There is NO Shine at All. So Do your self some Good Dirty It Up, after you buff it up. I will post some pictures Of a distressed Ammo Pouch. These 2 Ammo Pouches were made from my 1st template that is not shown and I have sence replaced it with the new one above, so your pouches will look better than mine "Should". I am making 2 more with that new template and Yes these are for sale. This is my MP40 Ammo Pouch #1 Next you can use Tandy Eco Flo Super Shene and apply with a brush after it dry's over night again, it should look like this. Only If You Want To..... "Be a Pretty Little SandTrooper" I did this only For Show and yes I will have to remove it....... Not bad for my 1st try and just using pictures and guessing at the measurements. This is my MP40 Ammo Pouch #2 (No Eco Flo Super Shene on it either.) Back side, remember the flaps and back are one piece My 2 MP- 40 Ammo pouches front view and back view Back View. Now For Any Guys Looking At This and saying "I can't Do It" COME ON !!! Yes You Can ! Also It May Not Be 100% Accurate But It Sure Does Look Good!!!! NOTE: Any Guys From The MEPD & Other 501st Forums Just Say Thanks. Let me know this has helped you build your own. I will Post your Comments Positive Only. " Troopers Helping Troopers" ******************************************************************* If you want a Ammo Pouch made Contact Tim another member of the 501st will make them using the Above Template. His email is : [email protected] ************************************************************************************** MP40 Shoulder Ammo Pouch This is The MP40 Shoulder Ammo Pouch I will Be Making Next Yes Just about finished with this one and will post a step by step on it "how to make your own", The One On the Left side. On this Shoulder Pouch you will see several parts or Templates to make the one Shoulder Pouch. I am making this as accurate as I can. What is needed to make one Shoulder pouch and small tool pouch. 1 each - 12" x 12" PREMIUM Tooling Leather 5/6 oz 2 each - 18" x 8" PREMIUM Tooling Leather 5/6 oz 1 each - 12'" x 12" PREMIUM Tooling Leather 4/5 oz 1 each - Tandy Leather Craft Tool Spacer Set System with 3 Wheels 4 each - Tandy Leather Sam Browne Button / Washer Solid Brass 1 each - Tandy Leather Craft Tool Sam Browne Button Stud Anvil 1 each - Tandy Leather Craft Waxed Thread white or tan 25 Yard 1 each - X-Acto / Ex-Acto Craft Knife with Blades 1 each - 4oz. Bottle of Tandy Leather Craft Fiebings Leather Dye U.S.M.C. Black ( Or 8oz, 32oz Bottle) 1 each 2oz. tube of Barge All Purpose Cement ( For Leather) 1 each - Tandy Leather Craft Stitching Needle (Note : Best to get an assortment) 1 - each Tandy Leather Craft Tool punch 4 tooth #8066 1- each Tandy Leather Craft Multi hole punch tool ************************************************* You can find all of the stuff you need at : www.RowensWorld.com OR Just Contact Nina & David Walker at: [email protected] OR Call at (812) 334-8289 ********************************************** Shoulder Pouch Template v1.0 Front When Punching the Holes for the Buttons, now that I have finished one (CHANGE) measure down to 75 mm instead of 65 mm. Also the small rectangles that hold the flaps down drop them 10 mm too.(CHANGE) was at 93 mm make it 103 mm The one I just finished is a little too high on the bottoms and flap securing rectangles Also the 26mm folds on the end I trimmed off 1 mm on each side so it would fold better And cut it down from 25 mm to 15 mm so it would glue better when you fold and glue it under to the 36 mm part Shoulder Pouch Template v1.0 Center Shoulder Pouch Template v1.0 Back If you re-adjust where your mark on the Buttons punch hole on the flap by adding 10 mm so it should be 55 mm Score the folded area up just so it can be folded to have a square appearance The Back and the straps cut out at the right length Flip it over to the finished side using a pencil mark where the straps go. Then Glue one end of the place . Due the upper part of strap 1st only glue a small part about 10 mm area Then use the punch tool l Then use the white or tan waxed thread and sew them down then use the punch again on the lower part of the strap. Now sew it down with the white or tan waxed thread. Once done it should look like this. Side View Now the hard part Glue the strap/Back onto the finished side of the Flap part both should be the same size make sure you cover both parts all over that is how this glue works. Then it should look like this (Below) Rough side up with the Flaps and smooth side down with the straps Also best do if you want the side strap with D-ring that is 20mm wide and you deside how long it is you have to fold it in half to install the D-ring (Glue together with D-ring in center) Then ponch hole for the rapid rivet and install it Now we cut out of 5/6 oz leather the thin straps the rectangles out of 4/5oz leather The Rectangles are 33 mm long and 18 mm wide, The Flaps are 135 mm long and 18 mm wide Attach them center and 20 mm from the edge like picture Above. Once Glued it should look like this Below Next we use the punch tool again, strait at the end like this picture then do the sides. It should look like this (Below) Next use the white or tan waxed tread again. Now Flip it over we want to install a strip of leather between the folded area and glue in place. Like Picture Below Now we move to the front part after it is all cut out and holes punched mark were the stitching will be on sides and in between the pockets. Also mark in pencil where the rectangles will go. Use the Tandy Leather Craft Tool Spacer Set tool. Now Use the punch and do all 3 rectangles Next I cut out 3 Circles that go on or around the Buttons ( See Below) Then install the Buttons like in this picture Nest sew the rectangles with the waxed thread again. I used a small nail and punched holes around the circles the sewed them down with the waxed thread Next we glue the 26mm flaps over you can see the marks I made It should look like this (Below) Once that dry's about an hour to 2 we glue the back half to the front half. (See Below) Now from the inside make a line from one side to the other at the end this will be a like to use for the punch make it about 3 mm to 4 mm from the edge Then used the Punch, turn it over it should look like this (See Below) Then use the waxed thread and sew the end. Now we use the glue and due one side put glue on both parts you can see the marks I made the 5 mm area only gets the glue. Then I clamped it down let it set for an hour this time, (Just needed a Break) Then Punched holes and sew it only one side this helps hold it in place while you glue the rest. Once it is all glued go back punch all the holes and use the waxed tread again and sew all sides. Also not shown but you have to punch holes and sew this area to. The top area from the start of the pouch opening across the top again 3 mm from edge. (See The Finished Picture Side View Very Bottom Of this page) Once it is all done with the sewing it should look like this (Below) End View. Side View Now Apply the Tandy Leather Craft Fiebings Leather Dye U.S.M.C. Black You may need to do it 2 times. All over and some inside too. Yes the dye is still wet, now it needs to dry 24 hrs then Buff it up with a soft cloth. Small Tool Pouch Template #4 The Small Tool pouch is next and it is secured to this pouch. It also has 3 parts to it. The one on theLeft use a 4/5 oz leather. The Center one I used a 3/4 oz leather The one on the Right I used a 4/5 oz leather After making one I re-adjusted the template this may look a little better. I am making a new on with this template you can see the 1st one below. After you sew it with the waxed thread now at this point you need to install the button. The Finished Tool Pouch. The Finished Shoulder Ammo Pouch My 1st Try. Well I Think it is Not a Bad Job for a guy who only has pictures of a Real MP40 Pouch Back View I went and installed the side strap with D-ring but Best to install that when you install the straps on the Back Cool Love this one. Now this one was a little harder than the last one. But I think anyone can do it. Now when I put the 2 side by side well see for your self. Like I said above the Buttons need to be lower and the three rectangles that hold the flaps down need to be lower. But the Over all height and width looks good same for the tool pouch
 2 points
 -
Hey Guys, Started a build over a year ago, then the pandemic exploded, plus my wife had some health issues, so my 501st dream got put on hold. Eventually reached out to Shawn Cantey of Imperial Assembly Line, (Pretty sure he's a Carolina Garrison member), to finish my build as I had clearly bitten off more than I can chew. He's down to the strapping, so will be putting my app in soon for my ANH Stunt TK. Picked up a new hobby in the meantime, directly related to my search for an E11. 3D Printing. Now I just need to assemble the one I printed. Meantime, I've got 3 printers going nonstop these days. (Currently printing a Mandalorian kit.) Anyway, I'm back.2 points
-
I can understand that the hobby is really intimidating when you first join FISD, and when I was much younger, I felt the same as you. To the point I *gasp* bought ebay armor because “what does it matter? Armor is armor!” sure enough, I opened the box and realized just what I got myself into. Between poorly made parts, tons of inaccuracies, and just in general, terrible part quality. Thankfully I was able to return the armor for a full refund. Didn’t sign back onto the forums for a long while since I felt so discouraged. Then I decided to go to the page Gmrhodes posted and ended up making that my home page for a bit. Weeks go by as I started to really study the different armors to figure out which one was best for me, between quality, durability, and accurateness. I started reading other people’s build threads to get a better idea of what I can expect. I got in contact with my local garrison and they arranged to have dinner with me in just the span of a few weeks! All for a total stranger no less, but they were excited to meet a possible future trooper! Eventually I settled on an Armor Master 4.5 kit. A kit that costed twice as much as the 400 USD ebay armor I got! And let me tell you, I did not regret it. All the research payed off and I was able to get help from everyone on the forums. Not only that, but one of the troopers at the dinner turns out to live just a few minutes from my place and offered me to work on my armor in his basement. He basically was a guiding hand helping me every step on the way and was the one who helped me take my submission photos. What you get for joining the 501st is finding a second family as it turns out lol. what sets the 501st apart from other costuming groups is the fact that we strive for movie accuracy, to aim for a level of authenticity that even Lucasfilm even recognizes. That’s not to say that there aren’t other costuming groups of similar standards, it’s just that in a lot of ways, the 501st is the gold standard. I suppose at the end of the day, you will need to ask yourself why you want the stormtrooper armor. If you want to dress up as a stormtrooper from time to time, it is perfectly fine to do so without the strict guidelines of the 501st. However, if you want to go the extra mile and be part of a group that helps others and has a lasting impact both to star wars and her fans, then maybe this is the place you want to be. Sorry for the long post, but I think it will give you a better idea of “why we are the way we are”. The 501st isn’t for everyone, but unlike Yoda, we are certainly open to people who at least try.2 points
-
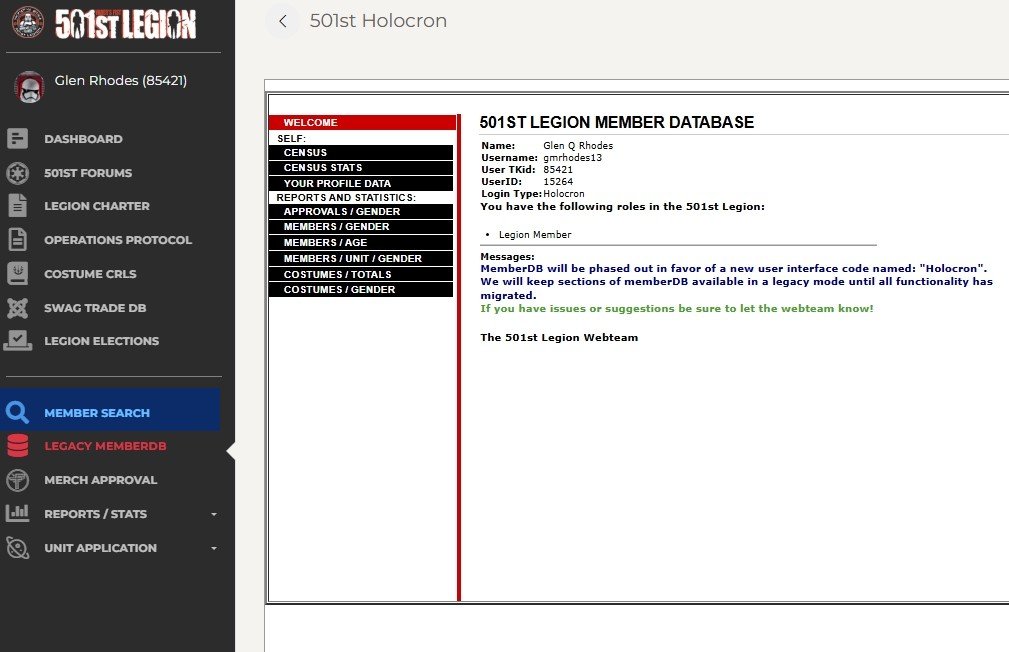
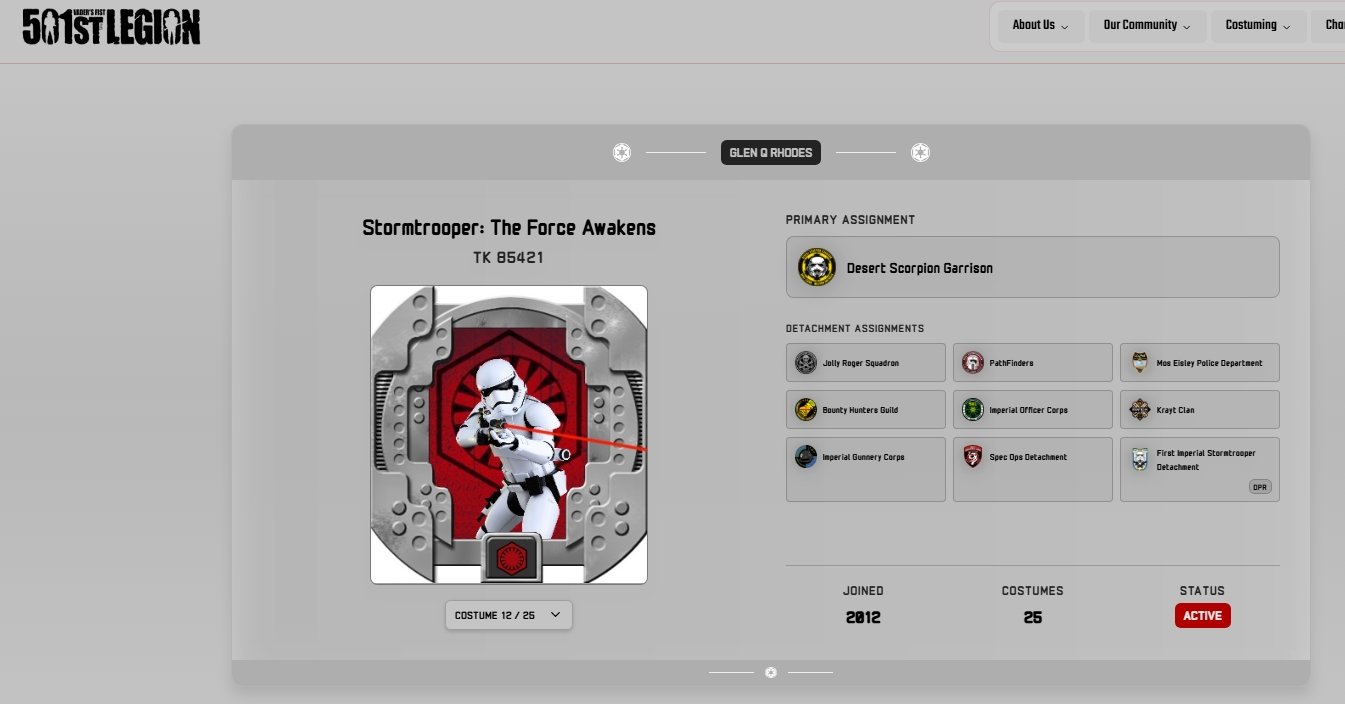
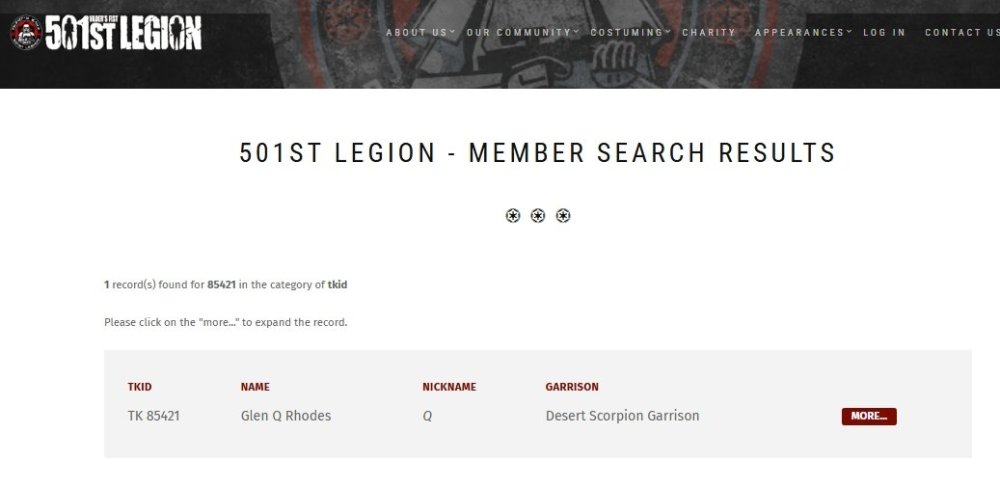
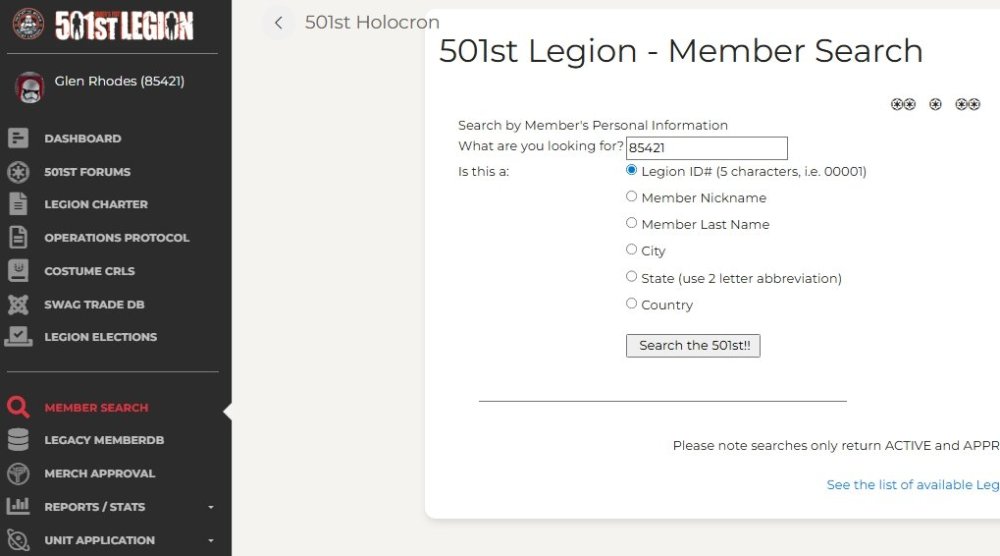
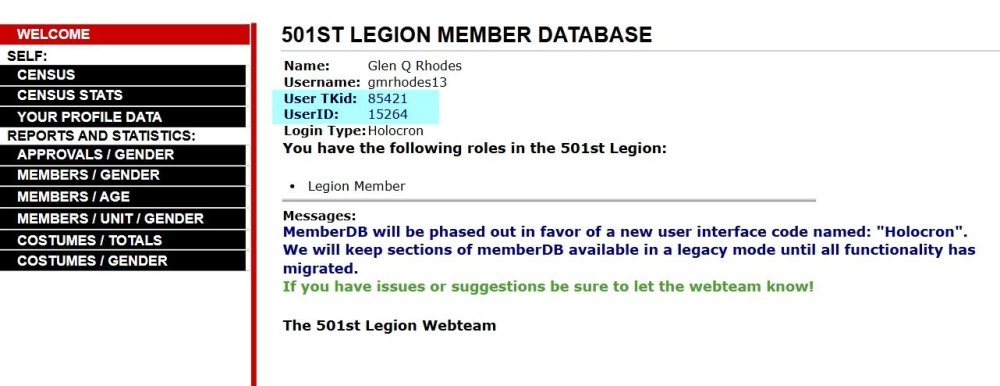
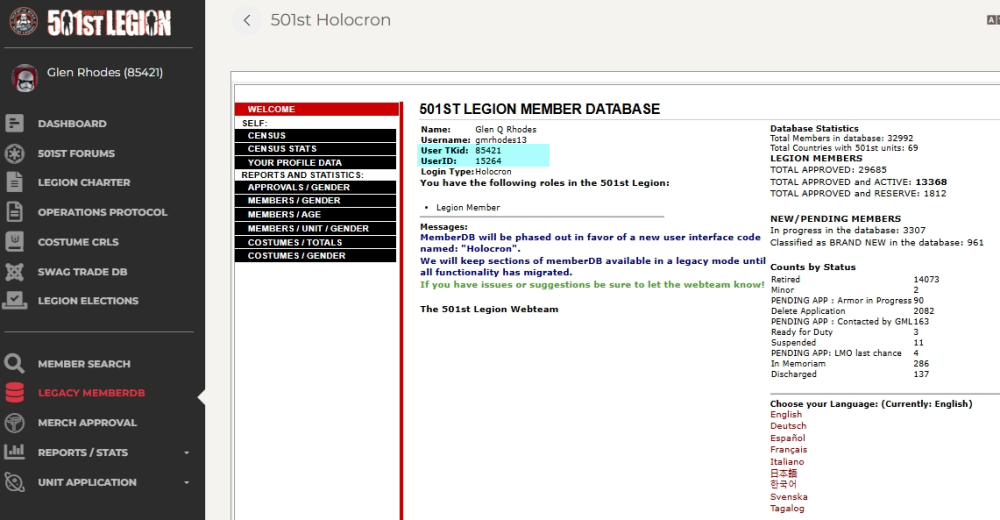
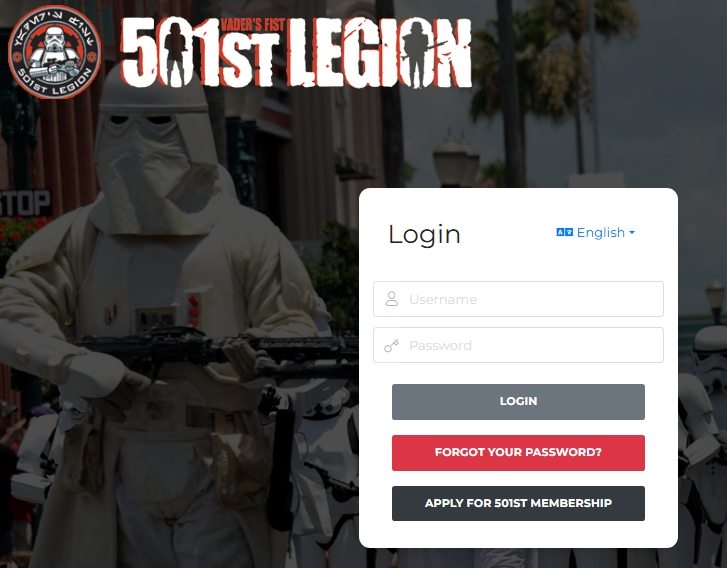
Request 501st status changes here. You must be an approved legion member with an official TKID to request higher forum access, or you can request TK higher access if you are an approved legion member with an approved TK version costume. NOTE: we (the site admins) will periodically check the list of people in this forums database against the list of 501st members as kept by the Legion COG. People will be added or dropped automatically, so it's a good idea to ensure that the email address you use for this board is the same you use in the Legion records. If you need your status adjusted in between database checks, please post here. UPDATE 05/04/2026 NOTE: You must include a link to your 501st record as per below, else your request will be ignored: With the recent legion website updates the link has changed. Please add both TKID and the User ID to your request, you can find this in the legion Holocron NEW INSTRUCTIONS There are 2 ways to find your membership profile: Go to legion forum https://www.501st.com/forum/index.php Click on Holocron/Census https://www.501st.com/holocron/login?returnUrl=%2Fmember%2Flegacy Enter your legion username and password then Login On the side menu click on Legacy/MemberDB and you should be able to access your USER ID OR In the navigation bar post this link https://www.501st.com/member/85421/ and replace 85421 with your TKID then click enter A.C. @NoVATie will then check the members costume list for TK costumes and update access accordingly **Please test your link when you post your request to make sure it goes to your legion profile page. We cannot use links for the Legion forum or Garrison pages.** Thanks to @gmrhodes13for pointing this out. Swapping your TKID into the link below no longer works http://501st.com/members/displaymemberdetails.php?userID=4733 Using the link below, replace 12345 with your TKID: https://www.501st.com/members/searchresults.php?searchfield=12345&criteria=tkid Paste that link with your status request post to have your FISD profile updated. Thanks to @revlimiter for pointing this out. 1. Go to https://www.501st.com/members/searchform.php 2. Input your TK number and "Search" 5. On the "Results" page click "More" to the right of your name 6. On this page that lists all of your costumes, copy the URL and paste it into this thread with your request.


 1 point
 -
Hi all! After being approved a couple of weeks back, I'm finally getting around to checking in. I've had a blast putting together my armor over the last year and I can't wait to get trooping! Many thanks to all of you here on the forums, especially @ukswrath for his amazing Anovos tutorial. This has always been my dream costume and I'm beyond grateful for everyone that has assisted along the way. Long live the Empire!1 point
-
Not everyone has the budget to burn on a Vader costume. It can easily run 4-5 times the cost of a TK.1 point
-
Probably going to list it for $1000, it is all trimmed with holster/gloves and the helmet is complete. Need to take pictures of everything with measurements before i list it1 point
-
Might just be me having learned English as a second language, but wouldn't it be more accurate/easier to comprehend to have something along the lines of: "and has upward facing edges"? Not that I know exactly what's talked about, but that sentence sounded a bit off to me. Since you said pointing out typos is welcome, I thought I should mention it. If this is just me, feel free to ignore it1 point
-
Thank you1 point
-
Brilliant. Thanks so much Glen1 point
-
Perfect. Just perfect. Thanks so much Glen1 point
-
Have you looked at some of the info or builds for the taller troopers, you will find info, heights and makers info Here's just a few from using the search function and entering "taller" Or even this thread in the Getting Started area1 point
-
I ended up going to Imperial Assembly Line/ Shawn Cantey to finish my build for me. Definitely bit off more than I could chew with my lack of experience and other issues that got in the way. Oddly enough I think if I had started with my 3D printed Mandalorian kit as my first costume, I may had been better off, since I was just problem solving rather than going an established route, so I understand the process better now.1 point
-
Hello and welcome looking forward to seeing some photos soon1 point
-
I am a new guy who started this journey last year about this time. At first, it DOES seem a little daunting and intimidating as to how to really get into this hobby. Things seem a little secretive and somewhat mysterious as to how to “join the family”, if you will. I get that! HOWEVER, there are numerous resources online and throughout social media that are readily available to DO ONES RESEARCH and learn for yourself what to do and how to do it “properly”. There’s no question that, “you get out of it what you put into it”, as it should be. I’ve learned a lot from the guys here at FISD and all have been friendly, receptive and very helpful! They clearly want me to succeed and their actions and attitudes to that end are obvious. I, too have an AM armor kit that I work on slowly but surely ,as well as a Studio Creations Imperial Scout costume. I’ve learned some new skills and have come a long way and will be completing both for submission soon. My advice is to stick with it, put in the research time, ask a lot of questions, start a build thread with lots of photos and take any criticisms constructively. You’ll have a very nice set of armor that you will be proud of! Welcome to the Empire! Sent from my iPhone using Tapatalk1 point
-
As Glen said, there is so much information that research is needed, but there are also many threads that compile a lot of helpful information. The vetted armor vendor list is an excellent place to start. I also have my own compilation, linked below, that may be of use to you. https://www.whitearmor.net/forum/topic/49412-all-in-one-tk-anh-stunt-index-of-resources-by-maskedvengeance/ Sent from my iPhone using Tapatalk1 point
-
Is something like this acceptable? I’ll still sand it down to make it smoother though.1 point
-
Sorry, I got carried away and was too excited to post the pictures on here yet. I’m just using Tapatalk for my picture needs. Here are some pictures1 point