Leaderboard


Popular Content
Showing content with the highest reputation on 12/01/2018 in Posts
-
Mine does, elliminates all need for extra strapping to keep the shins from twisting But you don’t have to take my word for it, you can see for yourself2 points
-
My pleasure glad to be of assistance , Troopers Helping Troopers1 point
-
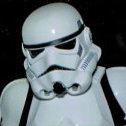
After getting distracted for a while by a whole bunch of soft costumes..... I'm back at it! We got a new oven that has a burner powerful enough to actually heat up the giant pot I needed to up an appropriately-sized hot water bath. Finally got around to shaping my shins to my satisfaction. Had more clamps on them then show in the picture but I needed to use those for other projects today. I put plastic bags on one of my dress forms and used it as my guide to shape the shoulders and shoulder straps. The front side is still clamped and gluing so no pictures of the finished project. But I figured I'd share that tip for anyone who, like me, primarily sews and may have a dress form around! I also use the hot water bath on the belt and the thigh ammo pack and attached it. I couldn't get the tools inside to do the double cap rivets so I did split rivets and painted them on the outside. I actually ended up using a C-clamp to flatten and spread out the split part of the rivet after I opened it a little bit with a screwdriver. I Sent from my iPhone using Tapatalk1 point
-
Finished with wrinkle paint. waited 24 hours for the paint to cure. rub off latex masking...1 point
-
My wife got ill so I was managing a toddler solo all week, so things have been moving slowly. But I finally got a little bit of reportable progress. Got the cup repainted, so that's good. The photo box has been cut down (CORRECTLY this time) to 2.5". I've been thinking about pack mounting options, and decided to use the lid plus some reinforcement. I cut two sides of the lid down so it fits perfectly inside the box. Two edges of the lid's rim (minus about 1/4") will fit flush inside the box, and I'll add a couple of cheap L brackets in the opposite corner. I can glue inside the box rim to the remnant of the lid rim, and that will give me a very strong full-length connection on 2 sides. I'll use a strip of strap wood inside so I can mount the lid (as a backplate) REALLY firmly to the oil pan. With that worked out, I went ahead and glued the radio faceplate on the box with e6000, and screwed in the corners. (I decided to use #8 machine screws with nuts, instead of the #8 sheet metal screws Ukswrath had used, since this 2-part printed faceplate really needs to stay in place firmly.) I even got a coat of paint on it! I'll add another coat of paint before calling this done, but we're very nearly finished with this part. I cut the new backplate for the arch box. (sorry, no photo yet) I used the self-adhesive floor tiles I had originally purchased for this pack. I took the warped 3D printed plate, and just traced around it and cut out the new plate. Worked pretty well, I think. I touched it up on the bench sander, and slapped on a coat of paint. Assuming it looks ok when I get home, I should be ready to glue the arch faceplate on it, and attach it to the tupperware, and we'll have yet another piece done! Next steps: I need to: Sand and paint the radio box faceplate Cut the picture box shorter (or make a box!), paint it, glue on the faceplate Repaint the cup assembly Clean off the labels/logos and paint the baby wipes canister Paint and glue the rubber bumpers Predrill and rivet the gray cup to the black faceted cup Add the top screws to the three faceplates where needed: Radio Faceplate, Button Box, Arch Box Cut the ends off the tube end caps and get that all glued together, with the TK shoulder strap part. Cut out the oil pan opening and remove the screw top, since I guess we can't use the antennas anymore? Bummer, since I bought the antenna. Scuff up the bare black plastic of the oil pan Attach all the various parts to the oil pan. (Gotta look into how best to attach them... I'm thinking nuts and bolts, so components can be swapped out easily as/if needed.) Attach shoulder straps 1 point
-
So long as they're not painted white would be the concern, the metallic color is not specified. Good observation Sha Sha1 point
-
As I wait for new shins1 point