Leaderboard


Popular Content
Showing content with the highest reputation on 07/07/2018 in Posts
-
There has been a bit of a debate going on on FB (maybe on here as well?) about whether the drop boxes were attached to the elastic with pop or cap rivets. Thought I'd add these pics of the RS original belt I took last year to clear things up: it's the same style of cap rivet used to attach the belt to the vac formed front piece. FISD team: Feel free to add those pics to the reference gallery3 points
-
Yes, Daniel is spot on in my opinion. Here is also a link for those TD screws. Nice job so far.2 points
-
Tiny bit of progress! My Hyperfirm DLT-19 B Pull and 12.5 qt oil can for my HWT pack came in! The DLT is definitely a rougher B pull but I think I may try cleaning it up a bit with my Dremel and touching up the paint. Its fine at a couple feet so its perfect as-is for trooping but I'm weird and can't leave well enough alone. Hyperfirm: https://www.facebook.com/HFx-Productions-1669859386576227/ And the oil can is just an oil can but it is the right size and shape to look right for the HWT. It is the style recommended on UKsWrath build thread ( https://www.whitearmor.net/forum/topic/30034-hwt-backpack-build-part-1/ ) but that particular can that he links to does not exist on Amazon for cheap anymore but this link takes you to the same can (just rebranded) for $9. I got two for $26 shipped. The second can is going to a friend that is also working on a HWT. Oil Can: https://www.fleetfarm.com/detail/garage-boss-drain-pan-with-funnel-12-5-quart/0000000271264?gclid=Cj0KCQjwodrXBRCzARIsAIU59TKEJFjCaMd5iysqYp5ugaAPtIPuTDXahUrf4bqC4kzhy1fF9M1QjgIaAouFEALw_wcB2 points
-
Brian, thanks for the support. I know it will be close but I will not know until the witching hour. Updates… Sanding is finally done (I hope). I knocked out the last few items earlier this week. I am still not happy with the thighs but I am hoping that the primer will do the job (fingers crossed). Next I built the paint booth. For this I used ¾” PVC. Lessons learned from my previous paint booth are as follows: 1. Buy a lot of “T’s”, you will still run out and need to go to Hope Depot but buy more than you think you need. 2. Ventilation, buys some cheap A/C filters and use them to filter air that is being introduced into in openings of the booth to equalize the pressure. 3. Figure out a way to prevent the sealed booth from collapsing due to negative pressure from vent fan. 4. Anchor the floor tarps so they don’t pull up from negative pressure. So I don’t recall exact measurements but I started out with a 10’ x 12’ x 80” tall booth and eventually made it 10’ x 10’ x 80”. I used more cross members and supports than I did on my previous booth to help in making the booth more resistant to the negative pressure. Once I tested the booth, I added some tables and hanging wires to hold the armor being painted. Since the hanging wire was an afterthought, I hard mounted it to the ceiling in my basement. This meant I needed to cut holes in the clear tarps and then reseal them. Due to a mistake on my part, I ended up adding another filter to one of the holes which will help in equalization. I did put some hanging wires on the PVC pipes but it will not support a lot of weight so this is for small stuff only. The blower is a 12” unit with exhaust hose I got from Northern tool. I already had an 8” (same model just smaller) for my smaller paint booth but I wanted something more effective. The motor is completely sealed so no issues with using it to vent flammable fumes. Running on low it does a great job for the paint booth. I think running it on high will be too strong for this paint booth. So, once everything was set up, I masked most of the armor and hung it in the booth. I still need to mask the helmet and then I will be ready to paint. Unfortunately, I will be working the next week so everything will have to wait until I am done with work. And that is the update, thanks for the interest.2 points
-
Ok, I'm officially starting "A.J.'s O.F. AM 2.0 Build." So, why "O.F.?" You’re probably thinking I'm dyslexic and meant First Order. Nope. That stands for "Old Fart." Or, in keeping with ANH canon, I guess maybe that should be "Old Fossil." Either way, I'm probably one of the older noob armor builders and 501st aspirants you're likely to trip over. In viewing all my armor spread out in my shop, my wife noted how pleased she was that I'm enjoying my second childhood. That's nonsense, since I’m nowhere near finished with my first one yet so the joke's on her. In any event I'm certainly older than most of you -- likely old enough to say, "Luke, I am your father" to a lot of you and have it be accurate. Well, except for all the genetics, of course. I've been reading the build threads (and pretty much everything else around here) for several weeks now, and while my abject terror at making the first trim cut is no less than it was when I first started researching, I'm fairly confident that I'm as prepared as I can possibly be. To that end, as soon as I post this I'm heading down to my shop to get started. Before that, however, a word about TrooperGear and the AM armor. First, I'm beyond impressed with this stuff. In going through the many, many builds I'm stunned at how nice AM armor is. The preliminary trimming work is top-notch, the ABS is thick and shiny, and the look of everything is simply beautiful. I'd also like to compliment TG (does that guy have a name?) directly. His correspondence with me before purchasing was complete and packed with information. His responses to my incessant questions were speedy. When I ordered, he was more than willing to ship my BBB around my busy travel schedule so I'd be sure to be home when my UPS guy dropkicked the box from the street to my porch. (All UPS drivers deliver this way, right?) Further, when I discovered a crack in the helmet components -- probably thanks to Mr. UPS -- he quickly and without questions shipped replacements. In fact, when I emailed to verify that he'd gotten the photos I’d sent of the parts, I was pleasantly surprised to learn that he'd already shipped them. Also, I couldn't get started without saying just how awesome all of you are here on White Armor. Your willingness to help is nothing short of amazing, and there are no words for the value of the copious amounts of info to be found here. In gathering stuff for my build I’ve even bought stuff from a few of you -- Ukswrath, Pencap, Darman -- and your gear is not only great, but your communications back-and-forth before buying are just as rapid as your shipping. Outstanding! A little about me -- I'm a full-time freelance writer/editor living in Williamstown, W.Va., and have been in the publishing industry in one manner or another full-time since the mid-'90s . Before that, I was a radio broadcaster for a few decades. (The two careers actually overlapped.) I've been a Civil War re-enactor for 20 years, and have written two books on the subject of making authentic reproductions of wooden items from the 19th century. In that regard, I guess I'm not a complete noob when it comes to making exact copies of things from a long, long time ago. If you're not already bored, check out some of the things I've made and written on my website, www.ajhamler.com. Haven't updated the site in a while, though. Gotta do that Real Soon Now. Let's see, what else? My passions include my 4-year-old grandson Jed (who, naturally, I call "My Young Jedi"), gourmet cooking, hiking and a really good IPA. Oh, and I'm also an Old Fart. So anyway, if you’re still with me after all of that, welcome to my build! Next post will be the first item on my build list: the Thermal Detonator. A.J.1 point
-
Looking sharp, and fantastic job on that AM armor, Jordan... this should be a super easy pass for basic ! (You are going to love that double snap system, I promise). A couple of things I noticed that will help you get to the next level: 1. A great paint job on that bucket, but the black around the ears could use some thinning out, and the ear bump could use some widening. Reference image In the first photo, your sniper knee plate wants to get caught under your thigh. This is a really common thing (I had it myself) and can be easily fixed by either adding a 8 x 1 x 1 inch piece of foam inside (behind the front cover strip) and/or making sure your left thigh is high enough. It seems to off a bit in the pic below. I can tell you really took your time on this armor, brother, and once you get basic approval, I expect to see your EI submission right after, sir! Great work!1 point
-
Yes the cover strips can be thinner. Matching the armor at the raised edge is a guideline.1 point
-
In order to get the most responses, I would suggest this, Jordan: When you click on the photo(s) in your imgur library, choose the "Direct Link" option in the drop down box on the right. This will post them on here so that they can be seen. From the ones I looked at, you have some INSANELY nice connections, brother, (ab/kidney, back/kidney/back/posterior). B E A utiful!1 point
-
To arms! To arms! Part I I couldn't decide between forearms and shins, so I flipped a coin -- arms won. The A.M. kit includes a healthy return edge on everything, which can make fitting difficult, plus there's not supposed to be any return edge on the wrists anyway. With all that in mind I decided to remove the return edges to pretty close to where I'll finally have them -- nothing on the wrist, and about 1/8"=3/16" on the elbow ends. Lots of ways to remove it (and I've seen all of them here on White Armor), but being a woodworker I opted for one of my woodworking tools. It's very much like a sanding drum you'd use in a drill, or a very small sanding drum like the ones for a Dremel rotary tool. These don't actually have sandpaper, though, but tiny chisel-like cutters. They use Microplane cutting surfaces (made my Grace Manufacturing for those taking notes, in case there's a quiz later), and were first made for the woodworking trade, but they've also migrated into kitchen tools as well. They make fast work of removing waste. They're called "rotary shapers," by the way if you go looking for them on Amazon. Above, I've chucked a 2" Microplane drum in my drill press (so I can use both hands, although you can also use them in a regular drill/driver). The drill press is set at 380 RPM; you don't really want to go much faster. 350-400 RPM is a good range. At this speed it still removes waste quickly, but almost no heat is generated. That, added to the cutter design, means that you don't get any of the melting you usually do with sandpaper-based drums. As a bonus, these things make mounds of finely shredded ABS you can use later to make paste. In the photo below you can see the trimmed returns on forearms. Almost nothing on the wrist end (I'll finish that later after assembly is complete), and about 3/16" on the elbow end. Note here just how smooth and even the curve is -- at 2", the diameter of drum creates a much larger arc than small Dremel sanding drums, allowing for smoother curves. Also here are the two other drums that came in the set I got (1" and 1-1/2"). I should mention that these are the older version of these things; the company has since redesigned them a bit. Haven't tried the new ones yet, but they look very nice. When I work in the shop I like to have as many of my components ready to go as possible before starting a building process, and while the forearms are now ready for fitting, taping and trimming to size I wanted to have the cover strips ready to go first. I laid out a sheet of ABS, marked it to 15mm segments and clamped a metal straightedge along the cut line before scoring it several times with a knife. After scoring a strip, I moved the straightedge to the next set of marks, clamped it down and scored another, then rinse and repeat till all the strips were scored. Then, after unclamping the sheet it's a simple matter to snap the strips off one at a time. With the strips all cut, I gave the edges of each a light sanding with fine sandpaper to remove any burrs or ridges, and lightly scuff-sanded the back sides for better glue adhesion. I even got lucky -- I used two sheets of the A.M. supplied stock for cover strips -- cutting four cover strips each -- and after cutting four strips what was left was a strip that was exactly the size of what I'd need later for the backs of the legs. OK, that's it for this segment. Time for a late lunch, and then back to working on the forearms. Up next, fitting and marking. A.J.1 point
-
Here is a before/after1 point
-
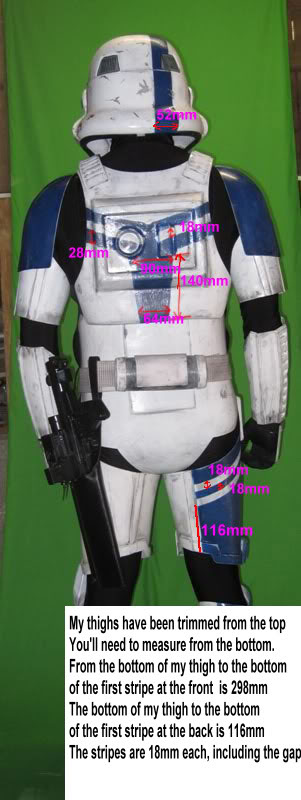
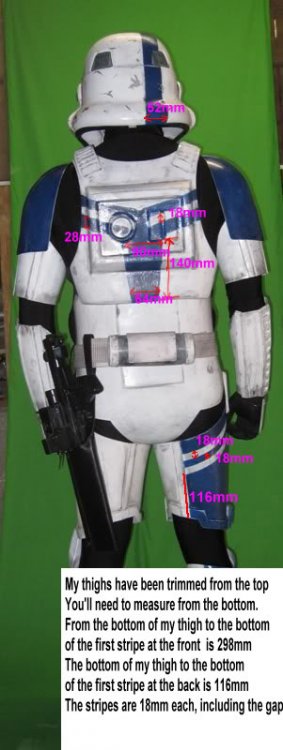
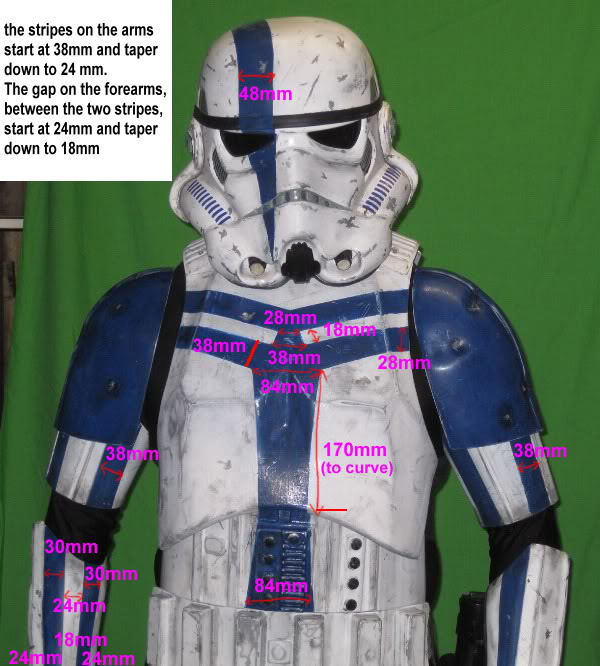
Hiya, Yes- rule of thumb is usually 15mm arms, 20mm thighs and shins, 25mm calves. :-) Sent from my iPhone using Tapatalk1 point
-
Yes, the ones shown above are indeed single cap rivets.1 point
-
Looks like you are well on your way, Jordan! Once you get basic approval, I will be looking for that EI submission soon after!1 point
-
Hi Dan. Thanks for the feedback! Yes my friends also had the same issues with the sizing. One of them wasn’t able to get the ab and kidney to meet. He will have a gap there unless he decides to use shims. I happen to have horse sized legs, so i had trouble with the thighs. Oddly enough, the shin pieces were the only ones that had huge amounts of excess plastic. I think I could have made another shin out of all the plastic I trimmed to get them to fit. And the butt plate also came particularly huge. Now that I’ve gone through this process, I definitely see the advantage to getting an untrimmed kit so that you can cut it down to size. These pieces all came almost over trimmed. As for the belt, not sure about pleats. It’s smooth canvas. The only downside to it is that it’s off white color and I have a small amount of Velcro that shows when it’s closed. But as you said the Thermal Detonator covers most of it. The helmet looks very narrow in the pictures with my armor particularly because the ears aren’t on in those pictures. I can see the difference in some of the other pics too, but overall I’m happy with how it turned out. If I can get this thing approved for basic I would like to eventually covert it to a TD so I can dirty it up a bit. Then I can invest in a nicer ANH TK kit to take to Centurion status Sent from my iPhone using Tapatalk1 point
-
Going back to all of your questions, Yes Brad is correct. As far and the ABS or Webbing for the snap plates, just be careful of the webbing snaps the E6000 and the metal snaps can sometimes have a reaction with ABS and may make a little deformity where they all meet which is your armor (doesn't happen all of the times but may). As far as the black webbing connecting everything, yes its for looks with the black under suit, they blend together.1 point
-
Blaster with ring installed and painted. Hope this will make L31 point
-
Thanks Tino and others for joining me on my journey. Sorry you guys had to suffer through my terrible chicken scratch writing Point #1 is a good one - If I'm unable to make a functional charging handle (this will need a wire channel underneath, as the Point #2) with pull back and opening and closing of the cavity that is the exposed bolt window, I'll resort to this Point #1. I can proceed to making the charge handle not movable, and run the speaker wires where the coil is and then cover the exposed bolt window with a cover. Hey yes! Here's to hoping the plastic ring and dense foam ring is sufficient - If I can screw in the speaker to give these two more support, that would be best. And yes, the dense foam will give me the 2 to 3mm for engaging the end cap clip, great to affirm that! I was on a sprint of sorts in and around father's day and Canada day, but now with summer vacations and family time, I will need to keep this build a 'slow burn.' Appreciate all you good people for the support in my crazy E-11 adventure. Don't get me wrong, updates still to come but will need to have more time between updates. Until next time; have a terrific day!1 point
-
What an adventure you've embarked on - here's a plastic alternative but requires trimming to get to screen accurate size. https://www.starwarscostumeprops.com/listing/529614517/new-star-wars-stormtrooper-1-12-wave Note: there's a sandtrooper Tunisian version from the same maker as well. I know there's rubberized versions as well and also metal replicas but are quite a bit more coin. Sent from my SM-G390W using Tapatalk1 point
-
Looked at my ordering back then: I used 2.5Watt 4 Ohm speakers 20x40mm. These are Notebook speakers and perfectly fit in the Doopydoos pipe. These can be bought in a 2-pack (Left/Right speaker). I bought them at www.Aliexpress.com (and as far as I can see you can still buy them). Good luck.1 point
-
Re-uploading images lost in the Photobucket apocalypse.
 1 point
 -
Thermal Detonator completed! This went together well, and I'm quite pleased. No issues at all. As I describe the steps I'm sure I'll be using tips and hints that I picked up here, and if I can remember where/who I'll give credit. However, I've looked at so many builds over the past several weeks that they've all kinda blurred together. If it's your tip I've used, by all means speak out and take credit. Since this is my first post of the actual build, I hope I do it right -- Too many photos? Not enough? I talk too much? Please, let me know! The first thing I did was drill an air relief hole in the TD tube. This is an example of a tip I found here, but can't remember who posted it. [Edit to add: It was Artshot's build.] However, it makes sense. Pressing the end caps into place can be difficult if the slight air pressure inside doesn't allow the caps to seat. Likewise, getting caps off after dry-fitting can be tough if there's a suction. I've just nestled the tube in my official TK-build carryall to keep it steady, and drilled a small hole smack in the middle. (The drill bit is 3/32", and I'll use it again later when mounting the belt clips.) It doesn't really matter where you drill the hole, as you can cover it later when attaching the button plate. And now, a tip of my own. The end caps can be hard to seat because the space at the bottom of the molded caps into which the tube slides taper slightly with the bend at the bottom, making it harder for the caps to go that last little bit and seat properly. To counter this, I tapered the ends of the tube just a bit. I first used a sanding block to bevel the outer edges of the openings, then a knife to bevel the inside edges. This results in a tapered rim on each end of the tube. Slipping the caps on is easy now (and easy to remove while test-fitting). My AM kit was nicely trimmed right out of the box, but the end caps were ever-so-slightly off-square. That is, the length of the sides wasn't quite consistent around the circumference. To correct it, I just used my knife to pare down the "lips" of the cap on the high side, and then slid the caps back and forth over some 150-grit sandpaper to level everything out. I checked the fit several times and sanded more as needed till the caps were perfectly square. While I was at it, I used some 220-grit paper to remove the sharp edges of the caps, as well as the edges on the curved button plate. Lastly, with everything dry-fit I measured, and it's a perfect 7.5" in length. OK, time to start some gluing. Now, a lot of you guys are gonna scream, but I elected to forgo the beloved E6000 for the TD build in favor of regular ABS cement. I've done a good bit of plumbing and have worked a lot with both ABS and PVC, and I felt I could handle the use of ABS cement for this part of the armor, plus the TD doesn't really involve fitting issues and I was confident I'd get it right the first time. But believe me, I will be using the easy-to-correct-screw-ups-E6000 when it comes time to fit the armor. I decided to start with the button plate, so first I scribed a perfectly straight pencil line down the side of the TD tube. Laying the tube on my workbench and using a piece of wood scrap allowed me to make the line as perfectly square as I could. I next lined up the button plate on my line, centered it on the tube, and penciled in a line along each edge to guide me when it was time to glue. Using the swab applicator in the cap of the ABS cement, I dabbed an outline around the underside of the plate, pressed it into place on my lines, and clamped that baby up. I bit of tape around the center helped, too. When the assembly was dry -- in only a few minutes! Take that, E6000! -- I unclamped it. Next, I used a disposable acid brush to swirl a small bit of ABS cement into the bottoms of the two end caps and slid them into place. Since I dabbed the cement around the underside of the button plate in a broken line, air escaping from my relief hole under the plate allowed the caps to slide home easily. To mount a pair of Ukswrath's fine belt clips on the TD, I first had to bend the straight part of the clips out of the way a bit to allow room to get my drill and screwdriver into the rear hole of the clips. They bent readily, and I can bend them back where they were when I'm done. With the assembly dry and solid, I masking-taped both clips into place per the Level 2 requirements in the ANH CRL -- "Thermal detonator belt clips are positioned with little to no gap between the clips and the end caps." Then I drilled pilot holes for the screws right through the clips (using that 3/32" bit from earlier), and tightened everything down with the screws. With all four screws in place I stripped off the tape and bent the clips back into their original positions, then did a quick check to look for errant cement or anything else that needed addressed. Everything seemed pretty good to me, and nothing needed fixing that I could see. Here's how everything came out: All that's left now is to paint the screw heads black and get to work on the rest of my armor. OK, hope you've all enjoyed my first installment. Next up -- I've decided to build the bucket. A.J.1 point
-
Quick update. Went out of town for a few days and got this done, so I had to take a break from building. Got back on track today and finished the biceps. Hooray! First pieces fitted, measured and assembled. Next up... Forearms. Stay tuned!1 point