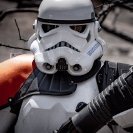
RlNZLER[TK] Posted June 17, 2021 Report Posted June 17, 2021 (edited) Name: Jacob Gonzales Username: Pistolsheets TK-86267 Southern California Garrison Inland Empire Squad Armor Maker = Anovos Helmet Maker = Anovos Blaster Type = E-11 by Hyperfirm Height = 5'10 Weight = 170lbs Boot Maker = Imperial Boots Canvas Belt = Kittle Belt Hand Plates = TrooperBay rubber latex plates Electronics = Icomm, UKSWrath fans, Microphone, Aker speaker Neck Seal Type = Anovos Holster Maker = Anovos Edited June 17, 2021 by Pistolsheets 1 Quote
RlNZLER[TK] Posted June 17, 2021 Author Report Posted June 17, 2021 Full body front: Full body back: Full right: Full left: Right side detail: Left side detail: Action Shot: Helmet: Front: Sides: Back: Hovi detail: Lense color: Accessories: Belt: Neckseal: Blaster Left: Blaster Right: Blaster back: Thermal Detonator: Strapping: Extra: Quote
ukswrath[Staff] Posted June 17, 2021 Report Posted June 17, 2021 Armor looks awesome Jacob, good luck on your application 1 Quote
RlNZLER[TK] Posted June 17, 2021 Author Report Posted June 17, 2021 17 minutes ago, ukswrath said: Armor looks awesome Jacob, good luck on your application Thank you Any more photos needed I’m happy to oblige. 1 Quote
justjoseph63[Staff] Posted June 17, 2021 Report Posted June 17, 2021 Looking sharp, Jacob! Before we can move you along we need a simple fix and one more photo, sir. As per the CRL for Level 2, the screws for the TD must be the slotted type (flat or dome head). The ones you presently have are Philips "V" head. I would check out your local hardware store, but if you can't find the correct style I can mail you some (just pay postage). PM me if interested. Reference image Also, can you post up a close-up pic of your ab/kidney rivets? Thanks, and I look forward to seeing the results! 2 Quote
RlNZLER[TK] Posted June 17, 2021 Author Report Posted June 17, 2021 43 minutes ago, justjoseph63 said: Looking sharp, Jacob! Before we can move you along we need a simple fix and one more photo, sir. As per the CRL for Level 2, the screws for the TD must be the slotted type (flat or dome head). The ones you presently have are Philips "V" head. I would check out your local hardware store, but if you can't find the correct style I can mail you some (just pay postage). PM me if interested. Reference image Also, can you post up a close-up pic of your ab/kidney rivets? Thanks, and I look forward to seeing the results! Will do! I’ll report back on those screws ASAP! In the meantime I wasn’t sure if on or off of the closeup. Here’s the side shot as requested. 1 Quote
RlNZLER[TK] Posted June 17, 2021 Author Report Posted June 17, 2021 51 minutes ago, justjoseph63 said: Looking sharp, Jacob! Before we can move you along we need a simple fix and one more photo, sir. As per the CRL for Level 2, the screws for the TD must be the slotted type (flat or dome head). The ones you presently have are Philips "V" head. I would check out your local hardware store, but if you can't find the correct style I can mail you some (just pay postage). PM me if interested. Reference image Also, can you post up a close-up pic of your ab/kidney rivets? Thanks, and I look forward to seeing the results! 2 Quote
Chemi[Staff] Posted June 17, 2021 Report Posted June 17, 2021 Hello Jacob. Your armor looks awesome!!! -We'll need you to do one more fix before we start reviewing...: Reference image -And one last request, could you add a picture where we can see the "HAN SNAP"? Something like this: Thank you for your patience Jacob!!! Quote
RlNZLER[TK] Posted June 18, 2021 Author Report Posted June 18, 2021 20 hours ago, Chemi said: Hello Jacob. Your armor looks awesome!!! -We'll need you to do one more fix before we start reviewing...: Reference image -And one last request, could you add a picture where we can see the "HAN SNAP"? Something like this: Thank you for your patience Jacob!!! I’m no painter but let me try again on these teeth. here’s the requested photo: 1 Quote
Chemi[Staff] Posted June 18, 2021 Report Posted June 18, 2021 hace 12 minutos, Pistolsheets dijo: I’m no painter but let me try again on these teeth. Some non-acetone (important) paint remover, some toothpicks and a few cotton swabs should do the trick!!! Thanks again Jacob!!! 2 Quote
RlNZLER[TK] Posted June 18, 2021 Author Report Posted June 18, 2021 3 hours ago, Chemi said: Some non-acetone (important) paint remover, some toothpicks and a few cotton swabs should do the trick!!! Thanks again Jacob!!! Teeth request updated *fingers crossed* And TD screws updated with slotted screws. 2 Quote
justjoseph63[Staff] Posted June 18, 2021 Report Posted June 18, 2021 Thanks for the photos, Jacob! I have some good news/bad news, but nothing to worry about. The teeth came out spectacular, and the ab/kidney rivets are good to go, but unfortunately the lighting on the screws on your TD is a too dark. I'm sure they are fine, but can you post up one last really close up photo of them? Once that is done we can get going and get that badge under your name! 1 Quote
RlNZLER[TK] Posted June 18, 2021 Author Report Posted June 18, 2021 6 minutes ago, justjoseph63 said: Thanks for the photos, Jacob! I have some good news/bad news, but nothing to worry about. The teeth came out spectacular, and the ab/kidney rivets are good to go, but unfortunately the lighting on the screws on your TD is a too dark. I'm sure they are fine, but can you post up one last really close up photo of them? Once that is done we can get going and get that badge under your name! My apologies, sorry about that. Here’s better lighting. 1 Quote
TKSpartan[Staff] Posted June 19, 2021 Report Posted June 19, 2021 35 minutes ago, justjoseph63 said: Quote
Chemi[Staff] Posted June 21, 2021 Report Posted June 21, 2021 Hi Jacob, and thank you for your EIB application! CRL and EIB Application Requirements: All required photos have been submitted, and on behalf of the entire D.O. staff we are pleased to welcome you to the rank of Expert Infantry. Congratulations! Other-Armor Fit/Assembly; In this area we review observations made by your fellow troopers and the DO team. Some observations may lead to suggestions to improve the overall look of your armour. Note that we consider both text (CRL) and pictures (screen caps/reference images) when reviewing submissions. Overall a spectacular build!!! Just a few items in this area, so let's get to it! - The paint details on the vocoder could use some definition with a few touch-ups. You can use the same method that you used with the teeth (some non-acetone paint remover, some toothpicks and a few cotton swabs). Reference images -Just a dressing issue. Your right shoulder bell aligns perfectly with the chest armor but the left needs to be lowered a bit. Reference images -Another dressing issue here. We suggest to move the right forearm down. The hand guard is quite far away from the forearm opening. I think the glove is bunched at the wrist, so, for this reason, the forearm is not in place. Reference images - A very small detail but one that can really make a difference. Aligning your thigh and shin pieces. It's small details like these that really elevate your look. Reference images *************************************************** Centurion Requirements; In this section we prepare you for Centurion. Because Centurion photos show more detail than EIB, items pertaining to Centurion might be seen there and not here and additional photos may be required. We try to point out all that we can from what we see, but the final accuracy is the responsibility of the trooper. -L3: The plastic shoulder straps need to be held down in the back via a white elastic band to the white fabric that connects/bridges the chest and back piece. In the published photos, I can't see clearly if the elastic is there or not. But the position of the shoulder straps suggests me that it's not. Adding the white elastic will also help the shoulder straps to be well positioned. Reference image - Although not specifically mentioned in the CRL, the O ring should not be facing toward the back and should be more toward the top so it will need to be raised for L3. Reference images - Your butt plate is riding out and should be brought in to where it aligns with the kidney plate. I would suggest doing a strapping adjustment to get it closer. You can also add a pair of "V tabs" to the end of the plate and this should make the fix. Reference images -Moving on to your thighs back, You have a small gap in the ridges. You could fill that gap with ABS paste, or, you can also just put a small square(very small in this case ) of ABS in, so the black doesn't show through. Very easy fix... Reference image -The front of the left thigh has the same case as in the previous point. 5 minutes and you're done! Reference images -The cover strips of your calves should close right in the center with an equal amount of space on each side of the strip itself, so it seems that they would have to be detached and placed correctly. Reference images -Sniper knee plate must be aligned with the ridges on the shin. As you can see , the sniper knee is a bit lower (discontinuous lines) and should go aligned with the shin (continuous lines). To fix that, It would be necessary to take it off and re-glue it higher to match the ridges correctly. We have a challenge here but we are confident that you can do it ,and here in the FISD you can find all the support and guidance you need to achieve this. remember, we are here to help. Reference images *************************************************** And that's it, trooper. Thanks for your patience. You have a great armor, and we have complete faith that you can address the above issues. After that, I look forward to seeing your submission for Centurion!!! 3 Quote
ukswrath[Staff] Posted June 21, 2021 Report Posted June 21, 2021 Congratulations Jacob, welcome to EIB trooper 2 Quote
RlNZLER[TK] Posted June 21, 2021 Author Report Posted June 21, 2021 3 hours ago, Chemi said: Hi Jacob, and thank you for your EIB application! CRL and EIB Application Requirements: All required photos have been submitted, and on behalf of the entire D.O. staff we are pleased to welcome you to the rank of Expert Infantry. Congratulations! Other-Armor Fit/Assembly; In this area we review observations made by your fellow troopers and the DO team. Some observations may lead to suggestions to improve the overall look of your armour. Note that we consider both text (CRL) and pictures (screen caps/reference images) when reviewing submissions. Overall a spectacular build!!! Just a few items in this area, so let's get to it! - The paint details on the vocoder could use some definition with a few touch-ups. You can use the same method that you used with the teeth (some non-acetone paint remover, some toothpicks and a few cotton swabs). Reference images -Just a dressing issue. Your right shoulder bell aligns perfectly with the chest armor but the left needs to be lowered a bit. Reference images -Another dressing issue here. We suggest to move the right forearm down. The hand guard is quite far away from the forearm opening. I think the glove is bunched at the wrist, so, for this reason, the forearm is not in place. Reference images - A very small detail but one that can really make a difference. Aligning your thigh and shin pieces. It's small details like these that really elevate your look. Reference images *************************************************** Centurion Requirements; In this section we prepare you for Centurion. Because Centurion photos show more detail than EIB, items pertaining to Centurion might be seen there and not here and additional photos may be required. We try to point out all that we can from what we see, but the final accuracy is the responsibility of the trooper. -L3: The plastic shoulder straps need to be held down in the back via a white elastic band to the white fabric that connects/bridges the chest and back piece. In the published photos, I can't see clearly if the elastic is there or not. But the position of the shoulder straps suggests me that it's not. Adding the white elastic will also help the shoulder straps to be well positioned. Reference image - Although not specifically mentioned in the CRL, the O ring should not be facing toward the back and should be more toward the top so it will need to be raised for L3. Reference images - Your butt plate is riding out and should be brought in to where it aligns with the kidney plate. I would suggest doing a strapping adjustment to get it closer. You can also add a pair of "V tabs" to the end of the plate and this should make the fix. Reference images -Moving on to your thighs back, You have a small gap in the ridges. You could fill that gap with ABS paste, or, you can also just put a small square(very small in this case ) of ABS in, so the black doesn't show through. Very easy fix... Reference image -The front of the left thigh has the same case as in the previous point. 5 minutes and you're done! Reference images -The cover strips of your calves should close right in the center with an equal amount of space on each side of the strip itself, so it seems that they would have to be detached and placed correctly. Reference images -Sniper knee plate must be aligned with the ridges on the shin. As you can see , the sniper knee is a bit lower (discontinuous lines) and should go aligned with the shin (continuous lines). To fix that, It would be necessary to take it off and re-glue it higher to match the ridges correctly. We have a challenge here but we are confident that you can do it ,and here in the FISD you can find all the support and guidance you need to achieve this. remember, we are here to help. Reference images *************************************************** And that's it, trooper. Thanks for your patience. You have a great armor, and we have complete faith that you can address the above issues. After that, I look forward to seeing your submission for Centurion!!! Awesome!! Thank you all so much! I can’t say enough how much I appreciate the help getting here. I definitely will make these changes and for the eventual centurion application! Just a couple questions I have regarding the changes for Centurion. 1. Will the TD need to be replaced if I move the O ring higher? The clips, as I understand it, need to be butted against the it on the bottom. 2. The gaps in the back of the thighs, can those be eliminated and be approved by removing more for mobility? It’s along the ridge by my estimation. 3. Not a question but an observation on the shoulder elastic straps. They are there, just my helper getting me suited up didn’t put them on correctly. smh lol I’ll be getting on these fixes right away! Again thank you everyone for everything! 3 Quote
RlNZLER[TK] Posted June 21, 2021 Author Report Posted June 21, 2021 1 hour ago, ukswrath said: Congratulations Jacob, welcome to EIB trooper Thank you sir! Quote
TKSpartan[Staff] Posted June 21, 2021 Report Posted June 21, 2021 Congratulations Trooper !! Welcome to EIB and just a few adjustments and we'll see you at Centurion Ranks 2 Quote
gmrhodes13[Staff] Posted June 21, 2021 Report Posted June 21, 2021 Congratulations trooper and welcome to the EI ranks 2 Quote
Chemi[Staff] Posted June 21, 2021 Report Posted June 21, 2021 hace 34 minutos, Pistolsheets dijo: Awesome!! Thank you all so much! I can’t say enough how much I appreciate the help getting here. I definitely will make these changes and for the eventual centurion application! Just a couple questions I have regarding the changes for Centurion. 1. Will the TD need to be replaced if I move the O ring higher? The clips, as I understand it, need to be butted against the it on the bottom. 2. The gaps in the back of the thighs, can those be eliminated and be approved by removing more for mobility? It’s along the ridge by my estimation. 3. Not a question but an observation on the shoulder elastic straps. They are there, just my helper getting me suited up didn’t put them on correctly. smh lol I’ll be getting on these fixes right away! Again thank you everyone for everything! 1. First, I would try to re-bend the belt clips. This may be easier than you think Jacob. 2. Personally, I think it's easier(and less "risky" ) to put some abs paste, or a small piece of plastic... 2 minutes and you're done. 3. Perfect!!! One less!!! I'm sure someone else can give you more suggestions. I am very glad that you are thinking about applying for Centurion. 2 Quote
RlNZLER[TK] Posted June 22, 2021 Author Report Posted June 22, 2021 3 hours ago, TKSpartan said: Congratulations Trooper !! Welcome to EIB and just a few adjustments and we'll see you at Centurion Ranks 3 hours ago, gmrhodes13 said: Congratulations trooper and welcome to the EI ranks Thank you!! 1 Quote

Recommended Posts
Join the conversation
You can post now and register later. If you have an account, sign in now to post with your account.