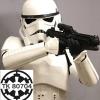
Sgt. Bilko[TK] Posted March 22, 2017 Report Share Posted March 22, 2017 (edited) TK-80407 Requesting ANH Stunt EIB Status [RS] Name: Scott Bilkey 501st ID: TK-80407 FISD Forum Name: Sgt. Bilko Garrison: Northern Darkness Garrison Armor: RS Prop Masters Helmet: RS Prop Masters E-11 Blaster: RS Prop Masters Height: 5’9” Weight: 166 lbs Boots: RS Prop Masters Canvas belt: RS Prop Masters Hand Plates: RS Prop Masters Electronics: Ukswrath's Hearing Assist System, TrooperTalk w/ Aker MR1505 Neck Seal: RS Prop Masters Holster: RS Prop Masters Edited March 29, 2017 by Sgt. Bilko Quote Link to comment Share on other sites More sharing options...
starsaber25[Admin] Posted March 22, 2017 Report Share Posted March 22, 2017 Hi Scott. Very nice job on your build. There are a few things that have popped out at me that could probably use some attention. First is the thermal detonator clips need to be pushed out more to the ends by the bottle caps. There should be very little to no gap in between. Also, I'm sure they are there but it is hard to tell from the photos if there are power cylinders on your E-11. I'm sure they are there but I just can't tell from the photo. And lastly, this probably won't effect your EIB submission but your snap on the right side of the ab plate appears to be pushed towards the center. The snap is supposed to be placed at the upper most corner on the right side. Again I don't know if that will effect your EIB submission or even a Centurion submission but it was just something that caught my eye. But overall you did a very nice job. Good luck with your submission! Quote Link to comment Share on other sites More sharing options...
Sgt. Bilko[TK] Posted March 22, 2017 Author Report Share Posted March 22, 2017 Thank you for the advice. I'll try to get a better pic on the power cylinders. Sent from my iPhone using Tapatalk Quote Link to comment Share on other sites More sharing options...
themaninthesuitcase[Admin] Posted March 22, 2017 Report Share Posted March 22, 2017 Looks good, but I see your sniper plates trying to get caught under the thigh. A bit of foam either in the front of the shin, back of the thigh or both will push the parts away from each other and help stop them catching. And whilst your in the TD, might as well paint the screw heads black for Centurion. Good luck trooper. Quote Link to comment Share on other sites More sharing options...
Shanester[TK] Posted March 22, 2017 Report Share Posted March 22, 2017 Very nice armor. Good luck to you! Quote Link to comment Share on other sites More sharing options...
Sgt. Bilko[TK] Posted March 22, 2017 Author Report Share Posted March 22, 2017 Thanks Shane and Chris, The sniper knee does clash with the thigh as I walk as well. I was going to install stirrups to keep the shins down on the book. The foam suggestion is a great add. Seems easy to install, so perhaps I'll start there first. Thanks for the support! Scott Quote Link to comment Share on other sites More sharing options...
Sgt. Bilko[TK] Posted March 22, 2017 Author Report Share Posted March 22, 2017 Updated pictures.....corrected TD and close up of power cylinders Sent from my iPhone using Tapatalk Quote Link to comment Share on other sites More sharing options...
ukswrath[Staff] Posted March 24, 2017 Report Share Posted March 24, 2017 Hey Scott Andrew or myself will be with your shortly. Quote Link to comment Share on other sites More sharing options...
Sgt. Bilko[TK] Posted March 24, 2017 Author Report Share Posted March 24, 2017 (edited) Post Edited Edited March 29, 2017 by Sgt. Bilko Quote Link to comment Share on other sites More sharing options...
justjoseph63[Staff] Posted March 25, 2017 Report Share Posted March 25, 2017 Great looking set of armor, Scott! For some strange reason, RS has started using pop rivets for the ammo thigh pack which are not permitted at levels 2 and 3. You will need to replace these with either split (bifurcated) or double cap rivets. It is actually a very easy fix... all you need is a drill with a bit (I would try a 7/64ths or maybe a 1/8th size) big enough to drill out the center of the rivet. That will break the bond, and then you can easily replace them. If you need two of either I will send them to you no charge, just PM me your info. See you at EIB soon! HINT: Use bits made for drilling metal, like cobalt or titanium tip. Start with a smaller bit for a "pilot" hole and then move to the larger one. Be VERY careful when doing this. It's pretty easy to do, just take your time. 1 Quote Link to comment Share on other sites More sharing options...
Sgt. Bilko[TK] Posted March 25, 2017 Author Report Share Posted March 25, 2017 Thanks Tony and Joe....PM sent Sent from my iPhone using Tapatalk Quote Link to comment Share on other sites More sharing options...
Sgt. Bilko[TK] Posted March 29, 2017 Author Report Share Posted March 29, 2017 Thanks Joe and Tony for the feedback. Corrections made and photo application above edited. Quote Link to comment Share on other sites More sharing options...
ukswrath[Staff] Posted March 30, 2017 Report Share Posted March 30, 2017 Thanks for the update Scott we'll be with you shortly. Quote Link to comment Share on other sites More sharing options...
ukswrath[Staff] Posted March 30, 2017 Report Share Posted March 30, 2017 Hey Scott, thank you for your EI application, let's get started. CRL and EIB Application Requirements: All the required submission photos have been posted. Your armor displays all the necessary elements to qualify for Expert Infantry. Welcome and congratulations! . Beautiful job on your build Jochen Other-Armor Fit/Assembly: In this section we review observations made by your fellow troopers and ourselves. Some observations may lead to suggestions to improve the overall look of your armor. If any suggestion affects any application, it will be listed separately in the above or below sections. Since this section is used to enhance to overall look of your armor we have a few requests. 1) Not a huge deal but if you could tuck the posterior in a bit that would be awesome. Reference photo 2) Ab snap (right side) out of place. Again not a deal breaker but as Steve mentioned the snap is not quite in the proper location. It's in the proper location if the Ab return edge was smaller or removed but since you're using it the snap should be closer to the seam edge as seen in the reference photo. Reference photo 3) Sniper knee return edge thick. Especially on the left side the knee plate should run parallel with the armor. Reference photo 4) Remove ID info from the TD tube and Ear screws touch up. When you get a moment please remove the TD tube ID info lol and your ear screws could use a little bit more paint. There are easy fixes that will enhance the overall look of your armor. Centurion Suggestions: In this section we prepare you for Centurion. If there were any areas of concern they would be discussed here. The only are of concern here is the ab to kidney gap. The CRL states ideally there's no gap. This will have to be remedied before applying for Centurion. Drop Box alignment. As per the CRL your drop boxes are to be aligned with the edge of your ammo belt. They also sit below the ammo belt. A simple fix for this is to glue the connecting strap to the cloth belt. For level three certification (if applicable): Drop boxes are vertically aligned with the end of the ammo belt with minimal gap between belt and box. Reference photo Ab to Kidney gap. The CRL states For level three certification (if applicable): Ideally there no gap between the abdomen and kidney armor. Both left and right side gaps will need to be closed a bit more. How you choose to do this is up to you. Reference photos That's it. Excellent job on your build, hope to see you at Centurion. Quote Link to comment Share on other sites More sharing options...
Sgt. Bilko[TK] Posted March 30, 2017 Author Report Share Posted March 30, 2017 Thanks Tony...I've got some work to do, but with this forum's help I'm sure I'll be there soon Sent from my iPhone using Tapatalk Quote Link to comment Share on other sites More sharing options...
bmth chris[TK] Posted March 30, 2017 Report Share Posted March 30, 2017 Congrats on EIB! Sent from my iPhone using Tapatalk Quote Link to comment Share on other sites More sharing options...
Sgt. Bilko[TK] Posted March 31, 2017 Author Report Share Posted March 31, 2017 Thanks a lot Chris. This forum rocks. Quote Link to comment Share on other sites More sharing options...
starsaber25[Admin] Posted April 1, 2017 Report Share Posted April 1, 2017 Congrats Scott and welcome to EIB! Hope to see your Centurion submission soon! Quote Link to comment Share on other sites More sharing options...

Recommended Posts
Join the conversation
You can post now and register later. If you have an account, sign in now to post with your account.