valo Posted June 8, 2014 Report Share Posted June 8, 2014 (edited) I had an extremely happy event about a week ago...A very large brown box arrived at my house filled with lots of goodies!! My troopermaster 1.5 ABS ANH stormtrooper kit was here! I chose to go with a stunt helmet for this build and also original strapping! I also got a leather holster and canvas belt. This is what my living room floor looked like later that evening! I spent a good few hours that evening just simply loving looking at each piece! I had spent quite some time looking into which kit to go for and I am so happy I chose to go with Troopermaster! Paul has been so nice and helpful every step of the way too. I know I'm going to be bombarding him with questions all through my build! After a week of more research into builds including looking very closely at Paul's own build thread here on FISD http://www.whitearmo...h-hero-buildtm/ I decided to take the plunge tonight and get cracking! I'm really excited to get building and get out there Trooping! I'm going to post my build here and also on the UK Garrison forum. All comments, suggestions, critiques and opinions about how I'm doing with this build will be very much apreciated. I really want to get this right and get myself approved and out trooping So after deliberating long and hard about where to start, I decided to go with my helmet! But first thing I did tonight though, was to go through the original strapping kit I got from Troopermaster and sort it into box to keep it all safe and easy to see. I'm pretty confident about most of the strapping system, but I will most likely be asking questions about that as I go along with the build! Now onto the lovely stunt helmet I got with my kit! I spent my evening very carefully trimming the faceplate and back of the helmet, marking and trimming the eyes. I'm pretty happy with the eyes, they may need a little more sanding perhaps but they are good for mow. I've marked out the teeth. Not got round to trimming those yet. Then I had a little test fit using magnets to hold everything together to get an idea of where i will be drilling to put in the rivets. Thats as far as I'm going for this evening. On to trimming and fitting the ears tomorrow! Another thing I have made a start with recently are some latex hand guards. I wanted to make these myself. I found a wonderful tutorial and templates by Karin, Queen of Handguards here on the FISD. She is wonderfully generous with her information. Using her templates and tutorial, I made some forms out of layered ABS plastic and used these to make a plaster mould. These are the sculpted forms made out of ABS. Sanded and glossed up with a clear lacquer. I decided to mix my latex with white acrylic paint and poured it in the mould. Edited June 21, 2014 by valo 1 Quote Link to comment Share on other sites More sharing options...
Starfox2010[TK] Posted June 8, 2014 Report Share Posted June 8, 2014 That strapping kit box Quote Link to comment Share on other sites More sharing options...
valo Posted June 18, 2014 Author Report Share Posted June 18, 2014 That strapping kit box Thanks. I enjoyed sorting it out Quote Link to comment Share on other sites More sharing options...
valo Posted June 18, 2014 Author Report Share Posted June 18, 2014 Its been a while since I started working on the my helmet. The first part of my TM ANH stormtrooper build. So far I have roughly trimmed out the eyes and teeth, riveted the faceplate and back together and trimmed and fitted the ears. I've fitted the brow and S trim temporarily and also the mic tips to get an overall look at things. I clamped the cap and back to the face plate so I could drill and rivet the parts together. I've been using bobojuice's TK resource thread http://www.whitearmor.net/forum/topic/18735-tk-resource-thread/ for some invaluable reference and also images on www.starwarshelmets.com and Troopermaster's own images of his great work! The ears were far from easy to fit and I have spent a long time whittling away at them to get the fit I think looks right! Here is the result so far. Pretty happy with how its shaping up. I'm going for as screen accurate as I can I would really appreciate all comments. Quote Link to comment Share on other sites More sharing options...
Bulldog44[TK] Posted June 20, 2014 Report Share Posted June 20, 2014 Nice job on the ears. Looks like a perfect fit. Looking forward to see the finished product. Quote Link to comment Share on other sites More sharing options...
Locitus[Admin] Posted June 20, 2014 Report Share Posted June 20, 2014 Nice work! Quote Link to comment Share on other sites More sharing options...
gazmosis[501st] Posted June 20, 2014 Report Share Posted June 20, 2014 I'd open up those teeth a little more. Outstanding balance to that helmet! Well built! Quote Link to comment Share on other sites More sharing options...
CorrosiveHitman Posted June 20, 2014 Report Share Posted June 20, 2014 Looks like you are getting on well, I have just finished my 1.5mm tm build. Just down the road in Hemel if you get stuck (not that I think you will based on what you have done already) Quote Link to comment Share on other sites More sharing options...
senna1rossi[TK] Posted June 20, 2014 Report Share Posted June 20, 2014 so nice mmmm, TM Quote Link to comment Share on other sites More sharing options...
Trooper Downen[TK] Posted June 20, 2014 Report Share Posted June 20, 2014 A very nice start to your build! I like how you decided to make your own hand guards. Looks like you're on your way to a fantastic result. Quote Link to comment Share on other sites More sharing options...
valo Posted June 20, 2014 Author Report Share Posted June 20, 2014 (edited) Thanks so much for the comments guys. I really appreciate them Nice job on the ears. Looks like a perfect fit. Looking forward to see the finished product. Thank you I'm pretty happy with them. They took me a loooong time to get right though! haha! I'd say about 4 - 5 hours each ear!! I'm so glad that Paul includes two pairs of ears with his kit! I really thought I'd screwed up the right ear at first so moved on to the spare one...only to end up 4 hours later going back to the one I'd started originally and realising I was much happier with it! Similar with the left. I thought I was happy with its fit but then went back to it the next day and whittled it down some more for another hour!...I am so glad I have finished that part! I'd open up those teeth a little more. Outstanding balance to that helmet! Well built! Thank you! I opened the teeth up some more this evening before starting to paint. Definitely looks much better Looks like you are getting on well, I have just finished my 1.5mm tm build. Just down the road in Hemel if you get stuck (not that I think you will based on what you have done already) I might take you up on that Thank you. Its nice to know there are UKG members living near by. So far I know of guys in Wycombe and St. Albans also. Really looking forward to getting this kit together, getting myself approved and getting out trooping with you guys! A very nice start to your build! I like how you decided to make your own hand guards. Looks like you're on your way to a fantastic result. Thank you! I'm going to post a bit more on the hand guards in just a minute. I'd like to hear opinions on how they are looking Edited June 21, 2014 by valo Quote Link to comment Share on other sites More sharing options...
valo Posted June 20, 2014 Author Report Share Posted June 20, 2014 I've been busy with more on my helmet build this evening. Sanded the eyes a little more and also opened up the teeth some more. I had painted the hovi mic tips over the past couple of evenings. Two coats of black gloss enamel. allowing each coat to dry til the next day. Fisrt thing I did this evening was to fit them to the helmet....I love how they look! Quote Link to comment Share on other sites More sharing options...
valo Posted June 20, 2014 Author Report Share Posted June 20, 2014 After I spent a little while sanding the eyes and opening up the teeth some more, I started the bit I have most been looking forward to...laying down some paint This evening I have painted a coat on the teeth and vocoder. Tomorrow I'll give them a second coat. I also started all the other details with some black. After a second coat on these areas, I'll cut in with the grey. I have ordered some tube stripe templates from Trooperbay to help me with painting those Quote Link to comment Share on other sites More sharing options...
valo Posted June 21, 2014 Author Report Share Posted June 21, 2014 (edited) I have also been doing a bit of work with the hand guards I'm making. Like I said in an earlier post I sculpted these out of layered ABS plastic using Karin Queen of Handguards templates and tutorial. Massive thanks to her for her generosity with passing on information and some wonderful tutorials. I had used these to make a plaster mould for pouring my latex. So far I have made some out of latex and painted them white. I have also poured some in latex that I mixed with white acrylic paint. These are the latex ones I painted white and glossed them up a little with a urethane varnish. Then I decided to try something a little different. I made a silicone mould off the sculpt and poured up a set in a urethane rubber called PT Flex 60. Available from these people http://www.mouldlife.net nice and flexible and can be coloured with a polyurethane pigment. They came out of the mould nice and white with a nice bit of a shine to them. Heres the silicone mould with the PT Flex poured in This is how the PT Flex hand guards came out of the mould Nice and flexible I still like the painted latex for accuracy but the PT Flex versions will last a lot longer for trooping. I'd appreciate your thoughts. Edited June 21, 2014 by valo 1 Quote Link to comment Share on other sites More sharing options...
valo Posted June 21, 2014 Author Report Share Posted June 21, 2014 On to the second coat of paint tonight. Just started cutting in with the grey Also, these arrived today from Trooperbay! Good timing Trooperbay! Quote Link to comment Share on other sites More sharing options...
valo Posted June 22, 2014 Author Report Share Posted June 22, 2014 I also Got some glue through the other day. I know the E6000 is a popular glue for glueing all parts together but I decided to get some Stelmax White Adhesive, which I believe is more acurate. I have also read that the Stelmax is pretty hardcore and can melt the ABS if you're not too careful. I'm thinking about going for using the Stelmax but I'd like to hear about any of your experiences guys, with both glues. I'd really apreciate it Quote Link to comment Share on other sites More sharing options...
valo Posted June 23, 2014 Author Report Share Posted June 23, 2014 Slowly getting there. Having a go with the tube stripe templates from Trooperbay. Hoping I applied them well enough to not get any bleeding. Not too far from being done now! I'm glad I started the with my bucket. I'm just excited to get cracking with the rest of the build now! Quote Link to comment Share on other sites More sharing options...
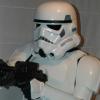
valo Posted June 30, 2014 Author Report Share Posted June 30, 2014 I've just finished my helmet this evening. I'm pretty happy with how its turned out. I've kept all the details hand painted except for the tube stripes and I used a template from Trooperbay to paint those. I didn't trust my steady hand enough for those They needed some tidying up and I think they still have a nice hand painted feel. Here are a few pictures of the finished bucket And the inside. Next its on to the armour build Quote Link to comment Share on other sites More sharing options...
vecspeed12 Posted July 1, 2014 Report Share Posted July 1, 2014 I love how your helmet turned out. Amazing. Quote Link to comment Share on other sites More sharing options...
valo Posted July 2, 2014 Author Report Share Posted July 2, 2014 I love how your helmet turned out. Amazing. Thank you very much! Im pretty happy with it Quote Link to comment Share on other sites More sharing options...
valo Posted July 5, 2014 Author Report Share Posted July 5, 2014 On with the rest of the armour build! I put together the thermal detonator the other day. Didn't find it too bad and I'm pretty pleased with it. I have decided to start with my shins and work my way up. This evening I managed to get all the shin halves trimmed up and front cover strips put on. I've also fixed on the sniper plate and as I'm going for Expert Infantry and Centurion, I glued this in place. No visible rivets or bolts The sniper plate still needs a little trimming on its top edge. I decided to go with the stelmax glue for all the gluing. It is definitely hardcore! Need to be careful not to drip any where I don't want it!! Tomorrow it will be adding the straps and hooks to the back of the shins Quote Link to comment Share on other sites More sharing options...
gazmosis[501st] Posted July 5, 2014 Report Share Posted July 5, 2014 Those handplates are amazing and you NAILED those helmet details. Best I have seen in a while!!! Quote Link to comment Share on other sites More sharing options...
valo Posted July 5, 2014 Author Report Share Posted July 5, 2014 Those handplates are amazing and you NAILED those helmet details. Best I have seen in a while!!! Wow! Thanks very much Steve. I was really happy with how the details turned out on my helmet. The PT Flex material that I made the handplates out of has actually yellowed some since I cast out the ones in the pictures. I think this might be something to do with it being a polyurethane rubber, which can be prone to yellowing and the amount of white urethane pigment I mixed in. It did start yellowing rather quickly though. I painted up a pair that I cast out in latex and these are the ones I have glued onto a pair of black rubber gloves. I do like how these ones look Quote Link to comment Share on other sites More sharing options...
valo Posted July 7, 2014 Author Report Share Posted July 7, 2014 A few more progress pictures of the recent work I've done over the past couple of evenings. Working on the shins. Both left and right are done. Sniper plate is attached and I'm using the screen accurate hook closure method. Sniper plate. Attaching back cover strip and hooks. Altogether I'm quite happy how they fit. Here are a couple of 'selfie' pictures I managed to take of the left shin Quote Link to comment Share on other sites More sharing options...
Techne[TK] Posted July 8, 2014 Report Share Posted July 8, 2014 Looks like it's coming along great. I'm super impressed with those handguards. Quote Link to comment Share on other sites More sharing options...

Recommended Posts
Join the conversation
You can post now and register later. If you have an account, sign in now to post with your account.