


valo
-
Posts
93 -
Joined
-
Last visited
Content Type
Profiles
Forums
Gallery
Articles
Everything posted by valo
-
Perhaps take a piece of your armour down to a model shop that sells ABS and then you can colour match it side by side? I know that Slough Radio Control Models sell small sheets of white ABS. I've bought it in there myself in the past for other projects. Are you on the UK Garrison forum too? Theres lots of great help and info over there too and their armourers are super helpful and awesome too I'm sure you will find the answers you need either here or there
-
Which armour kit do you have? Best bet if you can, is to contact the armour maker and ask if you can buy a couple of sheets of the ABS they use for pulling their armour parts. Then at least you will be certain of an exact match
-
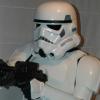
I like the rounded off look too. I did mine like this
-
 Thank you!
 -
TK-13376 requesting 501st access please. http://www.501st.com/members/displaymemberdetails.php?userID=17965 Thank you Anthony
-
Thanks guys! My clearance request for the UK Garrison has been approved! Hope to do my first troop soon! Just waiting on my 501st membership to go through so I can get my TK number
-
Then of course I'll be applying for Expert Infantry and Centurion
-
Thanks very much guys! I'm just about to put my photos in for clearance with the UK Garrison and also apply for 501st membership! Can't wait!
-
Finally finished my first Stormtrooper kit! Just finished by painting visible rivet and screw heads white. Took a load of photos tonight. With a very big smile!! Once I get the ok, I'll be putting it through for clearance with the UKG and signing up for 501st membership. Trooping soon!!
-
I've just fixed elastics to the thighs and these are now attached to a belt under my armor to hold them up Just done my first test fitting of the whole kit!...Very excited! Just a few bits to finish off then I'm ready for approval!!
-
Lastly tonight, I did a quick test fitting of the top half of my kit which is now pretty much done Last bits I have left are to touch up paint details like painting screw and rivet heads white, attach elastic to the top of the thighs and sort out a belt to hold those up with. I also need to sort out a new neck seal. The one I have is a little tight and I'd prefer it to go a little higher along the jaw line towards the back of my head. My wife is going to have a go at making one up in a nice soft black leather. We've also sourced some rubber cord that is the right thickness and nice, soft and flexible that we are going to use to pad out the ridges.
-
Belt all done
-
Getting there
-
Trying to get the belt sorted today. I have a great canvas belt that I got from TM with the rest of my kit. I wanted to prevent any unwanted fraying of the edges so I picked up a bottle of 'Fray Stopper' from a local craft shop. It is great stuff. clear and flexible and dries really fast. I just dabbed it carefully from the bottle along the edges of the belt. So far I've got my ammo belt trimmed and drop box front and backs trimmed and its now all ready for assembly I've also painted and fitted my ab buttons too
-
Wow! Thank you! That is really great to hear I'm having so much fun with the build! Just looking forward to being ready for 501st approval and able to troop with my local garrison! I'll be applying for Expert Infantry and Centurion of course too
-
Hi. Yes I got it from RS Propmasters. It was quite a few months ago now that I got it. I've just had a look on their website myself and its changed a bit since I last had a look. Can't find neckseals on there either. Perhaps drop them an email? Its really nice quality, although a tiny bit tight on me. I might have not measured my neck right or allowed a little extra when I sent them my measurements. I'm going to hang on to this RS one for possible display and my wife (who's tailors dummy I have my armor on) is going to make one up for me
-
Thank you! I'm really enjoying the build! I'm definitely going to go for centurion Thank you. That neck seal came from RS. It comes as a regular dickey style. The stand I have the body armor on in the picture is covered in a similar black material. I guess that's why it looks a bit like the neck is on a shirt.
-
Thank you very much. I am having a great time doing the build! Not far to go now! Going the extra with details is more than worth it!
-
Its been a while since I did any work on my kit. One thing and another has got in the way and prevented me from getting on with it. Over the past couple of days though I have managed to get going again and have made some good progress on the main body of the armor. Here are a few pictures of my progress. Abdomen and kidney parts joined with elastics and split rivets. Attaching shoulder straps to chest Crotch elastic attached with split rivet All parts joined together
-
Hi and thanks for the nice comment Its very possible you saw my helmet on fb. I did post a picture of it on there and I tagged troopermaster in the picture
-
I've been busy working on the arms recently. Putting forearms and biceps together and trimming my shoulder bells. I've joined the forearm and bicep pieces together with elastic and I've put the lower elastic strap on my shoulder bells. Here are a few pictures of the progress on the arms Gluing cover strips to biceps All the pieces Shoulder bells Forearms Biceps together with elastic glued in place for joining to forearms. Forearms and biceps joined together. On to trimming and joining chest and back pieces and attaching brackets for joining kidney and ab plates next
-
Here are a few progress pictures. I've been working on the thighs now that my shins are sorted.
-
A few more progress pictures of the recent work I've done over the past couple of evenings. Working on the shins. Both left and right are done. Sniper plate is attached and I'm using the screen accurate hook closure method. Sniper plate. Attaching back cover strip and hooks. Altogether I'm quite happy how they fit. Here are a couple of 'selfie' pictures I managed to take of the left shin
-
what to do inside my new TM stunt helmet build
valo replied to valo's topic in Build Threads Requireing Maintenance
Ive been dooing a bit of research into welding shields. I like the idea of using something like that for the lenses in my helmet. I found a few green welding glasses or goggles that look like they might do the job. Im thinking shade 3 will be sufficient? Shade 5 look like there would be less chance of seeing my eyes but I doubt ill be able to see out? -
Wow! Thanks very much Steve. I was really happy with how the details turned out on my helmet. The PT Flex material that I made the handplates out of has actually yellowed some since I cast out the ones in the pictures. I think this might be something to do with it being a polyurethane rubber, which can be prone to yellowing and the amount of white urethane pigment I mixed in. It did start yellowing rather quickly though. I painted up a pair that I cast out in latex and these are the ones I have glued onto a pair of black rubber gloves. I do like how these ones look
