Colin1138[TK] Posted May 2, 2012 Report Share Posted May 2, 2012 (edited) Hi folks! I've been trooping for a couple years now as a TIE Pilot and DS Gunner and last year, I decided to join the ranks of the humble TK. Being a fan of the lesser known/done costumes I decided on a ROTJ TK. I got the kit off of Mark last year-August I think- and got off to a flying start. THis is my first ever proper build(the TIE and Gunner hard parts came pre-assembled) so I was pretty eager to get started, but unfortunately I some how ran out of steam and the semi-finished kit has sat in the box for several months.. Until now! Next week has been booked off work so fingers crossed I'll be able to dive back in! Here are some pics of how far I got: Still to finish padding: I've retrimmed the butt and glued the edging since taking this pic: I've also trimmed the legs and belt.What's the verdict for a novice builder then? Thanks in advance for any and all tips you can give me! Edited May 2, 2012 by Colin1138 Quote Link to comment Share on other sites More sharing options...
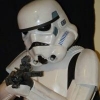
Locitus[Admin] Posted May 2, 2012 Report Share Posted May 2, 2012 Looking good! I'm not the greatest expert at ROTJ, but I think you did a great job on the helmet. Quote Link to comment Share on other sites More sharing options...
Rich330[TK] Posted May 2, 2012 Report Share Posted May 2, 2012 Looks good to me so far. Are you going to keep it clean and shiny or are you going for a dirty Endor Forest weathering job? Quote Link to comment Share on other sites More sharing options...
Colin1138[TK] Posted May 2, 2012 Author Report Share Posted May 2, 2012 Thnks guys! It's been lying in a box like that since October! I would have preferred the ears to be more flush to the lid and the stickers ended up with a couple bubbles/creases in them, but I guess that adds to the effect. Thinking of going grubby Endor Rick. I kinda want to differentiate my TK from all our ANH troopers as much as possible. I don't think I'm going to use a holster or attach the thermal det either. I've also painted my TKboots soles white,so most of the work ahead is making popper tiles,sanding my seams smooth and I still have to trim the rears of my legs and my biceps. (which have become a bit of a stumbling block) and sourcing an accurate blaster. I already have a small TK-friendly arsenal- an ANH E-11, an SE-14R and a DLT-19 but I really would like an accurate fugly ROTJ E-11. Where would you suggest I trim here? I know I'm supposd to trim along the lower line,but to me that seems like it won't leave enough of an overlap? Did you have a similar issue on your build Rick? Also, would it be advisable or not to follow the screenbuilt suits and rivet my belt directly to the Ab plate? WOuld that cause issues in the future? Quote Link to comment Share on other sites More sharing options...
bigtrev503 Posted May 2, 2012 Report Share Posted May 2, 2012 If you ever spill blue milk on your canvas belt it might be an issue I think a lot of guys here snap them on so they can be washed/replaced more easily. I'm not 100% sure though. Quote Link to comment Share on other sites More sharing options...
JoeR Posted May 3, 2012 Report Share Posted May 3, 2012 Helmet is looking awesome, fantastic job on the ears, they fit perfectly. Keep up the good work. JoeR Quote Link to comment Share on other sites More sharing options...
Rich330[TK] Posted May 3, 2012 Report Share Posted May 3, 2012 Where would you suggest I trim here? I know I'm supposd to trim along the lower line,but to me that seems like it won't leave enough of an overlap? Did you have a similar issue on your build Rick? Don't remember any issues. Check with Mark whether that particular part is OK. I can't tell from the photo. You don't have much overlap on the arm seams though. If you're going Endor style and you find the bubble lenses are difficult to see through, don't be scared to change to flat lenses. They are just as (or possible more) appropriate/accurate for the Forest "stunt" troopers and make life a lot easier. Quote Link to comment Share on other sites More sharing options...
Nassik Posted May 7, 2012 Report Share Posted May 7, 2012 The helmet is looking very good. As far as whether or not to rivet the belt to the ab plate, it's personal preference. Mine is riveted on. My webbing belt is three or so millimeters thick and there wasn't much of a way for me to use snaps although the idea did appeal to me. In the end, it was simpler to rivet it in place. The plus side to that is that I never have to worry about my belt shifting or moving. I don't have a hard time seeing through my bubble lenses. I may be the exception to the rule, though. Quote Link to comment Share on other sites More sharing options...
Shock Trooper Posted May 28, 2012 Report Share Posted May 28, 2012 Any help to cut the ears?. Thanks. Quote Link to comment Share on other sites More sharing options...
Colin1138[TK] Posted February 12, 2013 Author Report Share Posted February 12, 2013 Hey folks,..been a while since I updated! ran out of momentum a while back, but I recently got the box out again and got back to work: THoughts,opinions,warnings? Hope I'm on the right track so far! Quote Link to comment Share on other sites More sharing options...
gmrhodes13[Staff] Posted February 12, 2013 Report Share Posted February 12, 2013 Looking good so far, sometimes you need a break before the push to the end, good luck with the rest of the build Quote Link to comment Share on other sites More sharing options...
Kessel Run[TK] Posted February 12, 2013 Report Share Posted February 12, 2013 lookng good, just make sure you are able to move the thighs up a little I had to take mine apart 4 times to get them to sit right, and be able to walk and bend my knee some. your on the right track. Quote Link to comment Share on other sites More sharing options...
Colin1138[TK] Posted February 12, 2013 Author Report Share Posted February 12, 2013 Thanks guys. THe thighs are pretty much as high as they can be-it slipped a bit in that first pic, I should have posted this too: Both they and the shins will need trimmed,if I want to keep my knees! I thinkabout an inch off of each should do. THanks for the pointers! Quote Link to comment Share on other sites More sharing options...
Colin1138[TK] Posted February 18, 2013 Author Report Share Posted February 18, 2013 Got a bit more done, had a quick try on: Still to do: Shoulder bells padded with foam(for that classic 80's look) and strapped to chest/back connection. Thighs strapped and attached to belt Leg ammo belt and shoulder bridges curved(bricking this!) Knee plate and ammo belt attached to legs. Shins trimmed to allow leg movement. Main belt attached. Fore arms padded out. General tidy up of the thigh tops. Accurate blaster. Anything leaping out at our resident experts that I should be looking at? Quote Link to comment Share on other sites More sharing options...
Colin1138[TK] Posted May 13, 2013 Author Report Share Posted May 13, 2013 Finally got some more free time to work on this again: %5BIMG%5Dhttp://i1230.photobucket.com/albums/ee496/dooku507/912542_10152881302670651_771776059_n_zps302bd0a9.jpg %5BIMG%5Dhttp://i1230.photobucket.com/albums/ee496/dooku507/912558_10152881297965651_1244656584_n_zps7c86bd7e.jpg %5BIMG%5Dhttp://i1230.photobucket.com/albums/ee496/dooku507/912519_10152881297200651_1103557340_n_zpsa45d07f8.jpg Need to look at the chest/backplates. Not tight enough to my body. maybe shortening the sholder straps will remedy? Quote Link to comment Share on other sites More sharing options...
Colin1138[TK] Posted May 20, 2013 Author Report Share Posted May 20, 2013 Final stretch I hope! %5BIMG%5Dhttp://i1230.photobucket.com/albums/ee496/dooku507/20130518_215311_zps8f5a68c4.jpg %5BIMG%5Dhttp://i1230.photobucket.com/albums/ee496/dooku507/20130518_215333_zps9b81eab3.jpg %5BIMG%5Dhttp://i1230.photobucket.com/albums/ee496/dooku507/20130518_215359_zps83b197e5.jpg %5BIMG%5Dhttp://i1230.photobucket.com/albums/ee496/dooku507/20130518_215434_zpsace9a82e.jpg %5BIMG%5Dhttp://i1230.photobucket.com/albums/ee496/dooku507/20130518_215413_zps674455b4.jpg Quote Link to comment Share on other sites More sharing options...
JoeR Posted May 22, 2013 Report Share Posted May 22, 2013 Looking great Colin. Great to see another ROTJ join the ranks. Mark has done a superb job on these kits. JoeR Quote Link to comment Share on other sites More sharing options...
sskunky Posted June 1, 2013 Report Share Posted June 1, 2013 Great stuff! I really have done a great job......hahahahah Seriously you've done a fantastic job. Well done. Quote Link to comment Share on other sites More sharing options...
Colin1138[TK] Posted June 19, 2013 Author Report Share Posted June 19, 2013 Just got word, clearance is granted! Centurion next!! :D Quote Link to comment Share on other sites More sharing options...
bjsavage7[TK] Posted June 19, 2013 Report Share Posted June 19, 2013 Congrats, Colin! Great job! Quote Link to comment Share on other sites More sharing options...
gmrhodes13[Staff] Posted June 19, 2013 Report Share Posted June 19, 2013 Congrats and well done, welcome to the ranks Quote Link to comment Share on other sites More sharing options...
sskunky Posted June 19, 2013 Report Share Posted June 19, 2013 Well done Colin! Congrats. Quote Link to comment Share on other sites More sharing options...

Recommended Posts
Join the conversation
You can post now and register later. If you have an account, sign in now to post with your account.