Search the Community
Showing results for '"Imperial Gaskets"' in topics.
-
As we continue to improve our support for the FOTK we've comprised a list of all the Hard & Soft goods vendors to help you with your build. We will continue to monitor and update the list as needed. Just a reminder the FISD does not endorse any particular vendor, nor is responsible for any transaction between you and the vendor. Please do your research before purchasing. Armor/Helmet: Jimmiroquai - Origin PHILIPPINES: Kits are partially assembled/fully trimmed lightweight fiberglass (ready for rigging and painting). No issues with quality or service reported. Contact for delivery times/price details. FB Link Here, Email Here or send a private message @jimmiroquai KB PROPS Temporarily Unavailable KB - Origin USA: Kits are made of ABS and will need to be trimmed and assembled. No issues with quality or service reported. Contact for delivery times/price details. Link Here, Email Here Armoryshop Props - Origin RUSSIA: Supplies a range of First Order Armour and Specialised 3Dprinted Helmets Link Here Armor vendors under review: 850 - Origin USA: Kits are made of ABS and will need to be trimmed and assembled. No issues with quality or service reported. Contact for delivery times/price details. Link Here Imperial Surplus (Kevin Weir) - Origin USA: Kits are made of ABS and require trimming and assembly. Armour kit is vac-formed with ABS and cast detail parts and decals are included with the kit. Quality has been solid, communication and service good. Kits ship out in 4 weeks or less Link Here WTF - Origin USA: TFA and TLJ new kit awaiting member feed back and reviews for quality etc. Kit made of ABS with some resin parts. Link Here Anovos- Offers a "Pre-order" FO kit at this time, but due to legal issues and extended (1 year plus) wait times is no longer recommended or available Denuo Novo - Origin USA: Purchase Anovos and are now supplying kits are made of ABS and will need to be trimmed and assembled. Website Link Here Soft goods vendors: Soft goods assorted (Soulart) - Origin CANADA: Neck seals, Harnesses, Shiny biker shorts, First Order gaskets, Phasma capes. Link Here Soft goods assorted (Imperial Gaskets) - Origin USA: Rubber gaskets, Pauldrons and Waist belts. FB contact Soft goods Rubber gaskets (Thorsson Associates Workshop) - Origin USA: Link Here Email: sthorsson99@yahoo.com FB: https://www.facebook.com/Thorsson-Associates-Workshop-112076042142986 Soft goods assorted (Trooper Bay) - Origin USA: Link Here Under Suit - Stormtrooperundersuit Link Here link not working Gaskets - Sheev's Emporium - Link Here (Facebook sales page) Belt - Belts of the First Order (JAFO)- Origin AUSTRALIA: Link Here Boots - Imperial Boots Origin CHINA: Link Here Gloves - Imperial Boots Origin CHINA: Link Here Endor Finders Origin USA: Link Here Neck Seal - The Dark Side Closet Link Here (Facebook sales page) Sheev's Emporium - Link Here (Facebook sales page) Suspension - Awaiting vendor Waist belt pouches - Trooperbay Origin USA: Link here Hardware vendors: Holster - R2Dan. Origin GERMANY: Other hard accessories available by application. V2 Link Here Hand Plates - As above Shoulder bell supports- (Accuracy upgrade) - ukswrath Origin USA: Link Here Waist belt center box base (Accuracy upgrade) (Empire 3D) - Origin AUSTRALIA Link Here Machined metal components - Justin Morrison Origin UK: Parts for Blaster rifle and pistol mounting, Resin holsters and other greeblies, machined metal components and more. Email Here FB links https://www.facebook.com/groups/1654472361474254/user/802819468 https://www.facebook.com/kingleezard Helmet Lens - OPLE props Origin GERMANY: Link Here Accessories: Pauldron - Denuo Novo (No stock currently) Pauldron - Trooperbay Link Here Riot Shield - Awaiting vendor Tactical Vest - Awaiting vendor 3D files: 3D print files TLJ helmet (Sano) Sanotized Creations - Link Here 3D print files F11D (The5thHorseman) - Link Here 3D print files SE-44C (The5thHorseman) - Link Here Commission builders: Crooknight - Crookknight@gmail.com dbetters - dan@thetown.org Building Guides/Thread,Tutorials & How To: Please refer to Building guides ... Weapons: General - Link Here F11D - Branfurh Studios (Etsy shop) Link Here Executioner Laser Axe - Armory Shop (Facebook sales page) Link Here / Etsy shop Link Here 3D print blaster kits - The Imperial Factory - ( Facebook sales page) Link Here Email Link Here Electroprod - (Empire 3D) - Email here. Link Here F-11D/E-11 Picatinny Rails - (justloseph63) - Link (purchase) F-11D/E-11 Picatinny Rails - (evike.com) - Link (purchase) F-11D/E-11 Picatinny Rails - (m416gelblaster) - Link (purchase) F-11D Picatinny Rails - (themaninthesuitcase) - Link 3D files E-11 Picatinny Rails - (TK14082) -Link Part of Rogue One 3D files Please refer to Vendors weapons list for up to date links/info
- 42 replies
-
- 10
-

-
Finally, after having bits and pieces except the armour since 2017, I managed to get my hands on an ANOVOS TFA kit, and so finally my build can commence! Armour, Helmet and Neck Seal: Anovos TFA Gaskets: Imperial Gaskets (rubber) Boots and Gloves: Imperial boots Undersuit: Stormtrooperundersuit F11D Blaster: 3D Print As I build, I will be linking those parts here for easy reference instead of scrolling through every post. Disclaimer: I am intending to build this to Level 3 certification, so hopefully the CRL doesn't change drastically during my build. Comments are welcome! And here's the kit in all its glory. Washed with mild soap to remove any release agents that might be on the plastic. The basic tools that I am using: Cutting and Sanding Proxxon Handheld Jigsaw for cutting ABS: https://www.proxxon.com/us/micromot/38530.php Belt Sander for fast sanding Proxxon Handheld Belt Sander for finer but still fast sanding: https://www.proxxon.com/us/micromot/38536.php Files, various grades of sandpaper for final sanding Adhesives CA Glue for small quick joints Weicon epoxy for final and large joints: https://www.weicon.de/en/applications/bonding-and-sealing/linking-major-parts/for-large-bond-gaps/54/easy-mix-n-50-epoxy-adhesive Weicon Epoxy glue dispenser gun and mixing nozzle Cutting the pieces Every piece was first outlined with a marker pen to understand where to cut off. I tool care to use references and other build threads to see where there would be return edges, and where there wouldn't. Golden rule: MEASURE TWICE, CUT ONCE. BUILD INDEX CHEST PART 1 CHEST PART 2 THERMAL DETONATOR PART 1 THERMAL DETONATOR PART 2 THERMAL DETONATOR PART 3 THERMAL DETONATOR PART 4 YOKE AND BACK FOREARMS PART 1 FOREARM BAD PULL REPAIR FOREARMS PART 2 THIGHS BICEPS HELMET HANDPLATES COD PIECE PART 1 COD PIECE PART 2 POSTERIOR PIECE PART 1 POSTERIOR PIECE PART 2 SHOULDER BELLS PART 1 SHOULDER BELLS PART 2 ABDOMEN PART 1 ABDOMEN PART 2 SHOULDER TABS SHINS PART 1 SHINS PART 2 BELT BOXES PART 1 BELT BOXES PART 2 BELT POUCHES PART 1 BELT POUCHES PART 2 BELT ASSEMBLY ANKLE SPATS PART 1 ANKLE SPATS PART 2 GASKETS PART 1 GASKETS PART 2 LEGS ASSEMBLY COMPLETED PHOTOS SUITED UP PHOTOS CRL CLARIFICATIONS THIGHS AND BICEPS INNER SEAM OVERLAP
-
To all the troopers deciding or have built the new stormtrooper armor. Other then Imperial Gaskets. Is anyone making/ sewing there own ribbed undersuit? There is a few ideas on board, but looking for more input. What is everyones thought on what would work best, what are others useing, etc? Lets here it. Thanx
-
 In this HOW TO I'll be illustrating how to modify and attach Wyatt's Imperial cloth gaskets to a FOTK under suit from stormtrooperundersuit.com. After receiving my gaskets from Wyatt my first impression was they appeared flat in thickness in comparison to the rubber gaskets. No disrespect to Wyatt's wife for making these excellent gaskets however, being I can never leave well enough alone I decided to add to the perfection and increase their thickness. Something that also frustrated me about most the gaskets out there was having to buckle the left and right arms together or velcro the gasket to the armor. I wanted something that would basically be part of the under suit itself so that I could step into my armor with less effort, like with a OT TK. To do this I found it easier to just sew the Imperial gaskets directly to the under suit. Items needed: Cloth Imperial Gaskets Under suit form stormtrooperundersuit.com 2" x 6" black Velcro (sew in type) 2 yards of 1/2" polyester filler 2 yards of fabric backing to seal in the filler Tools: Scissors Exacto or similar (split seams) Fabric pencil or similar Sewing machine Imperial gaskets Stormtrooperundersuit.com under suit Starting with the legs, measure, cut and sew filler and backing to underside of knee gaskets. Next, remove stitching from shoulder gaskets seems Sew in filler and backing. With the shoulder gaskets turned inside out, sew the seams together that you separated earlier. Before After. Notice any difference? Returning to the legs. Locate the center of the leg gaskets. Cut a 2" x 2-1/2" section of velcro. Note This only applies if you currently have velcro retaining your knee cap armor. If not you may want to switch or find a way to incorporate your mount into the gaskets. Place the velcro on the fabric and outline Sew in place At this point there's two ways you can go here, either sew the seams together creating a round gasket where the outer diameter is the same at the top and bottom, or you can taper it, like the shape of your leg. If you want to taper it, using a fabric tape ruler measure the upper and lower legs where the gaskets will reside when finished. Cut the fabric accordingly giving yourself 1/2" extra for the sewing seam. Another way to do this is to turn the gasket inside out, wrap it around your leg overlapping one side, using a fabric pencil mark the over lapped section. Don't forget to add 1/2" for seam. Sew the seam. After With the armor knee cap. With under suit With armor, test fit Ready to sew in place Install leg and shoulder gaskets. Mark under suit and gasket locations. Sew in place. Cut of shoulder gasket connecting straps as they are no longer needed After, front side After, back side Finished I'll try to get a few more pictures with better angles.
 -

Doggydoc’s Jimmiroquai TFA FO stormtrooper build thread.
Doggydoc replied to Doggydoc's topic in TFA Build Threads
Since I am going to build this for centurion, I will need to get rubber gaskets. This seems to be a challenge as Imperial gaskets is no longer making them. Does anyone know of another place to source good rubber gaskets, or will I need to figure out a way to make them myself? -
Well the boxes have begun to arrive. So excited http://i5.photobucket.com/albums/y200/ukswrath1/ANOVOS/TFA/Brown%20Box.jpg Tools: Exacto knifes (large & small) Lexan Scissors http://www.amazon.com/Duratrax-Body-Scissors-Reamer-3-Piece/dp/B007KN0RQM/ref=sr_1_2?ie=UTF8&qid=1441204195&sr=8-2&keywords=lexan+scissors&pebp=1441204247995&perid=1E2086K8TZ8RZFFQEB6K Optional but highly recommended: Dremel (or equivalent) http://www.amazon.com/WEN-2307-Variable-100-Piece-Accessories/dp/B00A8DXKXS/ref=sr_1_2?s=power-hand-tools&ie=UTF8&qid=1441204317&sr=1-2&keywords=dremel&pebp=1441204320209&perid=07G870JQ8R30T9MKD32X Optional but highly recommended: Dremel plastic cutting wheel http://www.amazon.com/Gyros-46-20199-Cutter-Dremel-8-Inch/dp/B000U5ZZXC/ref=sr_1_4?ie=UTF8&qid=1441204290&sr=8-4&keywords=dremel+plastic+cutter+wheel Optional but highly recommended: Dremel small carbide cutting bit, large and small sanding drums - http://www.amazon.com/gp/product/B002OTIZ4I?psc=1&redirect=true&ref_=oh_aui_detailpage_o08_s00 Drill with 7/32" & 3/8" drill bits Steel ruler (large & small) http://www.homedepot.com/p/Unbranded-Cut-Resistant-Large-Gloves-7008-06/205813582 Square http://www.homedepot.com/p/Unbranded-Cut-Resistant-Large-Gloves-7008-06/205813582 40+ magnets http://www.ebay.com/itm/281363537848?_trksid=p2057872.m2749.l2649&ssPageName=STRK%3AMEBIDX%3AIT 10+ assorted clamps http://www.homedepot.com/p/OLYMPIA-Clamp-Kit-14-Piece-73-293-107/205742057 Pencil Sharpie Optional but highly recommended: Belt Sander 4" x 36" - http://www.amazon.com/gp/product/B00NAXSYT8?psc=1&redirect=true&ref_=oh_aui_detailpage_o03_s00 Optional but highly recommended: Hand Sander http://www.homedepot.com/p/BLACK-DECKER-Mouse-Detail-Sander-MS800B/100671602 Optional but highly recommended: Hand Sander additional 220 grit finishing sand paper http://www.homedepot.com/p/Diablo-3-7-8-in-x-5-1-2-in-220-Grit-CAT-Mouse-Detail-Sanding-Sheet-with-Hook-and-Lock-Backing-DCTCAT220H05G/202830877 Optional but highly recommended: Hand Sander additional sanding and polishing pads (kit) - http://www.homedepot.com/p/BLACK-DECKER-Mouse-Sanding-Polishing-Kit-74-580/204735220 200 & 250 grit sanding blocks http://www.homedepot.com/p/3M-Pro-Grade-Precision-4-1-2-in-x-2-1-2-in-x-1-in-220-Grit-X-Fine- Optional: Heat Gun - http://www.amazon.com/1500-Watt-Temperature-572%C2%B0F-1112%C2%B0F/dp/B0053U2B8G/ref=sr_1_2?s=hi&ie=UTF8&qid=1442428572&sr=1-2&keywords=heat+gun Spot putty spreader - http://www.amazon.com/gp/product/B0002JMORQ?psc=1&redirect=true&ref_=oh_aui_detailpage_o08_s01 Material: 3M Scotch Bright pad (light grey, fine grit) Wet & Dry sand paper for final and pre-paint prep - 3M 26400PGP-4 - https://www.homedepot.com/p/3M-Pro-Grade-Precision-9-in-x-11-in-400-Grit-X-Fine-Advanced-Sanding-Sheets-4-Pack-26400PGP-4/205415931 Sanding block - http://www.homedepot.com/p/3M-2-5-8-in-x-4-3-4-in-x-1-1-4-in-Sanding-Block-9292NA-6-CC/100142732 Painter's tape http://www.homedepot.com/p/3M-ScotchBlue-1-88-in-x-60-yds-Advanced-Multi-Surface-Painter-s-Tape-with-Edge-Lock-2093EL-48N/203085525 E6000 http://www.homedepot.com/p/E6000-2-oz-Clear-Adhesive-6-Pack-237032/205382750?cm_mmc=shopping-_-googleads-_-pla-_-205382750&ci_sku=205382750&ci_gpa=pla&ci_src=17588969&gclid=Cj0KEQjwvJqvBRCL77m2-uKczsIBEiQAkx8VjKypOZN0aqqOK82w4MXdTzgcl6h3dPgSAOWUFl5vGfEaAh6C8P8HAQ&gclsrc=aw.ds CA glue (zap a gap) http://www.ebay.com/itm/Zap-PT-01-Zap-A-Gap-Medium-CA-Glue-2-oz-ounces-NEW-Unopened-/400775409865?hash=item5d501370c9, Zip kicker http://www.ebay.com/itm/Pacer-Technology-Zap-PT15-Zap-Adhesives-Zip-Kicker-2-oz-/131592610768?hash=item1ea387e3d0 Plexus MA310 epoxy (old mfg Devcon Plastic welder II 14340), x3 - https://www.amazon.com/Plexus-Purpose-Strength-Adhesive-cartridge/dp/B06ZY7KMWD/ref=sr_1_1?dchild=1&keywords=Plexus+MA310&qid=1587473596&s=industrial&sr=1-1 Epoxy gun x1 - https://www.amazon.com/MixPac-DMA50-Dispensing-Adhesive-Cartridges/dp/B00KACZ8AU/ref=sr_1_2?keywords=MixPac+DMA50&qid=1562526455&s=industrial&sr=1-2 Extra epoxy mixing tips (12 pack) - https://www.amazon.com/3M-38191-Static-Cartridges-Nozzles/dp/B00596QVHG/ref=sr_1_1?dchild=1&keywords=Mixing+Nozzle%2C+38191&qid=1587473788&s=lawn-garden&sr=8-1 Strapping (suspension system) & Connection Material: 2" wide Velcro, 3M Industrial Strength, (black), Gasket to armor connection (armor side) - http://www.homedepot.com/p/VELCRO-brand-4-ft-x-2-in-Industrial-Strength-Tape-90595/202261932. 1-1/2: wide (sew in, black) Velcro, Country Brook Design, Gasket to armor connection (gasket side) - http://www.amazon.com/Country-Brook-Design%C2%AE-Inches-Velcro%C2%AE/dp/B003KWUSV6/ref=sr_1_2?s=arts-crafts&ie=UTF8&qid=1449608909&sr=1-2&keywords=1-1%2F2%22+velcro 2" wide Velcro, 3M Industrial Strength (white), Armor to armor connection (Chest to yoke) - http://www.homedepot.com/p/VELCRO-brand-15-ft-x-2-in-Industrial-Strength-Tape-90198/202261920?MERCH=REC-_-PIPHorizontal1_rr-_-202261919-_-202261920-_-N 1" Nylon Webbing (black) - Assorted strapping (suspension) connections - http://www.amazon.com/gp/product/B001QL2C26?psc=1&redirect=true&ref_=oh_aui_detailpage_o04_s00 2" Nylon Webbing (black) - Assorted strapping (suspension) connections - http://www.amazon.com/gp/product/B003K1HK9A?psc=1&redirect=true&ref_=oh_aui_detailpage_o02_s00 1-1/2" Elastic (black) Yoke to Shoulder Bell connection - http://www.amazon.com/gp/product/B015OPFF3C?psc=1&redirect=true&ref_=oh_aui_detailpage_o07_s00 5/8" (15mm) Elastic (black) - Left to right shoulder gasket connection - http://www.amazon.com/gp/product/B00NQ4O83W?psc=1&redirect=true&ref_=oh_aui_detailpage_o09_s03 5/8" (16mm) Nylon Ribbon (black) - Shoulder gasket connection anchor - http://www.amazon.com/gp/product/B00RQQLE60?psc=1&redirect=true&ref_=oh_aui_detailpage_o09_s00 1/2" Rigilene Boning (black), Mesh suspension (strapping) - http://www.amazon.com/gp/product/B00GBIRQJS?psc=1&redirect=true&ref_=oh_aui_detailpage_o09_s03 2" Buckle (black), Strapping (suspension) Waist belt connection) - http://www.amazon.com/gp/product/B006MKS00O?psc=1&redirect=true&ref_=oh_aui_detailpage_o07_s00 1' Buckle (black), Assorted strapping (suspension) connections - http://www.amazon.com/gp/product/B00IDBJH9I?psc=1&redirect=true&ref_=oh_aui_detailpage_o09_s01 5/8" (15mm) Buckle (black) - Left to right shoulder gasket gonnection - http://www.amazon.com/gp/product/B009X0KMV0?psc=1&redirect=true&ref_=oh_aui_detailpage_o09_s03 #24 Line Snaps, Yoke to Shoulder Bell - Tandy 12mm Double Cap Rivets (gun metal black), Shoulder gasket connection anchor - http://www.amazon.com/gp/product/B009X0KMV0?psc=1&redirect=true&ref_=oh_aui_detailpage_o09_s03 12mm Double Cap Rivets (nickle), Suspension Mesh to Ab - http://www.ebay.com/itm/121710367884?_trksid=p2057872.m2749.l2649&ssPageName=STRK%3AMEBIDX%3AIT 1" Buckle, swivel / slide release, black, strapping (suspension), chest to back - http://www.ebay.com/itm/151146077829?_trksid=p2057872.m2749.l2649&var=450215821998&ssPageName=STRK%3AMEBIDX%3AIT 10x Chicago screws (Standard waist belt assembly) 1/4" 1/8" x 1/4" Pop rivet, Ab to lower suspension mesh boning - 2 spools Heavy duty nylon thread - 1 square yard mesh fabric - armor suspension (strapping) - American plastics - 6" x 6" 1.5mm+ cover strip material - armor suspension (strapping) connection point - ATA or other Accuracy Update Material/Hardware: Rubber Isolation/Vibration Pad - material behind Center Waist Belt Boxes - http://www.amazon.com/gp/product/B00IT650T8?psc=1&redirect=true&ref_=oh_aui_detailpage_o07_s00 1/4" x 2" Neoprene - center layer of Waist Belt & Shoulder Plate (suspension system) - http://www.ebay.com/itm/170613703683?_trksid=p2057872.m2749.l2649&ssPageName=STRK%3AMEBIDX%3AIT Mesh - chest pill holes - http://www.whitearmor.net/forum/topic/34176-fs-ukswraths-fo-chest-pill-box-fabric-mesh/ Gaffers tape - material behind Pill Holes - http://www.amazon.com/gp/product/B00GZE3UJ8?psc=1&redirect=true&ref_=oh_aui_detailpage_o03_s00 1/4 x 20 x 2" nylon bolts - Ab box mounting - 1/4 x 20 nylon nut - Ab box mounting - Chicago screws (belt with 1/4" neoprene section and 1" tall center box rubber mounts) - Center belt boxes 3/4", Right side boxes 1/2", end of belt near buckle 3/8" Pre Paint & Paint: PPG DFL1 Spot Putty - You local auto body supply store 3M Spot putty - https://www.amazon.com/3M-05095-Acryl-White-Putty-Tube/dp/B003P6I5KS/ref=sr_1_5?ie=UTF8&qid=1467760849&sr=8-5&keywords=Spot+Putty Poly-Flex flexible polyester glazing putty - http://www.amazon.com/gp/product/B000P6US6A?psc=1&redirect=true&ref_=oh_aui_detailpage_o03_s00 ANOVOS recommended (rattle can) - RUST-OLEUM 249090 Gloss White - http://www.homedepot...49090/202071066 Primer - Rust-Oleum 249145 Professionally Painted - Paint, Clear and Hardener - http://www.whitearmor.net/forum/topic/31877-ukswraths-tfa-build-thread-tk-10116/?p=447887 Extras: F-11D - (DIY) http://www.whitearmor.net/forum/topic/41203-f-11d-resin-kits/. F-11D complete - https://www.etsy.com/listing/245791161/f-11d-blaster-11-scale?ref=shop_home_active_4 Boots & Gloves - Imperial - http://www.imperialboots.com/# Under suit, Gloves & Neckseal - https://www.stormtrooperundersuit.com/star-wars-first-order-stormtrooper-apparel-site.html Gaskets - Imperial gaskets - http://www.whitearmor.net/forum/topic/31019-imperial-gaskets-more-upgrades/ Gaskets - Jimmi - Chest pill hole fabric - http://www.whitearmor.net/forum/topic/34176-fs-ukswraths-fo-chest-pill-box-fabric-%20mesh/ Hard Hat Liner - Home depot - http://www.homedepot.com/p/3M-White-Hard-Hat-with-Pin-Lock-Adjustment-CHH-P-W12/202195392 Steel Holster kit - Available through The New Order Facebook page -https://www.facebook.com/groups/FirstOrderStormtoopers/ Pauldron - http://www.whitearmor.net/forum/topic/35470-fotk-vinyl-pauldron/ Cooling - http://www.whitearmor.net/forum/topic/35994-ukswraths-cooling-fan-kits/ Audio system - http://www.whitearmor.net/forum/topic/32951-interest-check-ukswraths-tfa-helmet-audio/ SHA system (hearing aid) - http://www.whitearmor.net/forum/topic/32487-ukswraths-stormtrooper-hearing-assist-system/ PPE Cut resistant gloves http://www.homedepot.com/p/Unbranded-Cut-Resistant-Large-Gloves-7008-06/205813582 Latex gloves http://www.homedepot.com/p/KLEENGUARD-Disposable-Blue-Nitrile-Gloves-X-Large-90-Count-57374/202798509 Safety Glasses Important SAFETY information, PLEASE READ!! So many chemicals that are used to assembly armor are toxic. Products like adhesives, fillers, paint, sanding byproducts, these are all toxic to your health and may cause cancer or organ damage over long periods of exposure. I can't stress enough how important it is when using these products to do so in a well ventilated area and/or wear a proper respirator. NOTE: When sanding a well ventilated area in NOT good enough, USE A RESPIRATOR suited for the job. TFA CRL - http://www.501st.com/databank/TK_-_First_Order Build Chapters Ab Boxes Ab Boxes: final assembly Belt Belt pt 2 Belt Accuracy (part 1) Belt Assembly Accuracy (part 2) Belt Assembly Accuracy (part 3) Biceps Biceps Accuracy (Part 1) Biceps Accuracy (Part 2) Chest Plate Indent Mod Chest Plate Accuracy Mod Chest Plate Accuracy Mod pt 2 Chest Plate Accuracy gap fill 1 Chest Plate Center and Pill Boxes Chest Plate Accuracy gap fill 2 Chest to Yoke attachment Forearms Forearm cont Gaskets Gaskets: thigh to shin Greeblies (clips) Hand Plates Holster Knee Caps Paint Code Paint prep: gap fill and sanding Paint Prep cont Shins Shin Accuracy Shin Closure Shoulder Bells Shoulder Bell Accuracy Shoulder Bell Accuracy pt 2 Shoulder Bell Accuracy: gmrhodes alt Spats Spats pt 2 Strapping: ab to cod Strapping: ab to posterior Thermal Det Thermal Det decals Thermal Det mounting Thighs Torso Torso: suspension system Torso: suspension system details Torso: suspension system details pt 2 Torso: suspension system details pt 3 Torso: suspension system details part 4 Yoke (shoulder + back) Yoke Re-enforcement 501st submission pictures Special thanks to Chris (Jancelot) for his organizational skillz
- 600 replies
-
- 17
-
-
From the Phasma FB Group: an old list so prices may have increased The Kits Helmets: Jimmiroquai (Jimmi/Jim): Jim’s helmet is $175 by itself. Requires some modifications to remove the excess eye flashing. Shipping ranges in price since it’s shipping from the Philippines. PM Jim for a shipping quote. Teresa Nuthall, Jessica Bowyer, Molly Lewis, Jen Belgin and Laura Williams have Jim’s helmets. You can find his work on the RPF. http://www.therpf.com/showthread.php?t=252114&highlight=jimmiroquai How to buy: PM on the RPF or Facebook (Shipping may take a while) Construction status: Message Jim Shawn Thorsson: Resin helmet. $225 for the raw cast plus shipping. Will require some mods as well. Ingrid Moon have Shawn’s helmets. Construction status: Active Misty Melillo started out with a Curtis Hoines helmet (Phasma V1) but now she has an Anovos for her V2. Armor: Jimmiroquai (Jimmi/Jim): Jim Tripon is the maker. His armor is made out of flexible fiberglass. It has some weight to it and certain pieces will flex, like the ab and calf armor. His newer kits are extremely accurate and are a fair bit lighter than some of the earlier versions. Jessica Bowyer, Jen Belgin and Molly Lewis have Jim’s armors. Cost is laid out as follows: Full set of armor and helmet: $980usd Armor only: $880 Jim requires a 40% deposit to start casting the kit. Shipping cost ranges. Message Jim for quote. You can find his work on the RPF. http://www.therpf.com/showthread.php?t=252114&highlight=jimmiroquai (Shipping may take a while. Message Jim for construction time) Phasma extras: Yes. Message Jim for info about what this involves. Construction status: Message Jim Shawn Thorsson armor: Shawn’s armor is made of fiberglass with some of the smaller bits made out of urethane resin. A complete kit costs $1965 and gets you all of the hard parts, helmet included. Shawn says the armor is best suited for those of a medium build. 5’8” and up. Misty Melillo has Shawn’s armor. Shipping varies, depending on buyers location. Shawn is located in Northern California. PM him for quotes. Construction time is 2-3 weeks depending on backlog. His process can be seen here: https://www.flickr.com/photos/8050182@N06/sets/72157659464323179 How to buy: PM on the RPF or Facebook Phasma extras: Yes. Message Shawn for info about what this involves Construction status: Active 850 Armor Works: 850 makes a basic plastic FOTK kit. Like KB, it fits a wide range of body styles with some trimming. Cost: Base kit is $600. Phasma upgrades is $150. How to buy: PM on Facebook. Construction status: Active (Helmet is not approvable.) ****All kits come with greeblies, finger armor, holsters and foot armor. Toe plates may need to be made by builder. See page for tutorials.**** KB also makes FOTK armor and Phasma kits, should be listed with Geeky Pinks thread Soft Parts (Gaskets/Neck Seal/Belt/Boots/Cape/Belt Pouches) Gaskets and Neck Seal: Geeky Pink’s Phantastic Gaskets: Our very own Teresa Nuthall stepped in to make gaskets for our group. Her gaskets are extremely well made and made with much love. Most will require some modifications to get them to fit to your body but she provides clear instructions. Teresa has a neck seal as well that runs about $45. She will take commissions for anything you might need. She’s done gaskets for Death Troopers and Shore Troopers. If there’s anything you want, PM her and she will do what she can to help. Minimal wait time for costruction. Cost: Contact Teresa Construction status: Active Neck seal: Amazon: $12-30 eBay: $15 Trooper Bay: $55 Darman’s Neck Seals: http://www.whitearmor.net/forum/topic/21385-darmans-neck-seals/ Cost: TK with velcro: $30+shipping TK with zipper: $38+shipping Gaskets: Imperial Gaskets: They make two kinds, a rubber latex version and a fabric version. Fabric version: $150. Has the shiny look that the rubber gaskets do but is latex free. Compression shirt neck seal: $75 Rubber version $300. Movie accurate. Will require some assembly and modification on your part. Contact: ImperialGaskets@gmail.com Construction status: Extreme Waitlist FN Armour: FN Armour gaskets are pretty common but a word of caution, the FN company has had issues with recasting in the past and has been placed on various DNB lists throughout the FISD. Their gaskets aren’t very popular with many of the Phasma’s. Consider going to another maker. Construction status: Caution Jim Tripon gaskets/pouches: Jim makes gaskets for his FO armors. They’re cloth and pretty sturdy. Cost: $120+shipping Pouches: $20+shipping (Both of these can be included with the armor. Jim recommends Imperial Gaskets, for more screen accuracy.) Sister Margaret’s Gasket Emporium: Sister Margaret’s works in Waves. Which means orders will be taken until slots are full and then construction will begin. This is a group of 1-1.5 so construction runs in a limited manner and as such may take some time. According to Sister Margaret’s maker, this would make a great alternative gasket maker. Orders may take 2-4 months to complete. Cost: Monies only due at time of sale once items are shipped. Currently sets with internal ribbing is set at 255 before shipping. Without internal ribbing and instead double foam (ribs will collapse a bit but not as much) 180. Message for pictures of different styles. Larger sizes would start at that price but wouldn't move much. Shipping is through Fedex Contact: PM on Facebook Cape: Jessica Bowyer is one of our own. She makes a gorgeous cape that is screen accurate and comes in two versions. There’s the rubberized version and the canvas version, both of which can be 501st approved. Cost: Contact Jessica Construction status: Active Joanne Marriott: Joanne takes costume commissions and she does a little bit of everything. Her cape is gorgeous so if you’re interested in getting a cape made, give her a PM. Cost: Contact Joanne Construction status: Active ***Cape hint and tip*** The cape is kind of tricky, especially since many people don’t make them to sell. A lot of people make them themselves or go to a local seamstress. This might be good because it can be custom made to your measurements. There just aren’t a lot of trusted sellers out there so if you see a person selling her cape, post in the forum and the veterans may be able to give you some advice. There may be some cape patterns floating around as well, that individual makers may be willing to share with the party. Belt: Jessica Bowyer also makes a belt that can be used to attach the boxes and pouches too. It’s a ribbed rubber and attaches with velcro. Very simple to use and works great (no clips!) Cost: Contact Jessica Construction status: Active Darren Vaughan (Belts of the First Order): Darren’s belts are pretty common with the FO’s. There are three layers to the belt: the outer is ribbed rubber, the inner is sponge rubber and the inner is webbing. Buckled together and there are chicago screws included for the boxes. It all comes together to form a fitted and comfy belt. Cost: AU$70 shipped Contact: PM on Facebook or email: beltsofthefirstorder@gmail.com Construction status: Active ***Belt hint and tip*** Many people have made their belt themselves, using ribbed rubber they find at their hardware stores. That way, if you can’t get one from any of the listed makers, there are still options. Also, self-drilling screws are a great way to mount the boxes to the rubber. Then you don’t have to fiddle with gluing chicago screws and the like. Belt pouches: Phasma has two belt pouches located on her left hip. They are canvas in construction. The longest one is about the size of a Samsung cellphone and is faced with chrome. The second box is relatively squat. This one does not have to be faced with chrome. Trooperbay is kind of the only place I’ve found the belts ready-to-ship, already-constructed. If there are any independent makers, please let me know! I have these pouches and I don’t mind them at all. They’re big enough to hold my phone and Aker and some snacks, which is always a plus in my book. Where to buy: https://trooperbay.com/star-wars-stormtrooper-tfa-first-order-stormtrooper-black-canvas-ammo-pouch-set Cost: $60 Belt and pouches: KB and Shawn both make their own belts and pouches and are included with the armors. Justin Lee Morrison’s Extras (holster/greeblies/belt): Justin’s holsters and clips are very clean and well made. Fit great with the armors and he now has a way to attach blasters to the thighs, which is always handy. Justin’s easy to work with and will combine orders when needed. Turn around time is extremely quick, especially considering he’s in Ireland and shipping can be funky. Holsters (v3, now stainless steel top) with rifle bolts. Assembled £50 Aerators (aluminium) £20 (Not necessary for Phasma’s but good for FOTK’s) Clip set (6 large, 8 small) £20 Belt £25 All of the above in a set £100 plus shipping (and Justin will also add extra clips) Contact: PM on Facebook Construction status: Active Boots: Okay boots are tricky. There’s no real specific design needed (unlike the TK’s and FO’s). As long as they’re black leather or leather-like and have no pronounced heel. Because Phasma is so tall, many Legionnaires have gone with lifted boots. These can be found on Amazon or ---------------- For now I’ll just list the first pair of boots I got, so you can see a common style and maybe go from there. Jodhpur style boots (common TK style) Amazon: https://www.amazon.com/gp/product/B00CUHT46M/ref=oh_aui_detailpage_o08_s00?ie=UTF8&psc=1 Cost: Around $60 Boots don’t have to be too specific. Some have even gotten boots with lacing. The armor will cover it and the foot armor will hide a majority of the boot. It just kind of depends on comfort for you and how tall you want to be. My second pair of boots is a lifted pair of boots that I found on clearance on tallmenshoes. They give me an additional 4 inches in height with room for another inch lift insert. I’m not sure how stable they’ll be but my hope is that they’ll be comfortable enough for my armor. If anyone has boot suggestions, send them my way. I’ll add them to the list. The bits and bobs So if you’re like me and live in a small town in the middle of nowhere, this costume can be kind of tricky to put together. I got a lot of stuff on Amazon and eBay because it was cheaper than driving to a city an hour or more away and run the risk of the stores there not having what I needed. I’m just going to list some of the things I’ve had questions on over the past year and go from there! You know the drill-if you think of anything you want me to add, let me know! Or if you have any questions, ask and I’ll try to find the answers and get them here. Sound system: ------------------- I think most people go with Akers but I found this little guy for relatively cheap and it works well. I just keep it in my smaller belt pouch and it fits perfectly. Wireless mic:---------------------- I love this wireless mic. It works great and it’s one less thing I have to have on my head! Syncs up great and works perfectly with my sound system. Hearing system: Enviro Kit is a great little trick. My handlers call it the Diva Hearing Aids. Jessica Bowyer brought this to the group. What it is is a set of tiny mics that you place in your bucket and it’s connected to an audio feed that you can connect headphones too. It’s a great system and if you’re like me who is already HoH it’s a good trick to have in a visually impaired bucket. Cost: $80 +$17 shipping anywhere in US or Canada. Shawn Preston is the builder and he has everything on hand to make it. If you want to wear it with headphones he’ll give you a discounted price. How to contact: Reach out to Jessica Bowyer. She’ll get you set up. Helmet lens: I am currently using the lens that came with my Jimmi bucket. It works pretty well but it’s getting scratched up so I will eventually have to replace it. Jessica told me to get a welding mask shield. Seems like a great thing to have on hand. --------------- Extra fingers: My fingers broke the first time I wore Phasma so I needed a Plan B. I got mine from Jim Sleeth. They’re resin cast, extremely sturdy and very easy to modify. Cost: $30 plus shipping. Contact: starbuck@gate.net KB Props and Shawn make replacement fingers as well. Contact for cost and shipping estimates. Fans: Fans are pretty essential for this costume. And pretty much any helmeted costume. If you’re interested in an already assembled setup, check out Troopercoola. They make custom fan setups and have a lot of different options. Cost: Varies Contact: Troopercoola Undersuits: This is all personal preference. I did the one piece bodysuit for a while and hated it. It made going to bathroom difficult, it wasn’t comfortable and after 6 troops I couldn’t do it anymore. I’m currently wearing an underarmor compression type shirt and some high waisted yoga pants that are extremely comfy and make emergency bathroom stops easy. If you’re going for movie accuracy though, then Stormtrooper Undersuit might be for you. This is the suit that was used in the movie and it’s a thick spandex with the glossed upper thigh. It has a crotch zipper as well, which might be handy for the guys. Maybe not so much for the ladies. Cost: £49.99 Where to buy: https://www.stormtrooperundersuit.com/star-wars-first-order-stormtrooper-costume-armour-compatible-bodysuit-undersuit.html Blaster: A blaster is not required to be approved of course, but it really is cool to have when you’re in the armor. I believe most people have the Heston blaster. There’s a lot of options for this blaster and price varies depending. You will have to chrome it yourself and if you want to be extra fancy, you’ll have to tint the chrome gold. Where to buy:-------------- Cost: $175+ If you have the ability and a 3d printer, there are free stl files on whitearmor for the F-11. Will require some work on your part but could be fun! http://www.whitearmor.net/forum/topic/32544- (you’ll have to be a member of the forum to open the link) There’s a lot of other makers on etsy but I am not sure about their quality or their ship times. So proceed with caution and make sure to do your research. Spear: (TLJ) JJ Industries is currently knocking out some great spears for current and future Phasmas. Luke offers a raw kit and a polished and finished kit as well. Current pricing breakdown: Price: - £90 Raw Kit - £120 Mirror Polished Extras: - £20 Padded Case & Polishing cloth Shipping: - £25 UK - Parcelforce Express - £30 Europe - DPD Express Classic - £40 USA - DPD Air Classic pictures can be seen here: https://imgur.com/a/rm9P0do Visit his page for more info. https://www.facebook.com/JJIndustriesUK/ Did you get your kit from another maker not listed here? Be sure to let me know so that the rest of the group can find them! List is subject to change.
-
The Entertainment Weekly photo spread from a couple weeks ago confirmed that Rogue One stormtroopers have gaskets. Today however, we've learned that the shoretrooper and stormtrooper appear to have cloth gaskets--different from the TFA trooper and the Rogue One Death Trooper. What are your thoughts on the material being used? Although Disney could probably make their own cloth gaskets similar to what Imperial Gaskets is doing, the material looks like corduroy fabric this time around. It's not as prominent a rib as the rubber gaskets. It kind of looks like this. Wishful thinking? A quick google search pulls up nothing for black corduroy sweaters or long sleeved shirts, but is it too crazy to think that they'd just get a hundred yards of the material and make their own undersuits? Also--woot for actual vents instead of stickers and a vocoder that's not painted on!
-
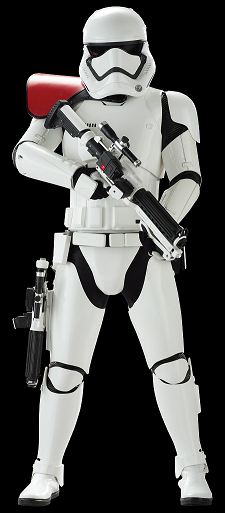
So last month I made a build thread in TLJ FOTK section about getting started on a TLJ FOTK. But I guess it was my bad to think I would get TLJ armor with my TLJ helmet. KB Props armor is TFA by default even if you get a TLJ helm, so that brings about a bit of issues when its time to go for EIB and Centurion. [IE: Cods are different, forearms are different, thermal detonator is different, and probably more I dont know about] Speaking of EIB, theres this #1000 EIB thing going on in the FISD announcements that I think I want to be a part of. So I've decided instead of TLJ to go full TFA to see if I can reach this milestone before the window closes. I'm pretty new to all this but from the previous thread I've already been through the whole BBB moment and got the ball rolling with trimming stuff. I've been scratched by abs, glued my fingers together, and got pinched by neodymium magnets. I've even been burned by CA glue already and almost lit a paper towel on fire! All the great noob stuff ya'll missed! Plan is to look something like this guy by the end of everything. Not gonna have the heavy F11-D at the moment, and I may or may not have the pauldron when I go for EIB cause the window is closing pretty fast, and theres a lot to do! Also 2 rifles? Overkill maybe? Should have an SE-44C holstered I feel like. Guy is packing some serious heat and doesnt even have the ammo vest! Anyways, I'm gonna do like my other thread and list off equipment I have thus far. I'll be editing this to reflect updates on what I have and what I need to get. Parts List: -Hard Bits- TFA Helmet: Anovos (Received) Armor: KB Props (Received) Pauldron: KB Props (Received) Holster: R2Dan (Inquired) Yoke Reinforcement: Ukswrath (Received) -Soft Bits- Belt: JAFO Belts of the First Order (Need to get a bit further in fitment before I commit to a size) Pouches: TrooperBay (Received) Gloves: Endor Finders (Received) Boots: Imperial Boots (Received) Undersuit: StormtrooperUndersuit (Received) Balaclava: UnderArmor HeatGear Tactical Balaclava (Received) Rubber Gaskets: Imperial Gaskets Cloth Gaskets: Sheev's Emporium (Received) Neck Seal: Sheev's Emporium (Received) Harness: Geeky Pink -Electronics- Helmet Cooling: Ukswrath Comm System: Ukswrath Chatter Loop: Ukswrath -Weapons- Z6 Riot Baton aka "Whappity Stick": Force FX Black Series Z6 Riot Baton Hasbro (Acquired) SE-44C Pistol: Arsenal Studio (Received) F11-D Blaster: Arsenal Studio (Ordered) Heavy F11-D Blaster: Branfuhr Studios -Armor Storage- Chest: Husky 37in Rolling Tool Box Utility Cart (Acquired) As I've said in the other thread, this my first stormtrooper and this be exciting times! I hope I can pull this off in time to make it to that special EIB, if not. Oh well, it'll be fun anyway!
-
I have been in the process of updating molds to a more screen accurate shoulder gasket. I am also creating a full polyurethane mother mold so I do not have to build mold boxes and bases any more. This will speed up my mold production time when they wear out or get broke. Molds are like working with fine china in a bull pen. FOTK belt kits are in stock and ready to ship with no wait time. Pauldrons are on hold until new gasket molds are complete and up and running. White pauldrons are on hold until I solve the problem that I'm having with the color. Cloth gaskets are still in production by Mrs. tk4205. She answers all of your emails, handles invoicing, printing, labeling shipping and book keeping. She also does all of the material scouting, sourcing and ordering too. I don't know how she finds the time to sew for us. She cares about us troopers, so It makes her sad when members rant and rave and drop F-bombs on her because they are tired of waiting. Our order list is "first come, first served" and I don't care who you are. Unless of course, you're the president;) If you are on our list and get an invoice, please don't ignore it; we have lots of people waiting and I wont take it personal if you no longer wish to buy. Just don't hold up the line. Imperial Gaskets (rubber) are the premium gaskets for accuracy, durability and comfort. You can reach Centurion level in only two brands of gaskets, but only one you can actually move in . Email ImperialGaskets@gmail.com to reserve your spot today. Cheers to all and thank you for your business.
-
Ok first of all imperial gaskets are absolutely amazing. Super mobility. Not complaint nag about them at all. <br><br> I just have a question as to the arms.<br><br> Anovos gaskets have about a 14 inch circumference. The biceps at the bottom have a hair over 14 inches inside circumference. The top of the forearms have a little over 14 inch circumference.<br><br> The imperial gaskets are 14 inches at the cuff but then sort of cone (like a sleeve on a shirt) larger to the shoulders, which you need, but at the bicep bottom it is 18 inches around. This results in needing to bunch up the gaskets at the bottom of the bicep, which is less than ideal.<br><br> All this is unmodified measures.<br><br> Now this was probably done to fit a range of arms. What I'm wondering is should I trim Down the gasket at the bicep so the gasket is more of a 14 inch circumference cylinder until it's at the top of the bicep where it needs to flare out?<br><br> Has anyone else done this?<br><br> Thes gaskets are so much better than the anovos economy ones that I could not move in. But the bunching up at the bicep is something I want t to fix, but before I cut I'm interested in what others have done.
-

Doggydoc’s Jimmiroquai TFA FO stormtrooper build thread.
gmrhodes13 replied to Doggydoc's topic in TFA Build Threads
Been waiting to see feedback on these. Rare I wear my Imperial Gaskets rubber ones, they are restrictive and build up a lot of heat, no air transfer, I now only wear them for LFL or high profile troops, fabric is way more comfortable in my opinion. Looking forward to see how much movement you have once you have the kit all fitted. -
Sorry for any confusion, I meant the other way around. Keep the list simple, titles highlighted in colour and links supplied, so the list is quick to read/reference. The bulked out version is good but very large. My thoughts were around quick reference and a streamlined approach. Don't get me wrong, I love the images in he R1 list, I would just like to build a sub forum for that newer section and have an easy list to fall under that. This is part of the FOTK list look. As you can see we have COO (Country of Origin) some descriptors which indeed could be fleshed out a little more, what parts they supply under headings and links to there platform and/or email addresses. Armor: Jimmiroquai - Origin PHILIPPINES: Kits are partially assembled/fully trimmed lightweight fiberglass (ready for rigging and painting). No issues with quality or service reported. Contact for delivery times/price details. Link Here, Email KB - Origin USA: Kits are made of ABS and will need to be trimmed and assembled. No issues with quality or service reported. Contact for delivery times/price details. Link Here, Email Here Armoryshop Props - Origin RUSSIA: Supplies a range of First Order Armour and Specialised 3Dprinted Helmets Link Here Armor vendors under review: 850 - Origin USA: Kits are made of ABS and will need to be trimmed and assembled. No issues with quality or service reported. Contact for delivery times/price details. Link Here Imperial Surplus - Origin USA: Kits are made of ABS and require trimming and assembly. Quality has been solid and service good when he is producing. Link here WTF - Origin USA: TFA and TLJ new kit awaiting member feed back and reviews for quality etc. Kit made of ABS with some resin parts. Anovos- Offers a "Pre-order" FO kit at this time, but due to legal issues and extended (1 year plus) wait times is no longer recommended. Soft goods vendors: Soft goods assorted (Soulart) - Origin CANADA: Neck seals, Harnesses, Shiny biker shorts, First Order gaskets, Phasma capes. Link Here Soft goods assorted (Imperial Gaskets) - Origin USA: Rubber gaskets, Pauldrons and Waist belts. FB contact Soft goods assorted (Trooper Bay) - Origin USA: Link Here
-
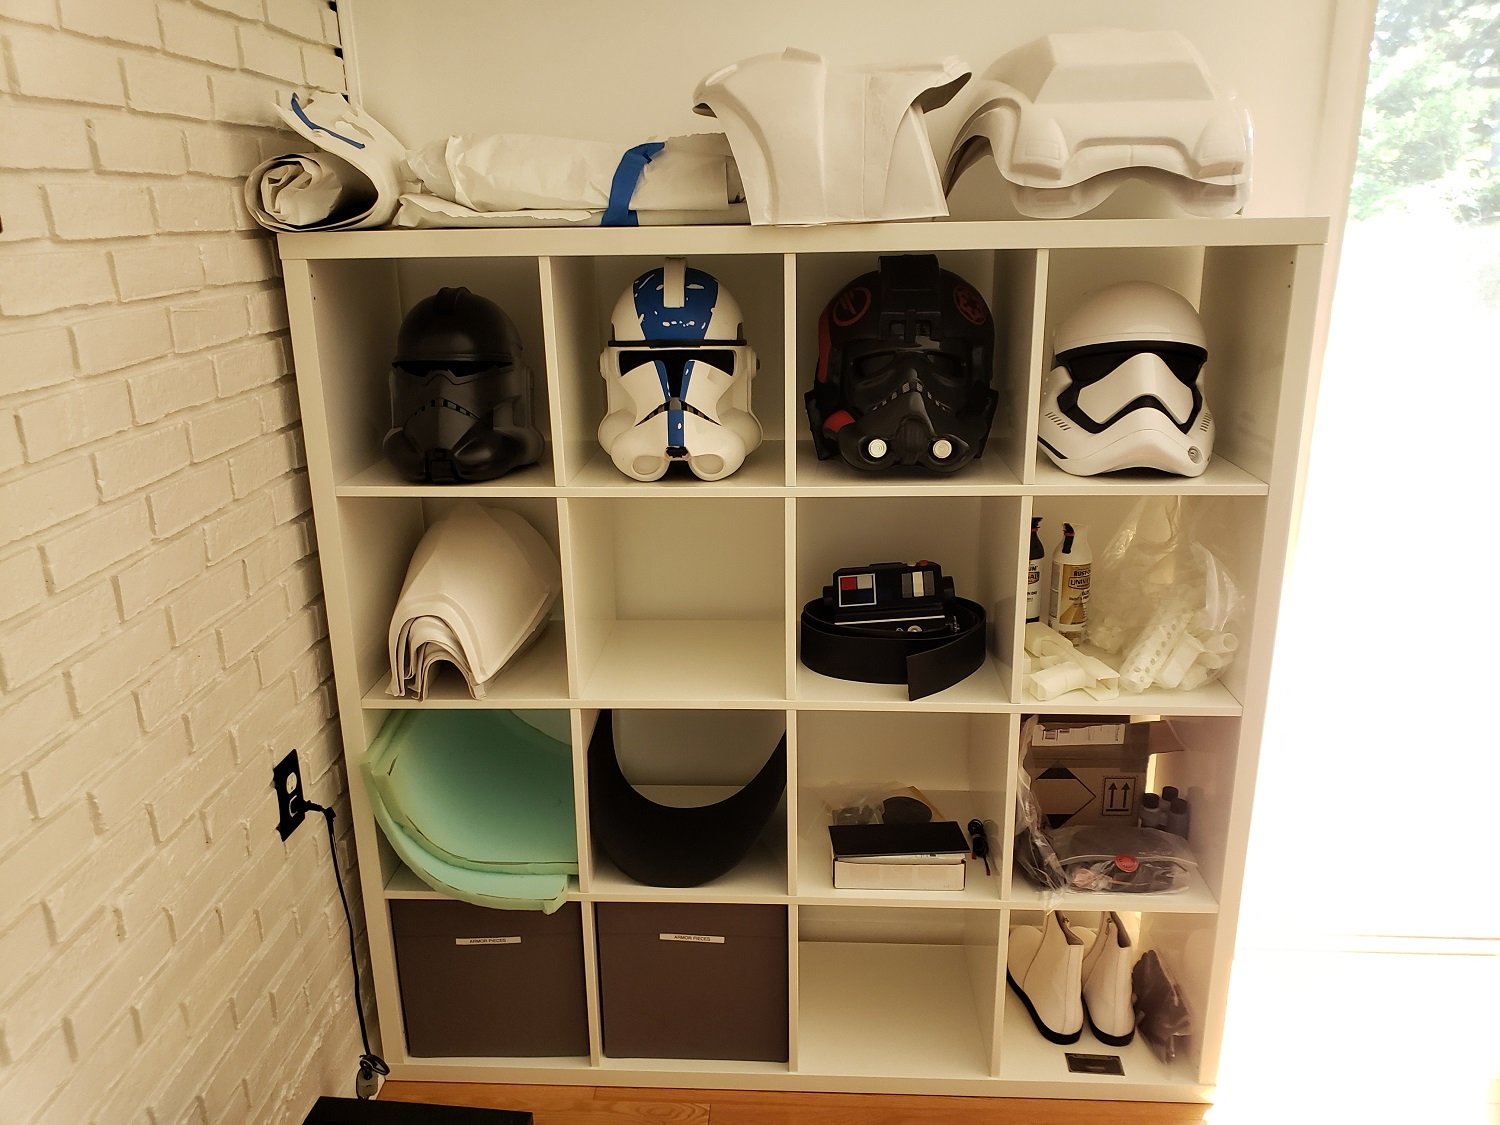
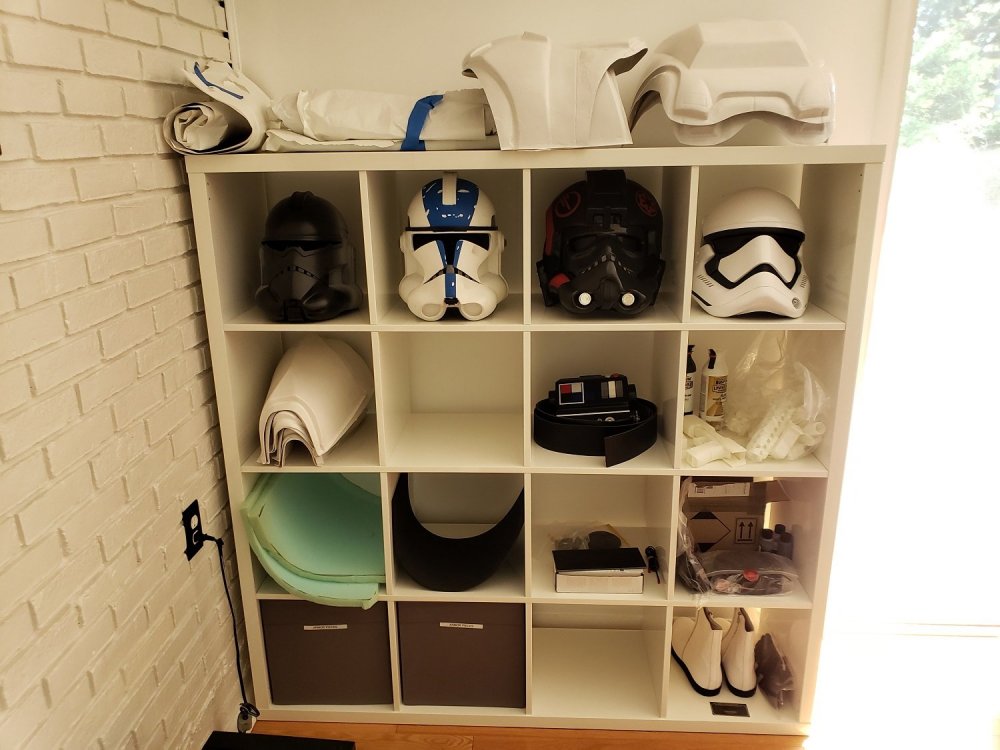
Feel like forever since I made my introduction post, but I'm finally starting my very own build thread! Been waiting for my KB armor to arrive since October and it's finally on the way, hurray! As I've done an ANH TIE Pilot and Inferno Squad build so far, this'll be my first "full armor" build. My goal is to go for Centurion level, so... that'll be fun. Pretty much have all of the accessory bits ready to roll, now just need the armor. Luckily enough my squad is doing an armor party next weekend so I am hoping to make some good progress on it there. I'm planning to document the build in detail, but we'll see how well I remember to do that as I go Parts: Armor - KB Props Helmet - Anovos Gaskets - Imperial Gaskets, Geeky Pink's, Sheev's Emporium (redundant much?) Belt - Belts of the First Order Gloves and Boots - Imperial Boots Neckseal - Anovos, Geeky Pink's, Sheev's Metal Holster - R2Dan Anything else I'm forgetting - Probably F-11D and SE-44C - Imperial Factory (updated 19 Oct 21) My collection, with all my FOTK stuff anxiously awaiting. Don't mind the clone armor still in progress
-
For my TFA build I think I want to go with a non-rubber gasket solution. The Anovos gaskets just feel bad and I know that the Imperial gaskets are much better. They are still rubber and I just feel that cloth will be much more comfortable in the long run. I am in line for cloth gaskets from Imperial but given the waiting time I am considering doing my own (high probability of me messing things up though). One question is fabric choice. The CRL states: Gaskets shall be rubber or a shiny black material with ridges The question is how shiny is shiny enough? I went looking at fabrics with the girlfriend yesterday and it seems that the shiniest options are quite fragile and wouldn't be very washable according to her. In the shiniest fabrics the surface is glued on which is more likely to crack and fall off when washed. There is a lot of wear and stress placed on something that will rub up against the rest of the kit and the inevitable sweat of trooping. I found a black bathing suit fabric which is stretchy and nice and sort of shiny. So would Under Armor shirt level of shiny be ok? Obviously it will depend on light setting etc. The pic may not accurately reflect the fabric. There is obviously a balance between shine, durability and washability. Question is just where?
-
Tutorial video: Imperial Gaskets now come with a bottle of black contact cement! It is my own formula , acid free and designed to work better on these gaskets than your average rubber cement. I.G. 88 Glue directions: brush on both surfaces to be joined together, let dry for about 5-10 then press together firmly. For those of you getting my Imperial Gaskets, they go together fairly simple. Pick up a bottle of Elmers non wrinkle rubber cement and follow these directions. Trim them out like this: Brush the entire back edge with glue and let dry for 10 minutes. The latex will ripple and misshape, this goes away and reclaims its shape as it dries. Once tacky to touch, fold the edge over and stick down, finishing up your edge. Only glue the flaps on one side Glue flaps on the other side and line them up. It should look like this. I suggest sewing the gaskets to your underarmor. If you are unable to sew, you can glue in felt tabs and use safety pins. Have fun. https://onedrive.live.com/?cid=8856a29d22617556&id=8856a29d22617556%2176111&ithint=video,mp4&authkey=!AGxnrTEk_xoA26M A little vid to demonstrate durability. Latex rubber can be tricky to trim. Start with a sharp pair of scissors, pull and stretch the piece that you are trimming towards you, likr in the picture below.
-
Merkava74's TFA FOTK Build Thread (Anovos)
merkava74 replied to merkava74's topic in TFA Build Threads
GASKETS PART 1 Had a set of Imperial Gaskets back when they were still in operation. Now that they're not, I was really worried when tackling this in case I made an irreparable mistake. But all is well, and here is how I did it. First, measure the inner circumference of the following parts of your armour. Do not measure your arm, as if you have skinny arms like me, your gaskets will look shrunk under the armour. I wanted the gaskets to fill out the armour nicely. A. Inner circumference near top of Bicep Armour B. Length from your armpit to your mid forearm. C. Inner Circumference around middle of Forearm Armour Then I proceeded to cut my gasket according the the dimensions: Once, cut, I started to join the ends RIB BY RIB using CA glue. I wanted to create as seamless a joint as possible. CA glue cures fast, and actually holds the rubber really tight. The problem is that they cannot flex, and the whole joint would need to be reinforced from the inside with a shim using flexible glue. Here you can see the mid-progress of the CA gluing. Tedious, yes, but the end result looks great. And here are both arms done. I have not glued the shims on the inside yet. As my arm Armour pieces are still with the painters, I want to have them back for a fitting before I finalise the gaskets and shim them permanently. Also, I did not cut the gasket into "Shoulder" and "Elbow" pieces as many others have done, as I want to see how it all fits with the armour before I do that. Remember: MEASURE TWICE, CUT ONCE. Same with the knee gasket. Measure the inner circumferences of the bottom of the thigh armour and the top of the shin armour, and join the 2 ends together. I was pretty confident with the thigh, so I shimmed it. Here are both pieces done. And I also test fitted my arm gasket to see how it looks. Pretty happy with it. Strappings and final adjustments if any when my armour pieces are back from the painters. -
Anyone know anybody else that is selling or wants to sell a gasket set. I'm number 69 [emoji14] on the waiting list with imperial gaskets and I was hoping to have some by wondercon. Thanks Sent from my SM-G920V using Tapatalk
-
COSTUME INFORMATION Armour, Helmet and Neck Seal: Anovos TFA Gaskets: Imperial Gaskets (rubber) Belt: Belts of the First Order Hand plates and Holster: R2Dan Boots and Gloves: Imperial boots Undersuit: Stormtrooperundersuit F11D Blaster: Resin kit (Justinian) Name: Jasper Tan Height: 170cm Weight: 80kg TKID: 7867 Garrison: Singapore Garrison EIB Approval: APPLICATION PHOTOS FULL BODY HELMET ARMOUR DETAILS NECK SEAL CHEST, YOKE AND BACK THERMAL DETONATOR SHOULDER AND ELBOW GASKETS SHOULDER BELLS BICEPS FOREARMS GLOVES AND HAND PLATES ABDOMEN COD AND POSTERIOR BELT UNDERSUIT THIGHS KNEE GASKETS KNEE PLATES SHINS ANKLE SPATS BOOTS F11D HEAVY RIFLE ACTION SHOTS Here's my submission for Centurion. The photos are largely the same, except for an additional helmet photo showing that the tube stripes are fully cut out, and also some different action shots. For the DO's kind considerations, and do feel free to ask me if you need any clarifications, thank you!
-
COSTUME INFORMATION Armour, Helmet and Neck Seal: Anovos TFA Gaskets: Imperial Gaskets (rubber) Belt: Belts of the First Order Hand plates and Holster: R2Dan Boots and Gloves: Imperial boots Undersuit: Stormtrooperundersuit F11D Blaster: Resin kit (Justinian) Name: Jasper Tan Height: 170cm Weight: 80kg TKID: 7867 Garrison: Singapore Garrison Level 1 approval: https://www.501st.com/members/displaymember.php?userID=13500&costumeID=326 APPLICATION PHOTOS FULL BODY HELMET ARMOUR DETAILS NECK SEAL CHEST, YOKE AND BACK THERMAL DETONATOR SHOULDER AND ELBOW GASKETS SHOULDER BELLS BICEPS FOREARMS GLOVES AND HAND PLATES ABDOMEN COD AND POSTERIOR BELT UNDERSUIT THIGHS KNEE GASKETS KNEE PLATES SHINS ANKLE SPATS BOOTS F11D HEAVY RIFLE ACTION SHOTS For the DO's kind considerations, and do feel free to ask me if you need any clarifications, thank you!
-
 Sorry for the long interval without updates! I'm still working on this, albeit slowly. It's been a busy month (something something excuses something) so most of my progress has come in the form of purchasing things. So first of all, gaskets! I got some factory seconds from Imperial Gaskets, which means I got to save a little money (woo!) but I'll have to do a little extra work before my gaskets are wearable. Said work is just filling in a bunch of tiny holes left by air bubbles in the latex, and once that's done I doubt anyone will be able to tell there were any imperfections in the first place. Service-wise, Imperial Gaskets had a few small issues on the communication front - they were at little slow to respond to my initial email (it took just over a week - slower than expected but nothing terrible), and I wasn't notified when my gaskets were shipped so I had a few days of wondering if my money had just dissapeared in to a void. I actually ended up contacting Wyatt through PM when I hadn't gotten a response to my email, which is how I found out about the factory seconds in the first place, and once I did get in contact he was very helpful. All in all it took just under 4 weeks from my initial email to get the gaskets, but keep in mind that this was for ready to ship factory seconds. The turnaround time is probably longer for non-defective gaskets (I've heard the cloth gaskets have a long waiting list - not sure about the latex ones). As far as packaging goes, I have no complaints, and the gaskets came with two bottles of liquid rubber to repair the defects, as well as a bottle of rubber glue to assemble the gaskets. The gaskets themselves seem to be well made defects aside, and are incredibly light! They're so much lighter than I expected them to be, which is a definite bonus. Next up, the belt kit. I ordered JAFO's Belts of the First Order kit. Service was great - both fast and professional. It took just over a week from first contact to receive the belt kit. The kit itself seems to be made with quality materials, and comes with the buckle and screws necessary for assembly, as well as printed instructions. And finally, la piece de resistance, the helmet! I already had the rest of Jim's kit that I had purchased second hand, so this was my first opportunity to deal with him directly. I found him to be professional, responsive and helpful and have no complaints. It took about 3 weeks from first contacting him to get my helmet, which was a faster turnaround time than I expected. When the package arrived the box was pretty beat up so I was a little worried, but I opened it to find the helmet snuggly wrapped in bubble wrap and completely undamaged. I was expecting the helmet to be the same flexible fiberglass as the rest of Jim's kit and thought that might be a little weird, but it turns out it's actually a rigid fiberglass, so nothing to worry about. The helmet also comes with bubble lenses. Overall, the helmet looks awesome and I can't wait to start working on it! @SkulShurtugalTCG thanks for the idea to plasti-dip the inside of the helmet by the way, that's pretty much what helped me finalize my decision to get Jim's helmet. I'm thinking I might give the entire armor that treatment on the inside. I'm not sure it will be entirely necessary but at the very least it should give a slightly cleaner, more finished feel to it.
 -
 I think I'm cool enough The undersuit was bought on extreme racing's webpage. http://www.extremeracing.co.uk/http-//www-extremeracing-co-uk/Costume-Body-Suits/Stormtrooper-Costume-Body-Suit/prod-10-html/prod_10.html Apparently, these were the same ones used onscreen. I probably wont end up using it though, because in all honesty..... it's flippin HOT! now i know why Finn was always sweaty in his stormtrooper shots. Gloves and boots are from http://www.imperialboots.com and i cant speak highly enough of them. Francois, who runs the company is excellent when it comes to customer service. TOP NOTCH! http://www.trooperbay.com for all your stormtrooping needs I got the belt and decals from here. very pleased with the material. and the decals fit perfectly so far (minus the top forearm stripe which i'll end up painting). I believe these guys sell the pouches as well. My pouches are from MTK. they are great! link http://www.whitearmor.net/forum/topic/34805-for-sale-tfa-pouches/#entry453833 Gaskets: now i originally bought Jim's Gaskets and liked how they looked. However, they are very baggy and need to be altered IMO to fit under the armor better without bunching up. I just purchased some latex/rubber gaskets from imperial gaskets. I was able to get them right away, because, Wyatt, the owner, had a pair of factory seconds laying around. normally you have to be on a wait list, even for those! (i guess i just got lucky) He also makes fabric ones which are the best gaskets out there right now! I'm currently #70 on the waitlist and was #95 in February for the fabric gaskets (just to give you an idea of how backed up they are). Apparently, the anovos provided gaskets were really crappy and now Wyatt is making gaskets for pretty much everybody who has a FO kit now. Here is the link to Imperial Gaskets - http://www.whitearmor.net/forum/topic/31019-imperial-gaskets-more-upgrades/ Or if you are really good with a sewing machine, you can make your own! http://www.whitearmor.net/forum/topic/34099-tfa-fabric-gaskets-how-to/ Hope this helps!
 -
 Armor info: Armor: KB Props Helmet: Props Emporium Gaskets: Imperial Gaskets Rifle: Branfuhr Studios Gloves & Boots: Imperial Boots Neckseal: Geeky Pink Lady Undersuit: Stormtrooper undersuit Cape: Geeky Pink Lady Belt & Pouches: Trooperbay Personal info: Name: Kaden Taylor 501st ID: TK36544 Garrison: Wisconsin (Black Ice Squad) Height: 5' 5" Weight: 145 LB
 -

Cookie Monster's Jimmiroquai FOTK
Cookie Nomster replied to Cookie Nomster's topic in TFA Build Threads
One thing I put focus on early was the gaskets. I ordered cloth gaskets from Jimmi as part of this kit. They aren't as screen accurate as the imperial gaskets, however they will be cooler. This outfit is reported to be extremely hot while wearing, so I don't intend to use the rubber gaskets anytime soon. With that said, I found that Jimmis gaskets required modification. Here are a couple pictures through the lifecycle of trying them on, and having my visiting-from-out-of-town sister do some sewing work for me: Shoulders only - as you can see, they need to be brought in so they aren't loose around my biceps. Maybe I should start lifting weights! Jims gaskets are separated, as you can see. The elbows connect with one velcro strap, and other purchasers of the armor have had issues with gasket falling away and exposing part of their undersuit (from a behind-view of the trooper). I'm demonstrating how that could happen here (see the split, revealing my arm - this was a problem for some troopers). Demonstrating the gap that can be unintentionally exposed, depending on how they fit So I decided that I would sew my elbows and shoulders together, since my arms aren't particularly long. Additionally, I would bring in both the biceps and elbows so they were a little tighter to my arm. Additionally, the knee gaskets needed to be brought in as well. Pinning the gaskets in place prior to sewing She came to visit and ended up working instead! A side shot of the completed product Front shot of completed gaskets As I mentioned, the knee gaskets also needed to be slightly brought in (particularly at the bottom under the knee). The pin row in this image below marks the area that was being brought in (I didn't have a fabric pencil at the time, so that's why pins were used to show the "line") -
 Gaskets What can I say about these other than they feel like you are wearing rubber floor mats. The weir stick was difficult to work with, and whatever you do, do not get it on your hands, wear gloves. I made that mistake and was pealing glue off my hand a week later. I washed the gaskets in mild soap (Dawn dish soap) and let them dry completely. Best to just let them air dry so as not to get towel lint all over them. I glued the Glue Strips on one side of the gaskets first and let it dry, then came back the next day to glue the other half. It took longer but I was able to line every thing up nice. Then I put some weight on them and let them set overnight. I tried to glue both sides if the shoulder at the same time. The glue strip started sliding around; I wasn’t wearing gloves, so I got covered in glue trying to keep it all together. They turned out okay though. I sewed straps to the shoulders, front and back, and attached buckles, these are adjustable so I was able to get them good and tight. I sewed velcro to the top and bottom of the knee gaskets, only on the front. and glued the mating velcro pieced to the armor. I have nothing on the elbow gaskets, that may change. Overall, the leg pieces are too short for me and the shoulder pieces are very bulky and don’t want to fit into the bicep armor. The elbow pieces don't want to fit into the forearm armor with my arm in them. Very frustrating. If I put the armor on the gaskets and then try to put my arms in, I have more success but need assistance. I will have to start trimming these down to see if I can get them to work better for me. I should have a better idea of what to do with then once I've worn them for an extended period of time. I will update this post with any modifications I make. In the meantime I ordered a set of TK4502 Imperial Gaskets. You glue them with Elmer’s rubber cement, and set up much quicker. Easier that the floor mats and Weir Stick. Here is a link to the tutorial. I also ordered a set of Mrs. TK4502’s Fabric Gaskets, (I hear they are very comfortable). Update: Since the silicone gaskets came in from Imperial Gaskets, I have not troopes with the Anovos ones. -Zaphod