

TK-4510
-
Posts
2,991 -
Joined
-
Last visited
-
Days Won
2
Content Type
Profiles
Forums
Gallery
Articles
Everything posted by TK-4510
-
Post some pics perhaps I can help. I am short too. Well 5'8" anyway.... I had to mod my AP quite a bit to get it to fit correctly. It looked good and fit me well when I sold it. Take some tips from Luke if you can
-
Looks to be about the same width as the vertical strip on the handguard (near the base or wrist)
-
Thanks guys! I hope I do this helmet justice!
-
Once its all done stand back and take a look at your work...... If you did good it will show. The same is true if you did bad. I think it looks awesome. I have taken some shots here for reference. The last shot is where I may trim the bottom to make everything even.... Not sure just yet. Next comes paint prep!!! ARE YOU READY???!!!! See you then!
-
AH!! We have a good fit!!! Its a bit tedious at times but its worth the effort. OK on this side same thing mark the ear, drill it on the table, then drill the top hole through the ear and helmet, then screw, then drill the bottom, then screw, then the middle, then screw. Phew!!!!
-
More ear fitting...
-
Measure the distance from the ear to the edge of the tear. You want to keep this the same on the other side. Mine was about an inch from the ear to the tear. Hey that rhymes!!! Mark the distance on the other side of the helmet and begin test fitting the ear to that side.
-
The last part is drilling out the middle of the ear. After you've done that..... Your right!!! put a screw in there too!! Make all the screws snug and see how everything fits. I needed to pull mine apart again and trim some more... Just keep at it until YOU are satisfied.
-
Once you have that top hole drilled you will need to put a nice authentic brass screw in to secure the top of the ear. Tighten the screw down till its just a little tight. Now you are going to drill out the bottom of the ear... When you do, be sure to hold the ear to the helmet at the bottom and keep it all together like I am here. Put a screw in there too.
-
-
Start off by taking the ear and test fitting it against the side of the helmet. I realized that I needed to drop my cap n back down a bit to make the ears fit better. I dont show the pics here but I drilled out my rivets and dropped the cap down about 1/4 of an inch and also trimmed the brow a bit. Ok fit the ear. See where there are gaps? we need to eliminate those gaps. Take a pencil and mark where meat needs to be removed. Make sure you are placing the ear in pretty much the same spot each time you trial fit. On the TE the ears are very slanted compared to say an FX or even an AP. If you look at the reference photos you will see that the ears tilt forward and the tails hang wayyyy back. I continue trial fitting and cutting with the utility knife. When I feel I have a good fit I sand the ear smooth and really press it into the side of the helmet. Once you get an acceptable fit you will need to drill the ear. The ear has dimples in it for recommended screw holes. I mark them with a pencil and then drill them out on the table before I even lay them up to the side of the helmet. Holding the ear firmly in place I drill the top screw hole.......
-
Allright,....Now the part everybody dreads.... The ears. Its easy!!! I will show you how. Remember too that they dont have to fit perfectly. The movie used ones are really bad. The hero's are marginal too! For reference sake I am attaching a few shots of the actual helmet used for the TE recast. This is how the ears were attached. I am going to attempt to do the same... Sorry Cant find these anymore
-
Make your adjustments and line everything up. Make sure you leave enough room for the rubber trim to slide in and out easily. Its drilling time!!! Now we are going to drill and rivet the helmet just like AA's crew did back in 76'!!! You are just going to drill a hole in each side right in the middle of the ear. One you have a hole drilled, slip a rivet in and back it up with the provided washer. Using the rivet gun secure the first side then move on to the other side. When you are done your helmet will tilt back and forth a little for a better fit. You can test the trim now again. Be sure not to push the brow too far up or you will split the helmet at the temple.....Been there done that, got the T-shirt....
-
OK take the two clamps and attach the faceplate to the cap n back like so. Try to line up the trapezoids on each side and pay special attention to the angle of the cap n back. If you want a more deathstar look keep the brow level. Want a Sandtrooper look? raise the brow and tilt the cap n back, back. Use a pencil and draw a straight line from the trapezoids to the ends of the eyes. Its important that the bottoms of the helmet meet as well or else your ears will have nothing to mount to. [
-
OK, I AM BACK! Lets jump right into the assembly. You will need some small clamps and a pencil as well as the rivets and a drill. A teaspoon of nerve will help from here on in too!! Dont worry, if you mess up it will just look like crap!!! Just kidding!! In the first shot here I just wanna show you how nice the repairs turned out. I can live with that!
-

ANHv2 Build Thread[*FX]
TK-4510 replied to Mr. Accident's topic in Build Threads Requireing Maintenance
I thought all ANH helmets are supposed to be put on sideways -
Walmart, Auto parts stores, Lowes, Home Depot, etc..
-
After the glaze putty dries overnight you are going to need to sand it. I use 400 grit wet or dry sand paper. Take your cap n back to the sink and get it wet. Sand evenly across the face of the rim as I am here. Watch as you go and rinse off the helmet occasionally to see how far you have gone. When you think you have sanded enough, remove the helmet from the sink and dry it off. Let it set for a good 20 minutes and take another look at it. It may have small cracks or more filling that needs to be done. When you think you have a smooth surface its time to apply primer! NEXT COMES ASSEMBLY!!!!!
-
To make the repairs we are going to use these spreaders and spot putty glaze. Just smear on about a half inch thick line of glaze putty and take the spreader and smooth it over the "chipped" areas. Work semi quickly as the glaze starts to chunk up within 30 seconds or so. Let this stuff dry overnight.
-
Ok here we go. We are going to repair the mold defects of the infamous "Bumpy Cap n Back". The mold is made out of a dense silicone and over the years it has been damaged from repeated pulls of plastic. I have circled the areas we will be fixing...
-
Happy Birthday!!!!
-
Elite Boots Question
TK-4510 replied to TK-9805's topic in FISD Expert Infantry Badge (EIB) Requirements
As far as I know, caboots are the only vender that you can get the boots from that cheap. The quality is marginal at best, but they are the only game in town. -
This is what we should have so far. Next we will begin repair of the mold damage on the cap n back!!! What, you say??? See you soon!!!
-
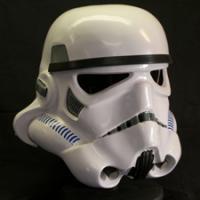
Now, using the utilty knife start slicing off thin strips from the eyes. Dont slip or you will cut too much! Trim all around the eyes getting them to the correct shape. Once that is done. Use coarse regular sandpaper to give the final shape to the eyes. Finish them up by sanding with 600 grit wet or dry so that they are nice and smooth. Refer to http://www.starwarshelmets.com for eye cutting. The helmets in ANH were cut pretty shallow towards the inner part and not on the outer part. For this tutorial I am going to follow the lines of the kit. Feel free to do your own thing though.
-
Be very careful with the eyes. I have messed up my fair share. I start first by using a dremel bit and the dremel on high. Just drill into the eye from the front and slowly go around the inside of the eye removing as much material as you can safely.