

TK-4510
-
Posts
2,991 -
Joined
-
Last visited
-
Days Won
2
Content Type
Profiles
Forums
Gallery
Articles
Everything posted by TK-4510
-
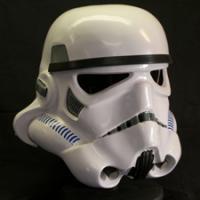
Here's the Dave M helmet.. Here's Mine....Not too bad
-
Just keep painting and staying within your lines. If you take too long the paint will start to gum up. Enamel goes on like silk and dries quickly. You have about 2 minutes of easy flowing then it will start to dry. dont worry about though. Dont rush it. Just paint nice strokes and follow them through. Fill it in as you go down... [imghttp://www.whitearmor.net/forum/uploads/1203302334/med_gallery_548_103_47407.jpg[/img]
-
For paint you will need a Satin Black Enamel. I place the helmet in my lap and turn it to the most comfortable position. Dip your brush and press down on the first strip and pull.......Fatten it up by applying more pressure as you pull. Stay on your guides (Stay an Target!!!!)
-
Next I am going to paint the vocoder. You will need a special brush for this. They sell them at Michael's and other art supply places. The brush you are looking for will be a camel hair round tipped brush that is thin when turned to the side.....
-
-
Next I will put on the pinstripe tape. I got tired of having to paint a pinstripe on the ears and thanks to a friend (Chris) I saw how easy it was to just use pinstripe tape. It looks great and if you mess up.....just do it again... I like that You can get the tape at any auto parts store. Unfortunately the place I went to only had the two strip tape...I went ahead and bought it. I just cut the parts off that I didnt need. You just start at the bottom of the ear and work your way around. When you come full circle just cut the tape with an exacto knife or a utility knife.
-
I decided to use the stickers that were provided in the kit rather than hand painting the details. I have hand painted them before, but for this tutorial I decided to use what was in the kit. Maybe on a later date I will do a thread on painting the details. I have yet to do the tube stripes, but I am figuring it out still... I used a utility knife to make small holes in the occasional bubble.
-
OK now onto the stickers...
-
-
OK now onto the ears.... Change brushes and use a "regualr" brush. We are just going to paint along our lines and fill in the rest....
-
Dave M helmet
-
OK its paintin' time take a brush load and go for it. Dont load the brush alot because Humbrol runs easily. Paint along the lines of your frown that you made.....Refer to the reference helmet pics for accuracy. If you are a little off dont sweat it. Its going to look better than anything that was on screen!
-
The Humbrol paint is great paint but as with all great paints its got rules... #1 shake the can for at least a minute straight. #2 stir the contents for at least a minute....
-
For a brush I use a #1 fine brush. If you dont have one thats fine enough you can cut a brush down.... as I have done here.
-
Now its time for paint! I use Humbrol Ad Grey 5 but you can also use Testors grey #1138. Here's a pic of both...
-
Draw the lines a little inside of what you really need. Here we are going to draw the lines and later when we paint we will finish up by using pinstriping tape to make the ears nice and sharp.
-
Now I will draw the ears....
-
Now I will do the vocoder... Same here, I am going to match the fatter look of the Dave M vocoder. Just draw a faint line if possible..
-
I start out by using the photos I have collected from the internet as guides. I am going to use a pencil here to draw a faint line as a guide for the frown. Keep referring to the pics. Notice how the left hand side of the Dave M helmets frown never gets to the 5th tooth? I like that.
-
Here is a pic of the Dave M helmets frown. We will be duplicating the Dave M helmet for this tutorial (to a point) so we are going to try and match the small details.
-
Well, its been 3 days. I let the helmet dry and it looks pretty good. Today I am going to do some painting and decals. To start out you will need some stuff. I have pretty much everything here that I am going to need. Paint, brushes, q-tips, thinner, etc...
-
I am assembling the tutorial now. I will be painting the frown and vocoder and ears. The rest will be stickers provided in the kit.
-
LOL Yes, I can see your point. In regards to this armor and helmet....Its over and the soup has been soured. In regards to the prop community its a heard lesson learned. I think Mike H. had a good point when he said "let the TE lineage be a lesson to us all." I DO love troopin' and I DO love my helmets. Chris is a good buddy of mine and so is Guns. I want to wash all this other crap away but I cant....I got both my helmets because of friendship and I hope thats how this hobby continues.
-
Gino, I agree with you to a point. I think that the original sculpts should NEVER have been be recasted. I think the TE lineage is a grey area as Matt has gone out of his way to rip you, GF, and Tony off. Unfortunately this has spawned many recasts of the same work. Yeah I admit its messy and its a perfect example of what not to do. But I also think its too late. There are alot of ANH parts available now. I know a guy who has hero molds that are amazing. Theres another guy in my garrison who has the complete set in hydrostone and cap nback and faceplate in resin. His armor sets are flawless and you cant tell them apart from the set he bought. I heard about a year ago that moncal was working on some ROTJ armor and was shut down. Then there is MFX, SDS, and a few others......Its over man. That armor and helmet will be the standard in two years or less and the FX will evolve into a hybrid of both. I know you can see this too. I think if you dont want it recast then you should not release it. Its inevitable... If you recast something so you can sell it and make good money on it, its foolish to think that it wont be copied..... Especially if its an expensive item. I think you are the only person who has used common sense when it comes to this. You go out of your way to make it difficult to recast your work. You are very secretive about your techniques. You are protecting your investment so you can continue to profit from it. Its too bad you didnt have the armor first or this would have ended up differently. With all this being said, thats why I support and promote TE2 so much. The guy loves the armor and helmet and paid alot for the molds. I want him to be successful, and I want people to turn to him for their needs. Not the next set of TE armor that Dan is working on or any other armor that people are working on. Its a sad line of history. I have decided to embrace what we DO have and forget the rest. MIke
-
Thats a dead link for me... I cant see it.
