

MaskedVengeance
-
Posts
2,148 -
Joined
-
Last visited
-
Days Won
47
Content Type
Profiles
Forums
Gallery
Articles
Everything posted by MaskedVengeance
-
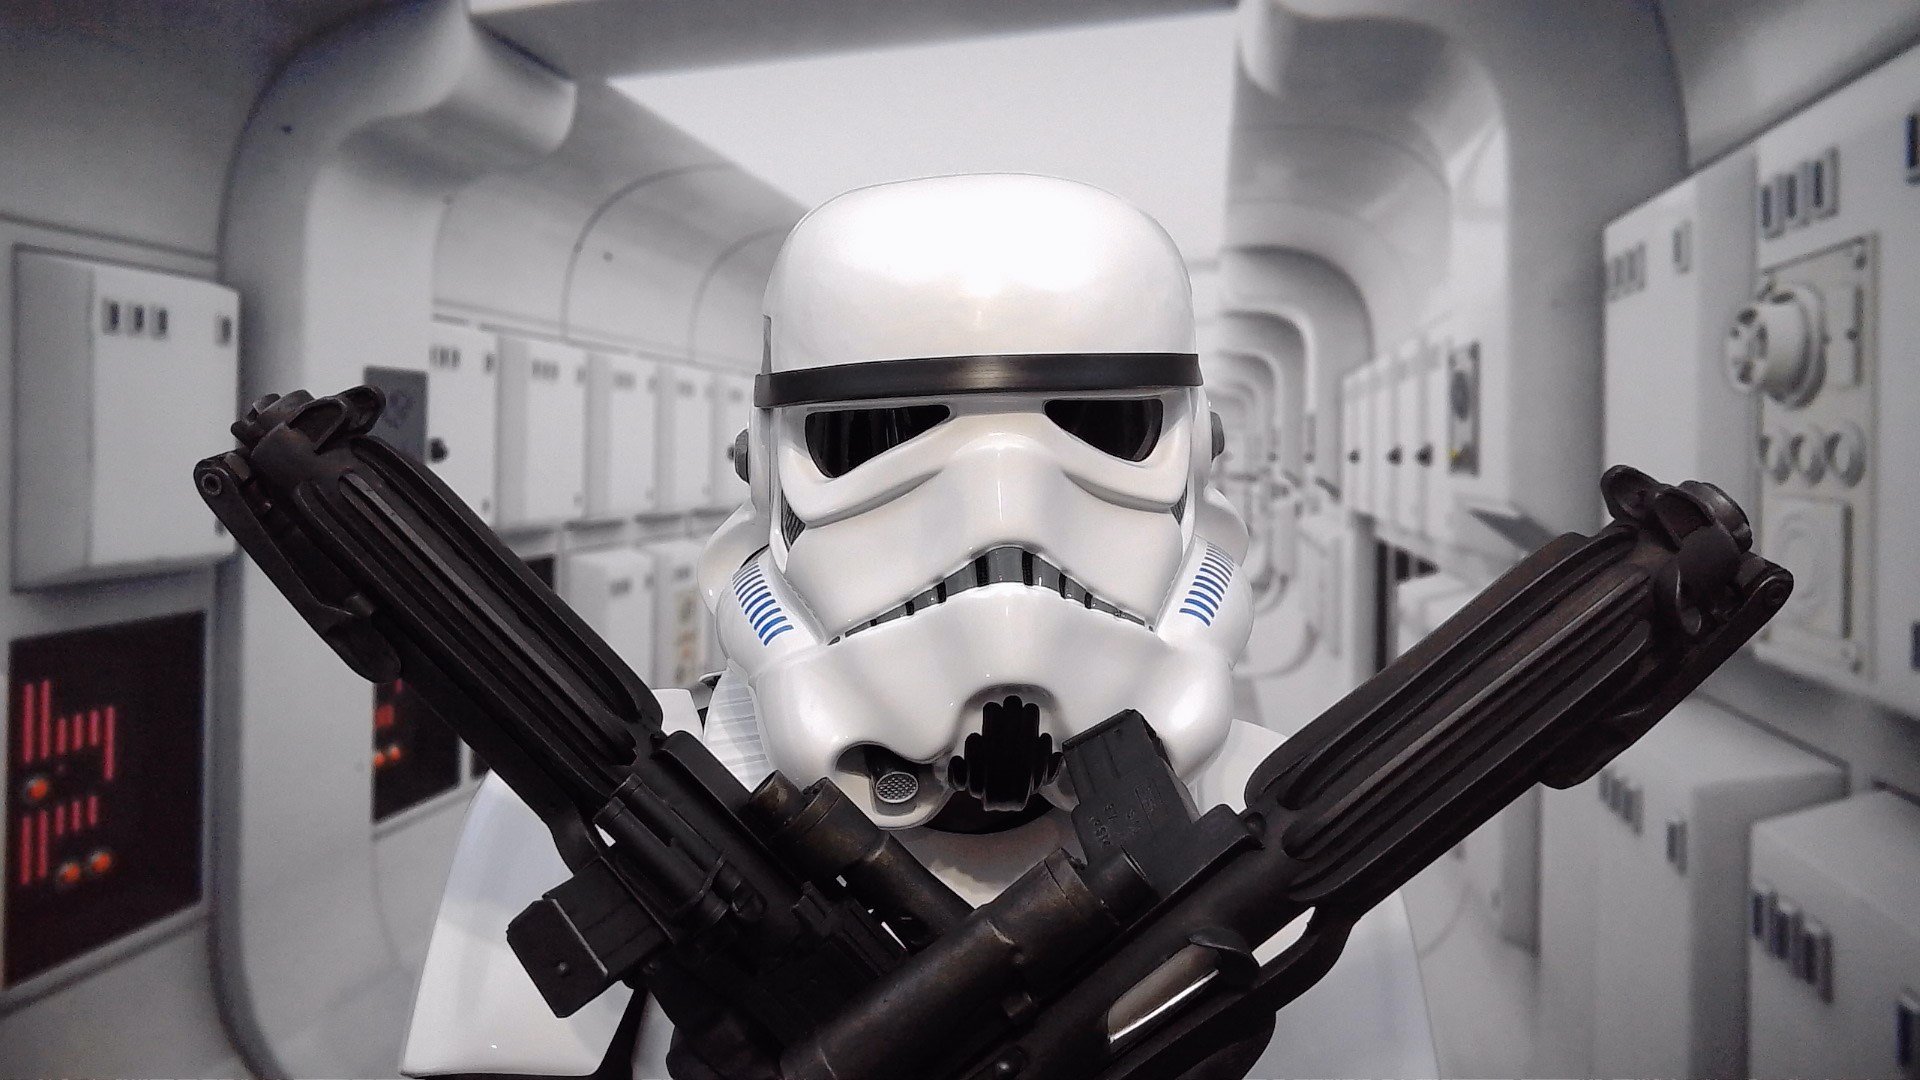
 Today I have prepared for you @Deployment Officer Team ... my L2 EI application, fresh after being granted TK permissions here on FISD. Name: Caleb M 501st Unit: Venator Squad, Georgia Garrison Armor: ATA Works (RIP Terrell Reber) Thermal Detonator: AM (DDD) Thermal Detonator clips: ukswrath Helmet: ATA Works Canvas Belt: Imperial Issue (Rob Kittell) Neck Seal: Darman's Props Boots: Imperial Boots Hand Guards: justjoseph63 (silicone) Gloves: generic rubber with handguards pre-attached by justjoseph63 Undersuit: Extreme Racing UK's Stormtrooper-Store one-piece Strapping system: Justin's RascalSnaps Holster: Darman's Props (8 oz leather) E-11 Blaster: Hellhounds Props (rubber) circa 2019 Height: 6' 0" (183 cms) Weight: 186 lbs (84.4 kilos) at time of photos. CRL: ANH Stunt Graciously assisted by @TKSpartan, @TheRascalKing, @justjoseph63, @Cricket, @zv288bot, among many others, for whom I'm forever grateful. Dressing and submission photos taken with the help of @paradoxb3. He patiently spent hours making me look presentable! Link to Pre-Approval thread: https://www.whitearmor.net/forum/topic/53006-maskedvengeance-requesting-pre-approval-review-for-anh-stunt-ata/ Full Body Armor Details Painted with Humbrol 5 Admiralty Gray and 14 French Blue Helmet Details Accessories Ha! Made you look at more thermal detonators! See my obsession HERE. Blaster Details Additional photos can be found on my rubber blaster comparison thread HERE. And that's all folks! Looks like I got this submitted in under an hour since my TK status was granted! TK-73692 over and out. 18 January 2023 @Deployment Officer Team - I'm adding these photos below to this application to ensure all bases are covered. =) 21 January 2023 After realizing that my left shoulder bridge had come out of the elastic retainers in one of my photos from my initial shoot, I tried to include addition images showing the bridges in place. However, due to additional comments on my pre-approval thread, I decided to retake that photo yested. Below you'll find the result of that. Goodness, I'm surprised I didn't snap my bridges right off while contorting my body while kitting up by myself at 4:21am. I also went ahead and shaved off more of the bottom return edge on my kidney, and cut notes to align with the posterior piece. Here are three photos showing these updates. Looks like I'll now need to downsize my v-tabs! 23 January 2023 As requested, I've completed paint removal on the bottoms of my frown teeth. Please let me know if there are any other issues I need to address! Thank you! First, a reminder of the initial updates that I provided via this post on this submissions based on feedback from my Pre-Approval thread. Those updates included: Removal of paint from bottom of center tooth, as re-shown in the first GIF image below. Reshot back image with both shoulder bridges properly retained by the elastic straps Removal of double return edge on the bottom of kidney piece Notched kidney piece to align with posterior piece ORIGINAL PAINT REMOVAL GIF and Timelapse Video: NEW PAINT REMOVAL:
 -
Keep at it James! You got this! Great to see you back at it after an extended period away! I know all about that myself, with my build taking three years to complete! patience is key! You already have wearable armor, which is great progress!
-
Maeander500 ANH TK Stunt build (MTK)
MaskedVengeance replied to maeander500's topic in ANH (Stunt and Hero)
Hi Matt! Great job on those arm adjustments! On your right arm the spacing looks very even between the bicep-forearm and forearm-hand plate. Your left forearm is a little lower, as you pointed out, but sometime than can be an illusion based on how you have your wrist angled. For example, bending your wrist up closes the gap, and bending down opens it. For now you can probably leave it. The general idea with thermal detonators is for their profile to fit within the span of the belt, which you've accomplished. As for the size of your det, you are correct in your evaluation that it may be a bit small. Screen-used dets were 68mm in diameter, as they were produced in the UK, but most dets available in the use are of US (imperial) plumbing sizes--more specifically, 2-inch inner diameter. That being said, both sizes are approvable. I write a lot more on this topic in my several thermal detonator posts, and list which armor makers have which sizes. Yes, I'm a little obsessed, and I still have two more detonator posts to write up! As for your posterior/butt piece, I'd stay away from a heat gun, since that plastic is so thin and could quickly warp. I reformed mine a bit using a hot water bath. And just an observation if you'll be seeking higher levels of approval: the larger tabs on the ends of your shoulder bridges (on the backside only!) will need to be trimmed off. You can either trim them off completely or simply chop them in half so that they appear the same size as all the other smaller ridges. Hope this helps! -
ANH Stunt "fitting/adjustment" thread (AP)
MaskedVengeance replied to BAZINGA's topic in ANH (Stunt and Hero)
Hi Bart, and many congrats on your approval! Here are my thoughts on the points you make: 2) In your photo the back and kidney appear to be wed pretty well. I suppose it's natural for them to stretch apart then come back together while walking and such. If the elastic is taught between the pieces, then I'd leave it. If the back piece is literally resting (weight-bearing) on the kidney, then cinching it a bit might be good. 3) Yes, the seams on the thigh pieces should generally be closed up. 4) Good decision on erring on the high side, at least for approval. Now for comfort and mobility you'll definitely want to either lower them, or shave off the top of the back of the thighs. I say just the back because the fronts appear to be at a good height aesthetically; but the minimal space between them and the cod may also be restricting. Hope this helps, and congrats again Trooper! -
I'm ready to submit right now, but first I need my status here on the forum changed so I have the permissions to post in the EI request sub. Haha. But as soon as that update occurs in the coming days, I'll be sure to submit!
-
TK-73692 requesting 501st Trooper status. https://www.501st.com/members/displaymember.php?userID=36181&costumeID=124
-
Yup. I'm in. True story. Now on to the next TK variation. We should take bets on what year I'll get my next approval.
-
TROOPERS! I just got word from my GML and received the formal email from 501st membership team. TK-73692 reporting for duty.
- 41 replies
-
- 10
-

-
Good morning friends! Nothing super exciting to post just yet, but I thought I'd share more about the tweak that I was asked to make as a prerequisite for approval. First I'll say that, though I disagree with the assessment, I completely respect the call that my GML made. As a TK and former DO here on FISD, my GML was simply striving to maintain both a high standard of screen accuracy and a close match to the individual thigh part on the CRL as linked to on this thread by Glen. The Death Star TK image that Joseph posted also shows a great many troopers with their ammo pack lowered. Besides the fact that I like my GML, despite never having met in person, I view this little hurdle as very minor in the grand scheme of things, and certainly hold no ill-will against my GML. In fact, I can appreciate standard-keeping. So, last night I stripped off a little E-6000, dropped the front of the ammo pack, and took new photos. I had installed the pack on the thigh tight enough that it can actually maintain it's position regardless of the height! I cleaned up the butt-joint a bit with some WHITE E-6000, lest the gap expose another speed bump for approval; far better quick solution than messy ABS paste, at least for this minor application. Now, a question for the @Deployment Officer Team. For when the time comes, would you prefer to see my raised or lowered thigh ammo pack? Personally I like the look of the raised pack better, but I will defer to whatever requirements you fine folks have for upper levels of approval! I also have the additional photos (album) below for your consideration which were not included in my original post. I believe that, now with the addition of these images, I have images of everything required for an EI submission. Hopefully more news soon!
-
Thanks Chemi, Adam, and Joseph! I spent an excessive amount of time on the ears, which I photo documented for my build thread. In fact, that specific post has already been nearly completely drafted. One might say I'm as obsessive about ears as thermal detonators... Oh, and you're spot on, Chemi! I really like my GML and we had friendly correspondence for quite a long time yesterday. The angle of the thigh ammo is certainly not something worth tarnishing a relationship for. Thanks Ardeshir! That means a lot coming from you! Thanks Gerald! It certainly wasn't an easy, or quick journey, but well worth it in the end! Thanks for your kind words! I really appreciate that Joseph! Interesting note about the rubber gloves which I got from you (actually the pair you did as a model for your hand guard attachment guide!), as they seem to be already form-fitting. I wonder if the material bulges when I make a fist? But we'll see, I may take you up on that and grab a smaller pair to try out. My goodness this certainly was a long-winded project! I think by now you know I sport some OCD tendencies of my own. Once again, thanks so much for your feedback and assistance!
-
It's all good, though! Yes, I disagree, and yes I made my case with the Gallery images I included above, but I very much like my GML (or at least the one I know from the team), so I'm happy to make a temporary adjustment. Then back up the pack the go. Heck, it took me over three years to get to this point, what's another three hours of waiting? Yeah Glen, this was mentioned in the message I received, though I was initially confused after looking at the CRL model. Only now that you posted the individual component does that make sense.
-
Obviously I'm stress/excited posting.
-
Update from my speedy GML team! I'm being asked to lower the front of my thigh ammo pack to not obscure the lower ridge of the thigh and effectively bring it parallel with the ground. I've been under the impression that, though both variations are present on screen, the raised posture if preferable. Thus I suppose I will pull up the E-6000 at the center point and drop the pack for some new photos. Hopefully I can simply photograph the updated thigh, or perhaps just dress one leg. Here are the references that I'd built my kit to, from the FISD Gallery:
-
And yes, I did set up email forwarding for 501st and GA501st domains.
-
At least Adam gave me a heads up! Phew!
-
Actually, I had mostly thought of that, but admittedly, not completely. I remembered the ab/kidney rivets and included those above, but I wonder if my exterior shot is too tight. I also took some strapping photos, but apparently the chest and back weren't attached! And no Han snap close-up or shots of my neck seal other than those I took for my build thread post. I suppose my backdrop will be making another appearance in the near future, and then I'm more closely review the EI requirements again. Keep on with the feedback, friends!
-
Thanks for the feedback Adam, Justin, and Luca! Some items are perspective (angle) related, but yeah the ATA kidney has a slightly odd return edge on the bottom which I've attempted to harness to assist in aligning/joining with the posterior. I had decided against the kidney notch since it's not required and I didn't quite have the kidney surface area to cut the notch size I wanted, but it certainly might help obscure that return edge, so I may change my mind on that. The right forearm runs extremely large on ATA kits, so I reduced it's circumference to more closely match the left forearm, and I believe they also measured very close to RS's original standard-sized suit (yes, I watched all their videos and recorded all their measurements, haha). And Adam, I thought exactly what you did while shooting. I liked the look of the holstered blaster, but shot an empty holster version of several poses just in case. Here are some of my images in reserve: And a BTS look of my shooting checklist. I recompiled a document in which the photo examples are on the same page as the written list text, instead of at the very end of the long list, for easier reference. I think I may want to add some additional text and photo examples to those the Joseph had in his original content, such as the mention of green lenses and photos of split rivets.
-
Here it is, the moment you've been waiting for! Three years after beginning my TK journey, I'm finally ready for my 501st application. While recently speaking with @Morgi I realized that this build has taken me longer than the elapsed time from when my wife and I started dating, through our engagement, and to when we got married. I've actually simultaneously submitted these photos to my GA Garrison GMLs this morning, but feedback is still very much appreciated, especially in light of my goal for EI and Centurion approval. The information and photos below are a combination of Pre-Approval and Centurion suggestions and requirements. Name: Caleb M Future 501st Unit: Venator Squad, Georgia Garrison Armor: ATA Works (RIP Terrell Reber) Thermal Detonator: AM (DDD) Thermal Detonator clips: ukswrath Helmet: ATA Works Canvas Belt: Imperial Issue (Rob Kittell) Neck Seal: Darman's Props Boots: Imperial Boots Hand Guards: justjoseph63 (silicone) Gloves: generic rubber with handguards pre-attached by justjoseph63 Undersuit: Extreme Racing UK's Stormtrooper-Store one-piece Strapping system: Justin's RascalSnaps Holster: Darman's Props (8 oz leather) E-11 Blaster: Hellhounds Props (rubber) circa 2019 Height: 6' 0" (183 cms) Weight: 186 lbs (84.4 kilos) at time of photos. CRL: ANH Stunt Graciously assisted by @TKSpartan, @TheRascalKing, @justjoseph63, @Cricket, @zv288bot, among many others, for whom I'm forever grateful. Dressing and submission photos taken with the help of @paradoxb3. He patiently spent hours making me look presentable! Full Body Armor Details Painted with Humbrol 5 Admiralty Gray and 14 French Blue Helmet Details Accessories You guys didn't really think I'd let you off the hook with only the two required TD photos did you? Captive audience = unsolicited TD imagery. See my obsession HERE. Blaster Details Additional photos can be found on my rubber blaster comparison thread HERE. Action & Profile Photos And here I am, showing the face under the bucket for perhaps the first time here on FISD. Hello there! And there we have it, everything I submitted to my GML this morning! Let me know if you see any areas that need to be addressed all the way up to L3! That, or if additional photos will be necessary for subsequent submissions. Link to my Flickr album containing all these images: Flickr Submission Photos Link to a Google Drive containing: Folder of all images for individual download Zipped file of all images for bulk download Below is a link to my still incomplete WIP build thread. Worry not, I've still continued to document my build progress with entirely too many photos, and will update the thread and my PDF compilation in the coming weeks and months.
-
Wow, this community never ceases to amaze me, though in truth each and every one of you simply constantly maintain the comradery and serving attitude that embodies the motto of Troopers Helping Troopers. It brings me great joy to hear that I have, in some fashion, been able to reflect that service back to the community, and really I've only ever wanted to extend the same assistance and guidance that I have myself been the beneficiary of over the past 3-4 years. Thanks to each of you who sent a congratulatory note, as well as all the rest of you whom I've had the pleasure of interacting with here on FISD. I'm so very excited to soon be formally inducted to the 501st (I submitted my app this morning!), joining the Georgia Garrison, and continuing to participate in all things TK related here with this AMAZING Detachment! Caleb
-
But worry not, my friends... That's right. The deed is done. And my GML @Cricket has confirmed she's received my photos. Now the waiting and anticipation stage.
-
And lest there ever be any doubt, Joseph is prime OCD material, which I can also relate to. So rest assured his advice is always actionable. Glen’s too!
-
This is brilliant and terrifying at the same time, Chemi! Turning my own name against me! Credit to @paradoxb3 for the idea for this next one below, while we were taking my official submission photos yesterday. SEVERAL WEEKS LATER: And let me just say that the DOs are some of my favorite people in this community! You all are amazing!
-
On some kits the left side doesn’t match up initially and a notch can be cut to bring it into alignment and also flush with the posterior (butt) piece. I’m on my phone and can post a photo later at a computer, but you can do a search for kidney notch and get more info.
-
Very exciting indeed, and certainly perhaps overwhelming! Here are my thoughts on build order. First follow the Return Edges 101 thread that Glen linked to for initial trimming of the raw pieces. Be aware, too, that builders with a slim body May elect to leave more return edges on limb pieces for better fitment. As far as assembly of butt-joined pieces, it’s generally recommended to get your feet wet with pieces of armor that are less prominent, such as the biceps, which have a portion significantly covered by the shoulder bells. You can also practice making your first cuts on the sides of the armor that will face your rear instead of front. Also note that the helmet is considered the most challenging component, so some save it for last. 1) Biceps (and always remember to wear your undersuit while fitting armor) 2) Forearms 3) Thighs (do your right side first for practice since the bottom seam will be covered by the thigh ammo pack) 4) Shins (do your left side first for practice since the top seam will be covered by your knee sniper plate). Be sure to wear your boots while fitting shins. Torso and shoulder bells can be done any time, and you don’t necessarily need to rush to do the ab buttons since enamel paint really only takes a couple days to cure. In fact, I waited to paint them until the very end of my build after I had already mounted the ab button plate to the large ab piece. This enabled me to use magnets and clams on that piece without messing up the paint job, and also negated the risk of scuffing the paint while handing the torso pieces during fitment and assembly. The belt can be done anytime but is most helpful after you’ve assembled the torso. Thermal detonator after the belt. Hope this helps!