
fishgoh0nk
-
Posts
360 -
Joined
-
Last visited
Content Type
Profiles
Forums
Gallery
Articles
Everything posted by fishgoh0nk
-
I would take a revisit on the ear paint, the perimeter stripe and the stripe in the middle could use a redo.
-
 Thanks Glen! Thanks Chemi!
 -
Request your Centurion Certificate here:
fishgoh0nk replied to justjoseph63's topic in Request Centurion Status
James TK 83751 Centurion Letter Chemi https://www.whitearmor.net/eib/certificates/83751-centurion.png -
How does this look?
-
What a great Friday morning surprise! Thank you guys! Justin, thanks for believing in me with the Centurion patch!
-
A trick I learned when doing mine, if gluing on cover strips one side at a time, start with the side that faces outward first, so you can get a flush seam on the more exposed/visible side. This is because the second side may be a bit more difficult getting super flush as you've already locked down the first. Sometimes I had to use locking clamps to secure a flush seam as the rigidity of the cover strip and the armor may be a bit stubborn. Also when using locking clamps, don't press too hard, I've managed to squeeze all the e6000 out of the cracks it didn't adhere at all, hours wasted ><
-
Congrats Glen!!
-
Newbie trooper ready to join the club
fishgoh0nk replied to PlastoidHero's topic in New Member Introductions
You came to the right place! "That's good - You've taken your first step into a larger world." and BOY, is this a large world. I think the thing I hadn't realized until after spending more time on FISD and local garrison is that there are so many degrees of dedication and enthusiasm to the armor. Scouring the forums is really thorough but time consuming; talking to people directly is highly efficient and would definitely recommend! So reach out, everyone I've met here is extremely helpful and friendly. Good luck with your build! -
Thanks mate!
-
Matt and James's TK build thread - AM 4.5
fishgoh0nk replied to Sawanator's topic in ANH Build Threads
Arizona, where everything melts -
Wait, mods are being made to a link in the armor history chain? Oof, I'm sure it's not my place to say, but if it were me, I'd build it the way Marco had intended, goofy, inaccurate, but definitely a nice display piece for preservation.
-
Thanks Richard! Like grade school exams, I never have good feelings about any of it lol I just fetal position, cross fingers legs and arms and hope for the best
-
Thank you! Please let me know if anything else is needed
-
@Chemi I tried the best to align these with some more glue directly on the ammo boxes and the strap, how does this look?
-
Thanks Chemi, will get on it as soon as I get home.
-
Sorry, hit the submit button too early, added additional photos for blaster, D ring is 3rd from last photo and I added the EIB link. Thanks!
-
Name: James W. TK-83751 Southern California Garrison Orange County Squad Armor Maker = ANOVOS Helmet Maker = ANOVOS Blaster Type = @trooper96 Height = 5'11 Weight = 200lbs Boot Maker = Imperial Boots Canvas Belt = @TKittell belt Hand Plates = @justjoseph63 silicone handguards Electronics = Raspberry PI Zero W, iComm, Aker amp, @ukswrath SHA hearing assist, quad fans Neck Seal Type = ANOVOS Holster Maker = ANOVOS EIB Application Link: Full Body Front Back Right Right Raised Left Left Raised Action Action 2 Details Right Left Helmet Front Left Right Back Lens Color HOVIs & Vocoder S Trim Armor Strapping Arm Strapping Forearm wrist returns Cod Elastic Han Snap Shoulder Elastic Ab Button Panels Thigh ammo left Thigh ammo right Thigh ammo rivet right Thigh ammo rivet left Sniper knee front Sniper knee right Sniper knee left Belt Belt rear Accessories Neck Seal Gloves Boots Thermal Detonator E-11 Blaster Right Left Close Ups
-
Looks great!!
-
Fish's ANOVOS Build Thread - Aspiring for L3
fishgoh0nk replied to fishgoh0nk's topic in ANH (Stunt and Hero)
should've waited for the paint to cure before doing the crayon... Also should've chose a brighter sheen for the undercoat when scraping to weather... lesson learned haha -
Fish's ANOVOS Build Thread - Aspiring for L3
fishgoh0nk replied to fishgoh0nk's topic in ANH (Stunt and Hero)
Finally got the E11 Sanded and wrapping up the paint. I'm really digging the texture - using Krylon Textured, knocked down with Krylon Matte, and then topped off with Rustoleum Dead flat top coat. Thoughts? -
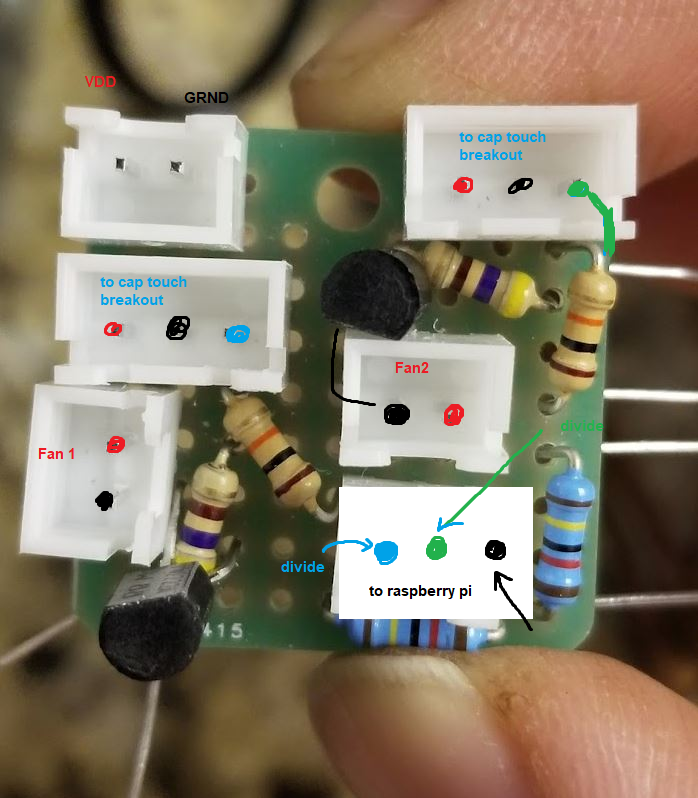
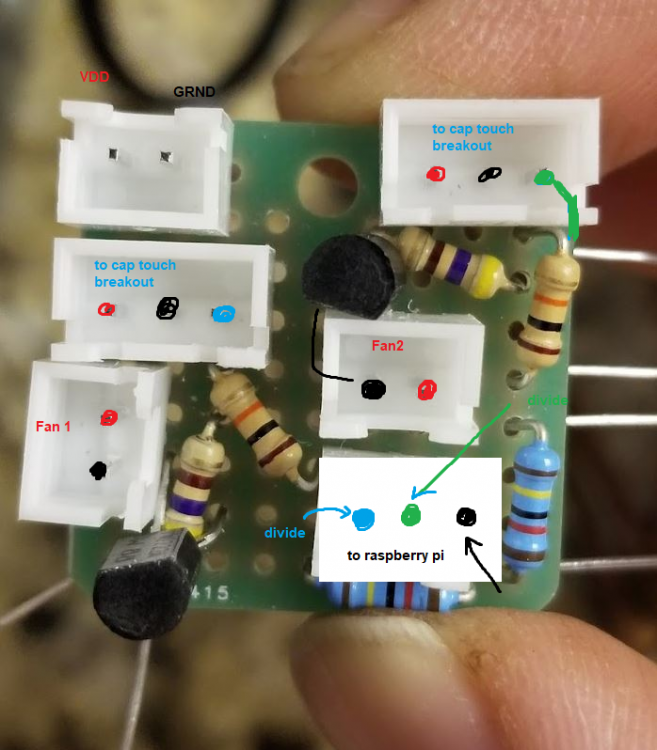
I had to divide the 5v because the raspi is a 3.3v device. Do you think the 10k and 14k are too resistive, it was ducking into the micro amps? I did some calculations and I'm currently going to try a board with 1k and 2k respectively; that should give the fans roughly 1.6mA edit - forgot the purpose - they're an out to tell the pi and trigger a audible feedback that the fans are on, just something for fun, not required, but i wanted it to talk to the pi
-
thought about it - would probably need an i2c pin board for the pi to accomodate additional pins; i'm running out of pins on the 2x20. second thing is - what do we show on the hud? temperature? star wars movie? email?
-
Running into the second set of fans shutting off after a few seconds - probably have a bad ground or a short; would love someone to critique my circuitry. https://www.falstad.com/circuit/circuitjs.html?ctz=CQAgjCAMB0l3BWcMBMcUHYMGZIA4UA2ATmIxAUgoqoQFMBaMMAKABcQM8AWEb7FCDxhCfAVHAgGMeBgTEEKNJELyEhPJGJRoCBCIyEwSjJDDZK24lQAmdAGYBDAK4AbNiwBuFYyEyDVUX8JKm5aEJ0EFm4wJEC-DEFhIMSQ3UkYWJ0smUEZJAhIFgB3EHjg+JjRIpi49T4RIUaqtILspEyO2DzYNqKOLl4UPDwmoJGJQtg4ZhQwYXVINHVuPEIevTBibG3sOTW8eVHSWwcXdxLOHj8JwZBsbGrLu-5BF80oS+T7yF4RqlwvCKpX+Pz+HyUQMu+kEkJ8sNSwLGfFWyJhnxBjXR2N8RW8CG4vAeokI+HujwiYWoVBpukupNG2GuDL4HyRBKJFPRwSKACcyqliVdOdU+KYWPyWasqO8aWK+fDFeiwnKwPAFcq4IqeeAVezfCq+FrDdgJUIIShwVQwITJuqzaCbVaykDdfAvh9CLx0V6MYrfdzLX7HbbSIInfcWABnMpkoWEQUUuVOVxRujR2OMikspmuqgptMsIA EDIT: i think i need to lower the resistance, not enough current to run both the fans and the touch breakout... it's in the microamps attempts to measure it cuts power.
-
I had built a nice soundboard into my bucket that utilized raspberry pi to hook into the iComm's Line In and momentary buttons around the chin; but the buttons were not accessible when the armor was worn; the design was pretty short sighted. I had experimented and prototyped new options for helmet sound control via 315mhz remotes; but the fidelity was quite bad. Some of the actuations were picked up, some were not; and given anyone else at the event could also be using a similar frequency, interference was a high possibility. So I experimented with capacitive touch - if one is not familiar, basically an electrical current is run through a single conductor or wire and a logic board will detect if the current drops, meaning someone grounded or has a higher capacity for electricity, absorbs the signal. I experimented with the touch option through Anovos ABS thickness as well as the 3mm ATA armor thickness as well as with rubber TK gloves. So far so goood As I'm not super savvy with electronics, I followed adafruit's guide to wiring their components, their touch breakouts were relatively cheap and easily accessible. Here's the guide - https://learn.adafruit.com/adafruit-capacitive-touch-sensor-breakouts I basically went nose first into the deep end, picking up a breadboard and began learning about voltage and resistance management. The breadboard as well as this circuit design calculator helped me out greatly. https://www.falstad.com/circuit/circuitjs.html After concept proofing, I figured a 5 way breakout was better for my usage. I had not read carefully, but the 5 way pulls low rather than high when sending the signal, which was better for raspberry pi as it has a 3.3v max input. Any more than 3.3v in would burn it out. As I supplied a 5v to the breakout, drops in voltage didn't require down stepping, that made wiring a lot cleaner. I took apart my bucket and hid all the wires under velcro. The touch points were created with conductive adhesive copper tape and a single conductor wire. I found that 26gauge headphone wire worked the best; I had limited supply, but favored their low profile and high conductivity. There's a total of 1 x 5 way breakout, 2 toggle breakouts (fans) and 2 momentary (one for iComm PTT and extra control button) The solitary breakouts, even though requires 3 wires total (VDD, Ground, Out) were a lot easier to manage as you could localize the breakout and not have to worry about crossing wires or accidental actuation. Two fan controller breakouts were wired directly to the power supply, controlled by a NPN transistor. It's 5v output needed to be down stepped via 10K and 14K ohm resistors for R1 and R2. The final signal is passed into the pi to trigger voice commands and visual queue that the fans were enabled or disabled. Version 1 Version 2 I didn't plan to, but eventually just soldered directly to the pi, the 40pin headers were too tall for profile in the helmet. Also tried experimenting with a usb soundboard rather than the iComm. Haven't figured out the voice changer on pi... maybe one day. I added last minute a visual queue indicator to tell me the status of the touches. It's hard to keep track of the touch combinations and what has actually occurred, so this RGB LED helps a lot https://i.imgur.com/1g2ULHU.gifv This is by no means cable managed, I could've tried harder to conceal the wires, but I'll get to that next time I take this apart. Plugging everything is touch work, and I just want to get to trooping. After messing with the wiring till 6am the day of my first troop, sometimes it's better to keep it simple or just not mess with it. On the software side - I'm running a systemd startup service that runs a python script which uses pygame.mixer and a few other libraries to handle the functionality. It's quite spaghetti right now, if anyone's interested, I'll share or upload it to github. Hope this helps someone out. Edit - here's a video of the functions
-
Like a smooth, shiny egg! The foundation of every trooper rump.