
.png.c79477c1740a05d2252e896e392c2c0e.png)
Ensi
-
Posts
226 -
Joined
-
Last visited
Content Type
Profiles
Forums
Gallery
Articles
Media Demo
Everything posted by Ensi
-

JAFO'S FIRST ORDER STORMTROOPER BUILD (Jimmiroquai)
Ensi replied to JAFO's topic in Build Threads Requireing Maintenance
Try it on a piece of scrap first. I did and the flexible fibreglass did NOT like it. -
Hi! Sick of photobucket being a slow, bloated piece of bantha poodoo (that now apparently charges you insane amounts for external hosting)? Wish you could just upload some images to your build thread to show off your sweet-an impolite person testfit of your armor after you've done all the strapping and not use 50% of that time closing popups? FEAR NOT! PSA: Keep a backup of your images! No one can predict the future, Imgur may not always be around (or may hold your images hostage like Photobucket). 1) CLICK THIS TO GO TO IMGUR.COM (Or you could click the mouse wheel, which opens any link in a new tab) 2) Make an account: 3) Fill in your stuff or use Facebook/Google whatever: 4) Go to your images: 5) Find your awesome picture: 6) Drag and drop your awesome picture right onto Imgur (or use CTRL C+V): 7) Click your newly uploaded picture: 8) Click the Copy button on the BBCode section: It will flash green and stuff, welcome to the future! This baby's almost ready for paint! Pretty painless! It also has albums, ability to auto-resize, you can even select several pictures from your folders and just drag them all onto Imgur. Pictures are hosted on imgur, and you are merely linking to them by posting them using this method. If you remove it from imgur, it will be removed from anywhere else you posted it using the link. Here's what all the sections do: Image Link: Links to the image, but on Imgur. [EXAMPLE] Direct Link: Links directly to the image, and nothing but the image. [EXAMPLE] Markdown Link: Formatting for Reddit comments, disregard this one. HTML: For embedding your picture onto your website. HTML Code. BBCode: For embedding your picture onto forums (like FISD and 99% of all other forums). Linked BBCode: Same as above but with a clickable picture that leads to the picture on Imgur. [Example below, click it!] HOW TO RESIZE YOUR PHOTOS FROM YOUR SMARTPHONE/CAMERA IF YOU HAVE BANTHA POODOO INTERNET CONNECTION (WINDOWS ONLY): If you're like me, you have a sub-par internet connection and a "regular" smartphone. Smartphones takes pictures with a large file size and it is not optimal for us with a bad connection wanting to upload it for web viewing. 3.5mb takes a long time to upload, so let's shrink those files while still keeping it high quality for the web. 1) Open up the pic in MS Paint Right clicking the image and clicking edit should open up the selected pic in Paint. If you highlight multiple images and do this, it should open an instance of paint for every selected pic. 2) Resize in Paint Click the "resize" button in MS Paint. You'll see this: Click TAB once and it should highlight the number, making you able to type into the field. I usually resize my pics from my Samsung S8 by 40-50%. Press OK (or just hit enter) and it should resize. Now you can go to File->Save/Save As.. or simply just press CTRL+S to overwrite and save to the file you opened. Now it only takes a few seconds to upload a picture, instead of a minute. Time saved that you can use on removing excess E6000 glue from your coverstrips If you have any questions i'll do my best to answer them. Ensi out!
-
Ended up just using E6000 on the outside and velcro on the inside of the shins. Filled the seams from the cutting and sanded it down, working with this Gelcoat Filler (from Plastic Padding) was super nice, but once it starts gumming up/changing consistency it's done and you need to mix another batch. Filled the holes on the TD but they need another round. Also some of it fell into the TD itself so now there's a piece in there making noise.. Nooo Added snaps to everything The 2 snaps on the yoke here that connects to my chest made the chest sit too low, so they were moved up right besides the shoulder connections. Mr. Chest is excited about this build: Decided to cut up the forearms as they were just too huge for me: Wear PPE! Fibreglass is nasty stuff and you DO NOT want it inside your lungs. It does not go away. Get a proper respirator. I also used safety glasses, cut resistant gloves, and have a separate change of clothes for when i'm outside working with it. Glued them together the same method as thighs and biceps, by using some ABS plastic to join them. This time I instead tried the Loctite Power Epoxy with the 4 hour setting time. Sooo much nicer, with the 5-min you really have to work fast and it's just so stressful. This is how the upper part is right now. I tried velcroing on the biceps to shoulder bells, but it just wouldn't hold under movement, so I removed it (woo, E6000!) and added snaps. My velcro concoction of elastic, nylon, and velcro. Loop side on armor, hook on this thing: My order from ImperialBoots also arrived. Ordered my regular shoe-size, 42, and they fit perfectly. Trimmed knee gaskets too, and added some velcro on the bottom: Started adding buckles to the thighs. These will be held up with a belt I ordered on eBay, tacticool airsoft belt. Next up is connecting the ab-harness. Plan on just doing some nylon webbing over my shoulders, but with adjustable buckles. Also considering strengthening up one of the thighs as it is kinda thin and not as strong as the other one. For this i'm planning to use some fibreglass mats and polyester.
-
Jayben's Anovos First Order: Painting, and Magnet/Velcro Strapping
Ensi replied to Jayben Kenobi's topic in TFA Build Threads
Looks great! Those makeshift paint stands are awesome, maybe I should get a trike.. -
Looks great! Can't wait to see more. Also yeah the undersuit is soo tight haha.
-
Looking good! Will be following this build What did you use to fill the holes, and what are your plans for painting?
-
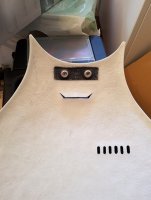
What's the consensus here on picture heavy? I like my posts to be picture heavy, please tell if I should tone it down haha. If replying please don't quote the large posts or you can snip the picture URL's from the quote Had a friend over for 2 weeks, so build slowed down but things are starting up again now. First up was connecting the shoulder and elbow gaskets as well as trimming them down. Doing knee gaskets soon. Didn't cut off the excess material in case I want to change it in the future. Before: After: Cut out the chest vent with a blade: Also cut out the chest and bicep pill holes, as well as the forearm doodly-doo and 2 squares, contemplating cutting out the shin ovals as well as the forearm square up where the hand sticks out (com pad?). [EDIT SEPTEMBER: I did not cut out the shin ovals as cutting them would eat into the overlapping and probably weaken it structurally, decided to just use decals here.] Decided I wanted this kit to fit right from the start and made some dreaded cuts: As you can see here I already trimmed down the thigh-shape. I may have gone overboard here, so if you're thinking about downsizing your thighs, downsize them first THEN do the shaping. Hopefully it won't turn out too bad. Excess material from biceps and thighs. Wasn't that scientifically measured so I decided to cut too little rather than too much. Got some ABS material from TK-50501 (thanks!) to make inner cover strips for the joints on the thighs and biceps. Gluing the strips with Loctite 5min Epoxy. Areas that were to be glued I roughed up with 60 grit sandpaper beforehand, washed, and (if I remembered to) went over with a little Isopropanol (rubbing alcohol). Also got my Trooperbay package with the decals and a buttload of E6000, decided to glue on some snaps to the ab. LESSON LEARNED: Do NOT get cheap ebay snaps, they absolutely suck. Go for some heavy duty quality ones. Plan now is to fill the cracks on the thighs, biceps, and TD with some Gelcoat Filler (2-part filler for boats) and sand down. Then on to some strapping/rigging. Also decided to try velcroing both sides of the shins together, has anyone done this before? I tried it with some small dots and it sat really well. Preventing some flex while kitting up/down is my main concern here. It seems doable as long as you are careful with the greeblies and only glue them on one side.
-
BBB day is here!! Jim is an absolute packing wizard Found some cracks/damage, added superglue to the cracks, what to do about the TD I don't know yet. Bought an automotive 2-part filler (can't get bondo here), should work? Ab Thigh TD, was like this on the other side as well. People are saying the TD feels very fragile and they are correct, it does. Gaskets... will need to be trimmed haha. Doesn't help that I have super thin arms. Got around to sanding the inside of some of the parts with 120-grit sandpaper, until it of course started raining. Hoping for better weather tomorrow! I wore heavy duty nitrile gloves, long sleeved shirt, pants, glasses, and a face-mask. Showered right after as well and i'm only itching in 2 places so I must be doing something right. Plan is to sand the insides of all the pieces, drill all the holes, and give it a light sand on the outside with finer grit, then wash.
-
JAFO'S FIRST ORDER STORMTROOPER BUILD (Jimmiroquai)
Ensi replied to JAFO's topic in Build Threads Requireing Maintenance
Congratulations! How does it feel? What things do you wish you knew before you started now that you're "finished"? -
Thanks! I've read so much i've started to grow return edges and sweat E6000. Will be sure to ask questions if I need to This community is pretty great. Thanks! Hey Darren! Looking forward to working on it, your build thread will be of great help. Expect an order for a belt kit in the near future.. Hux's speech scene in TFA just won me over. First Order TK's are so darn cool! Will be plenty motivation I think. Building a TD was also on my wishlist but I think i'll tackle this one first.. So not really any "progress" just yet, but I have been getting 2-4 packages a day in the mail and it feels like christmas. Various electronics I plan to use in my helmet and also in my blaster kits I have yet to order. TotallyVelcroBrandVelcro©®™, webbing, elastic, magnets, clamps, wires, buckles Stormtrooperundersuit's FO-Neckseal. It has these nice magnetic fasteners that are really easy to get on and off. 2 balaclavas because they were so cheap, why not have a backup? Will definitely be Plastidip™ing the inside of the bucket. But i'm gonna wait until I get it padded and the fan system up and running. Stormtrooperundersuit's FO-Undersuit. This one is pretty kinky. So glad I ordered a large, it fits snug. Is the image sizes ok? Let me know Now i'm gonna wait until BBB-day, then get some PPE and sanding equipment.
-
Hey all! Daniel from Norway here. After participating in 2 troops with my garrison as a handler, I was so close to pulling the plug. Then this guy let me try his stupid TB and now i'm broke Been reading FISD and Facebook-groups like an absolute madman the past few months doing my research. This will be my first costume of any kind, I have zero experience in any type of prop-making so this'll definitely be a journey. I want to make a build-thread because: 1. It helps push me to continue and document everything 2. I can get GREAT help from all you people 3. It will help future builders People said the FOTK would be a tall order for a first costume, so I guess it'll be my First Order No? I'll show myself out.. I'm 177cm (5'10"), 79kg (175lbs), mesomorph. TABLE OF CONTENTS Shipment of various parts, testfit of undersuit Big Brown Box day Gasket trimming, chest vent cutting, ab/thigh/bicep downsizing, first snaps Filling downsizing seam thighs/biceps, cod/shoulder/yoke/chest snaps, downsizing forearms, joining forearms together again, yoke to chest velcro connection, boots/gloves, knee gasket trimming, thigh buckles Ab harness, greeblie gluing, weapon/holster screws, forearm/TD tidy up, shin box gluing, paint match picture Pinhole filling/surface imperfections, strengthening thigh (fibreglass mats/polyester resin), bicep step details, test fit Pinhole filling/sanding yoke, priming, painting, paint match, belt assembly 1, belt box painting, belt box attachments HOLSTER: Broke it, fixed it, screw installation/types, painting, assembly, belt assembly 2, wobbly belt box elastic string mod, TD complete, TD right-side circle accuracy update, tape backing on all holes, AB done, polishing pad padding mod, forearm seam accuracy update. ARMOR DONE, laid out, test-fit APPROVAL PHOTOS Post approval mods 1: Kneeplates, clearcoating, removal of orange peel, high gloss! Night-time painting, abdomen crack and fibreglass mat/resin fix, painting spreadsheet Paint failure on abs, whining Fibreglass and paint failure on abs, ABS plastic shoulder support system Blacking out inside of helmet, armorcase pimping PARTS Helmet: ANOVOS Standard Line (Arrived, from eBay-seller, because ANOVOS doesn't ship to Norway and if they did i'd probably have it in 2028) Helmet Padding: eBay (Arrived)[Combat/Airsoft/Tactical Style] Neckseal: Stormtrooperundersuit (Arrived) [Medium] Armor: Jimmiroquai FOTK v4 (Arrived) [Flexible Fibreglass] Undersuit: Stormtrooperundersuit (Arrived) [Large, order this a size or so above your regular size!] Belt: JAFO's Belts Of The First Order (Arrived) Belt to suspend thighs: eBay (Arrived) [Airsoft style combat belt] Pouches: Jimmiroquai (Arrived) Boots: ImperialBoots (Arrived) [42EU/9US] Gloves: ImperialBoots (Arrived) [Medium] Gaskets: Jimmiroquai (Arrived) Decals: Trooperbay (Arrived) [You can also just buy some matte black car vinyl wrap and make your own, way cheaper. I had to remove my decals so now it's only vinyl wrap.] F-11D Blaster: ("Shipped" 3 months and counting.. NOT happy) (3D-Printed Kit) SE-44C Pistol: ("Shipped" 3 months and counting.. NOT happy) (3D-Printed Kit) HESTON BLASTER AND PISTOL IS ON ITS WAY THOUGH I MEAN SERIOUSLY IT'LL GET HERE BEFORE ONE FROM A COUNTRY A STONE'S THROW AWAY GETS HERE Hardware screws for F-11D and SE-44C: MaxSW [LINK] (Arrived) F-11D Decals: MaxSW [LINK] (Arrived) Torx Anti-Tamper/Security screws for the holster + bearings and some washers: eBay (Arrived) Fan system: Making my own USB-powered system. Voice system: (Ordered) TRamp Hearing assist: Looking at ukswrath's kit, but it'll have to come at a later stage. Webbing, elastic, hook/loop tape, clamps, magnets, snaps, leds (blaster), wiring, fans etc: All from eBay, super cheap. Because buying it locally would literally cost 5 times the amount. EDIT: DONT BUY EBAY SNAPS THEY ARE SUPER BAD. E6000 from Trooperbay eventually with the decals, planning to use this for most of the armor as it's forgiving. Still need to get some tools/misc (Dremel, sanding equipment, PPE etc.) from work. Now for the painting i'll have to do some experimenting. What I have in mind right now is to get a plastic primer, white paint, and clearcoat. Then do a test on scrap and hope it matches the helmet. If not i'll have to get custom spraycans, and according to my research RAL 9016 should match the ANOVOS bucket pretty well, also heard FIAT 249. What do you all think about adding clear on top of already glossy paint? Is it neccessary? FOTK's are pretty shiny. Picture so first post isn't pictureless: Peace!
-
JAFO'S FIRST ORDER STORMTROOPER BUILD (Jimmiroquai)
Ensi replied to JAFO's topic in Build Threads Requireing Maintenance
Looking really nice! Do you know what caused those paint issues?
