ukswrath
-
Posts
14,618 -
Joined
-
Last visited
-
Days Won
180
Content Type
Profiles
Forums
Gallery
Articles
Everything posted by ukswrath
-
This great. I'm always looking for new technology. Great find
-
Heavy Weapons Backpack build part 3, Final
ukswrath replied to ukswrath's topic in HWT Build Threads
Thanks Joseph. Weathering - Charcoal dust, blush brush and hair spray. Pm sent on ammo packs -
TK-10116 Requesting HWT EIB Status (ATA)[APPROVED] 2nd
ukswrath replied to ukswrath's topic in Request Expert Infantry Status
Hey Andrew, I was half tempted to build and sell them, but there's just not enough interest, yet. It's really not that difficult, I built mine in a weekend, just follow my tutorial. You can do it! -
TK-10116 Requesting HWT EIB Status (ATA)[APPROVED] 2nd
ukswrath replied to ukswrath's topic in Request Expert Infantry Status
Thank you Manuel. Waving the checked flag for you brother -
TK-10116 Requesting HWT EIB Status (ATA)[APPROVED] 2nd
ukswrath replied to ukswrath's topic in Request Expert Infantry Status
Great idea and most importantly, enjoy the journey my friend -
TK-10116 Requesting HWT EIB Status (ATA)[APPROVED] 2nd
ukswrath replied to ukswrath's topic in Request Expert Infantry Status
Hey G, HWT is just an extension of Stunt with minor alterations and weathering however, in addition there's a few items you'll have buy or build like pouches, a pauldron, backpack and maybe a BFG. To answer your question, it's up to you, it all depends on your building skills and the depth of your wallet . If you are a hobby/craft enthusiast and love these kinds of things then I say, go for it however, take your time, read, have patience, measure twice and cut once. If you're new to what I just said then I suggest by all means, baby steps, and of course take your time, read, have patience, measure twice and cut once. See where I'm going with this? Good luck and thank you -
TK-10116 Requesting HWT EIB Status (ATA)[APPROVED] 2nd
ukswrath replied to ukswrath's topic in Request Expert Infantry Status
Thanks Andrew -
TK-10116 Requesting HWT EIB Status (ATA)[APPROVED] 2nd
ukswrath replied to ukswrath's topic in Request Expert Infantry Status
Thanks a lot Steve -
TK-10116 Requesting HWT EIB Status (ATA)[APPROVED] 2nd
ukswrath replied to ukswrath's topic in Request Expert Infantry Status
lol thanks Pat. Amazing what you can do when all the kids are grown up and you don't have a million activities to be at -
Good call Manuel, I've updated this all 3 posts.
-
TK-10116 Requesting HWT EIB Status (ATA)[APPROVED] 2nd
ukswrath replied to ukswrath's topic in Request Expert Infantry Status
Thanks Germain, very much appreciated. -
Heavy Weapons Backpack build part 3, Final
ukswrath replied to ukswrath's topic in HWT Build Threads
Manuel PM sent -
haha Awesome!
-
TK-10116 Requesting HWT EIB Status (ATA)[APPROVED] 2nd
ukswrath replied to ukswrath's topic in Request Expert Infantry Status
Hey Scott, thank you very much. -
TK-10116 Requesting HWT EIB Status (ATA)[APPROVED] 2nd
ukswrath replied to ukswrath's topic in Request Expert Infantry Status
Belt -
TK-10116 Requesting HWT EIB Status (ATA)[APPROVED] 2nd
ukswrath replied to ukswrath's topic in Request Expert Infantry Status
Hey Steve, no problem, I totally dropped the ball on that sorry. I'll have that for ya a bit later today. Is there anything else you want pics of while I'm at it? -
Name = Anthony (Tony) Jobe TK ID = 10116 FISD Forum Name = ukswrath Garrison = Golden Gate Garrison Back Pack Build Threads: http://www.whitearmor.net/forum/topic/30034-hwt-backpack-build-part-1/, http://www.whitearmor.net/forum/topic/30036-heavy-weapons-backpack-build-part-2/, http://www.whitearmor.net/forum/topic/30038-heavy-weapons-backpack-build-part-3-final/ Armor= ATA Helmet= ATA Height = 5'11" Weight = 190 lbs Blaster= T-21 Anthony Bailey (Blaster 8266) Boots = Imperial Boots Hand Plates/Gloves = TrooperBay Electronics = N/A Neck Seal = Self Made Inside Brackets = Self made Backpack = Self Made Pauldron = Trooper1 MP40 Leather Pouches = Anthony Bailey (Blaster 8266) Front Back Left Right Action Helmet Off Helmet Front Helmet Back Helmet Left Helmet Right Helmet inside "S" Seal Kidney & Ab Rivets Right Ab Ab Section Front Calf and Thighs Sniper Knee Gloves and Forearm Return Edge Backpack Close Up Cod, Posterior Inside and Out Attachment T-21 Thank you for the opportunity to represent the FISD and 501st as a HWT
-
You're very welcome Charles, awesome backpack you have there If I may say.
-
Thanks everyone for the positive feedback. I agree Vern. Like with the TD I think the HWT backpack may be under refinement for some time. It really depends on the accuracy of the screenshots and those with the decision making authority to determine what will be considered CRL. At this time I want to give a big shout out to Quartermaster for blazing this new accuracy trail we're on. Thank you sir
-
Sweet! Thanks Mathias
-
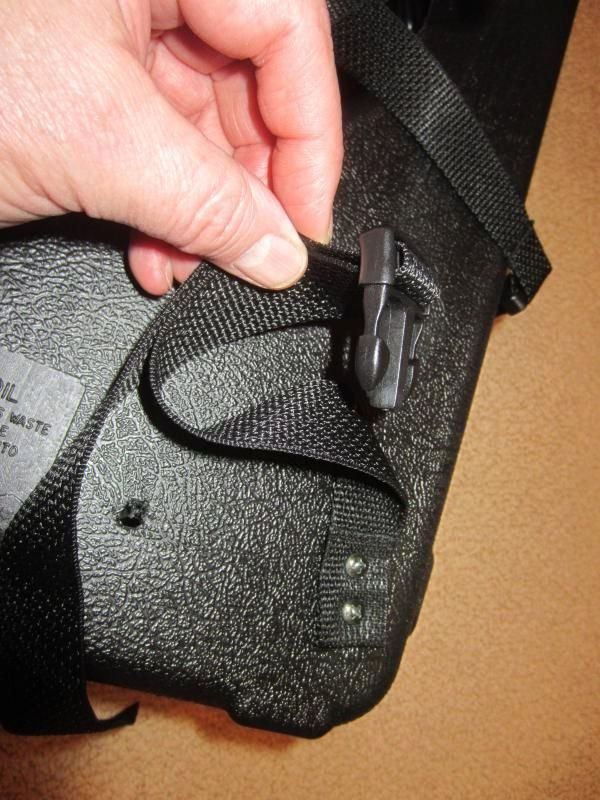
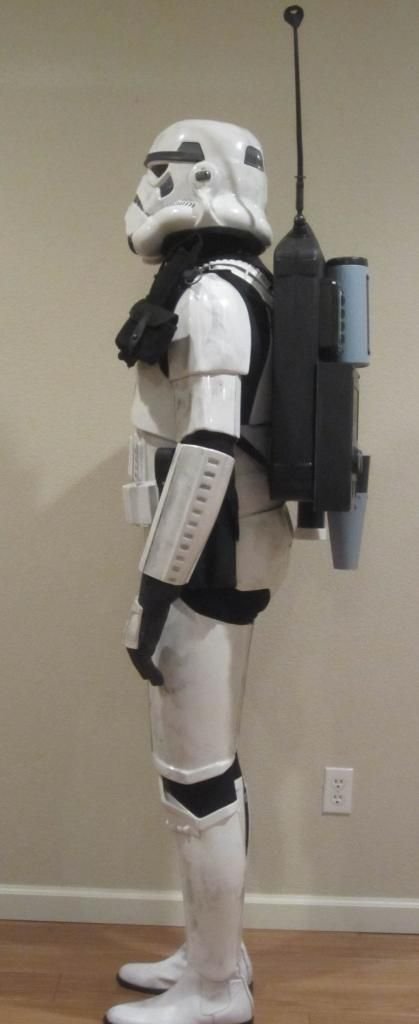
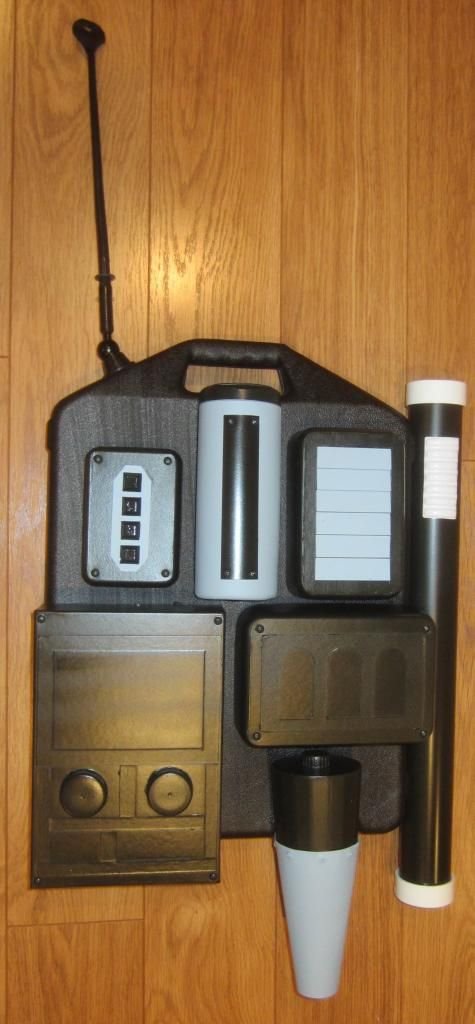
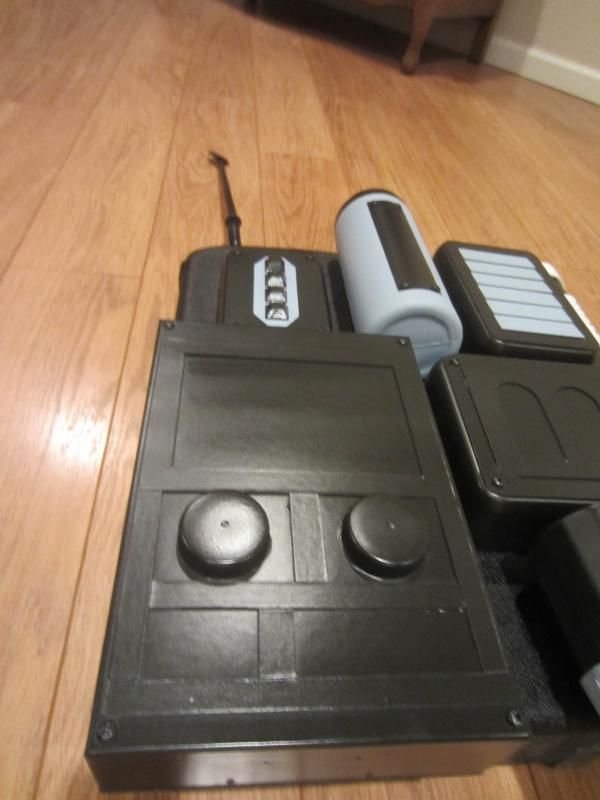
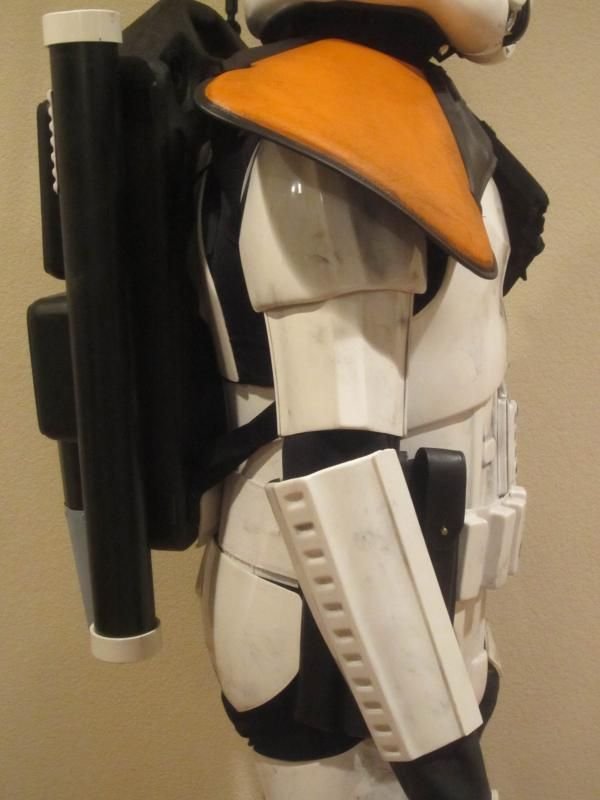
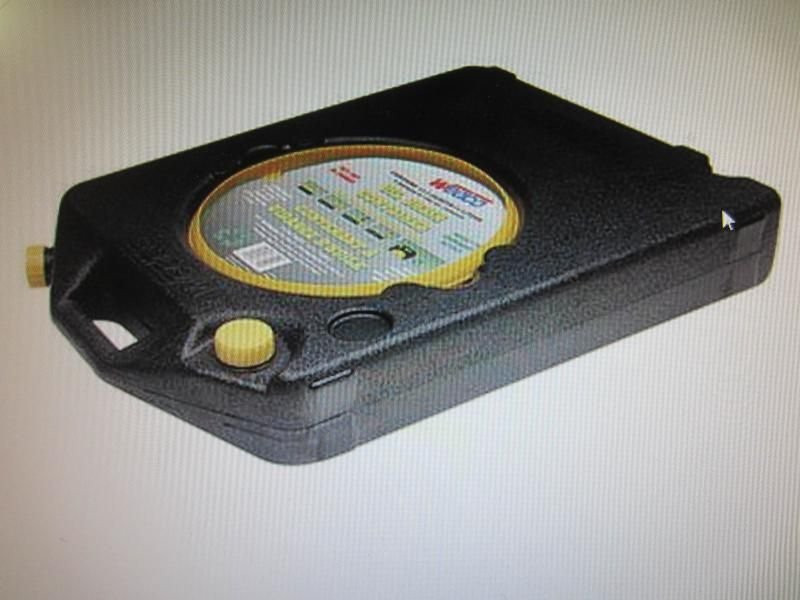
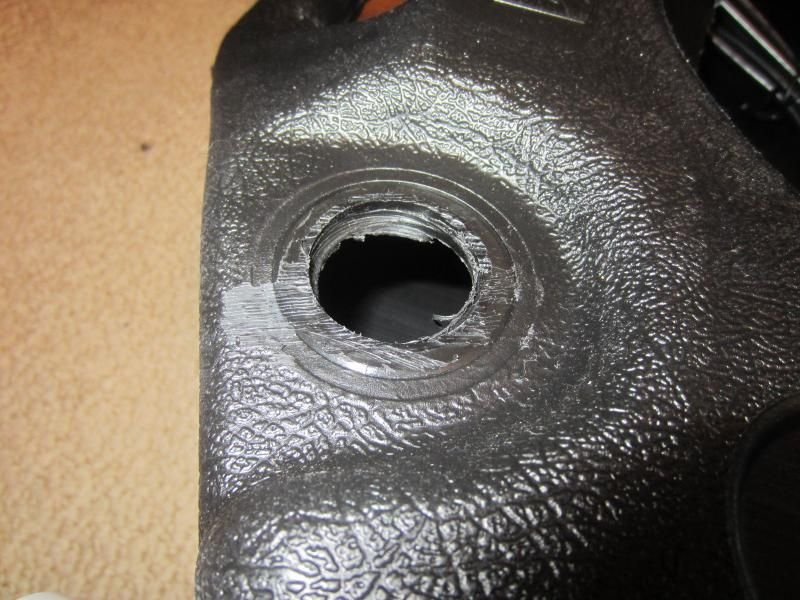
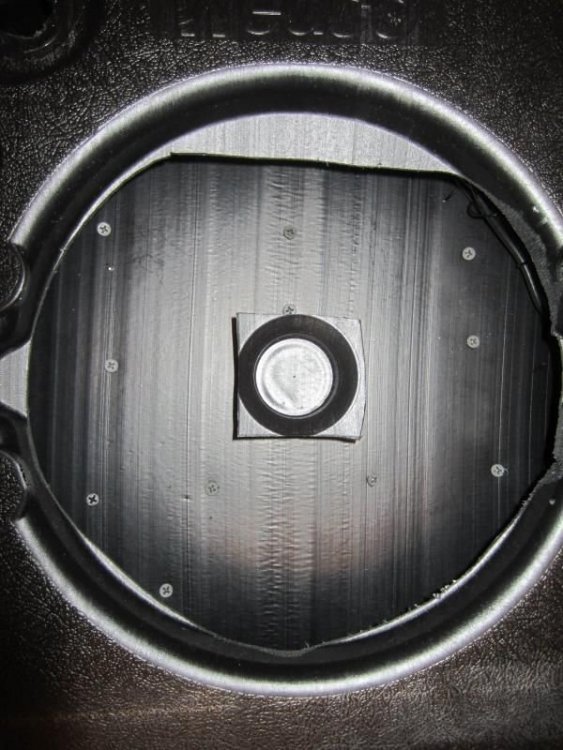
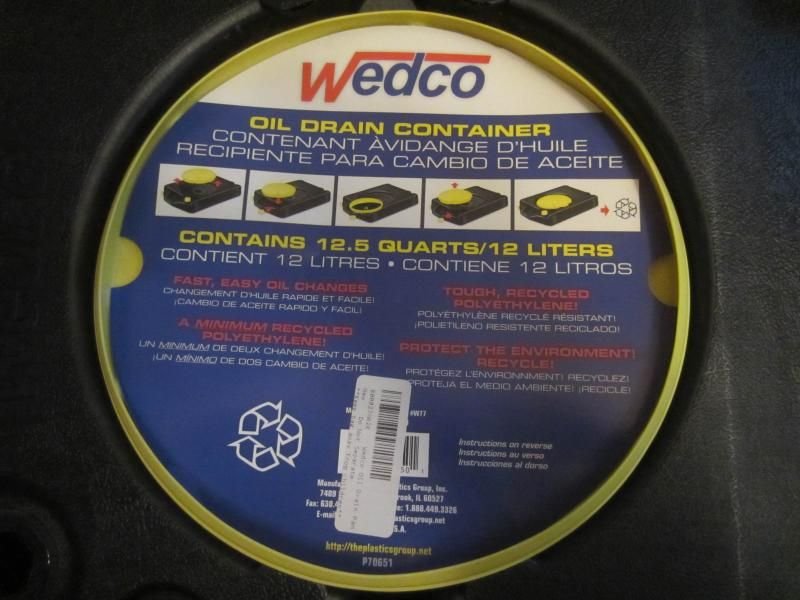
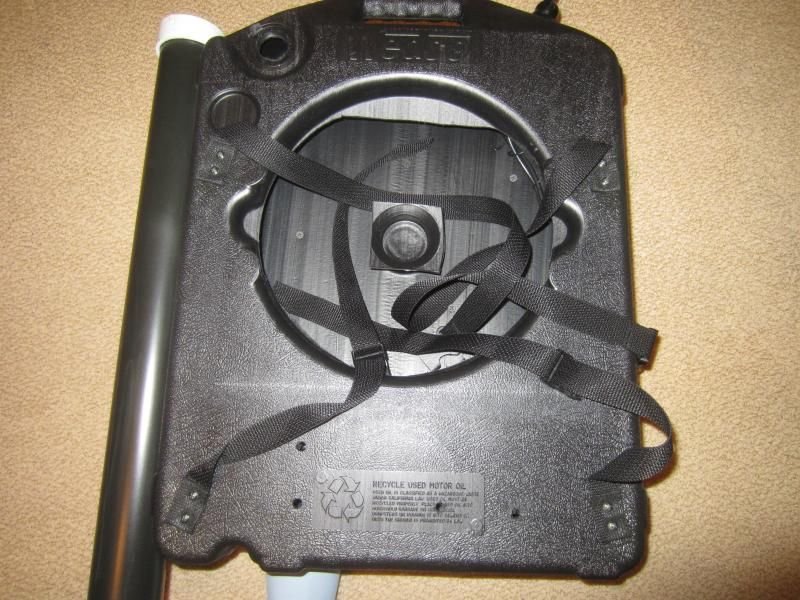
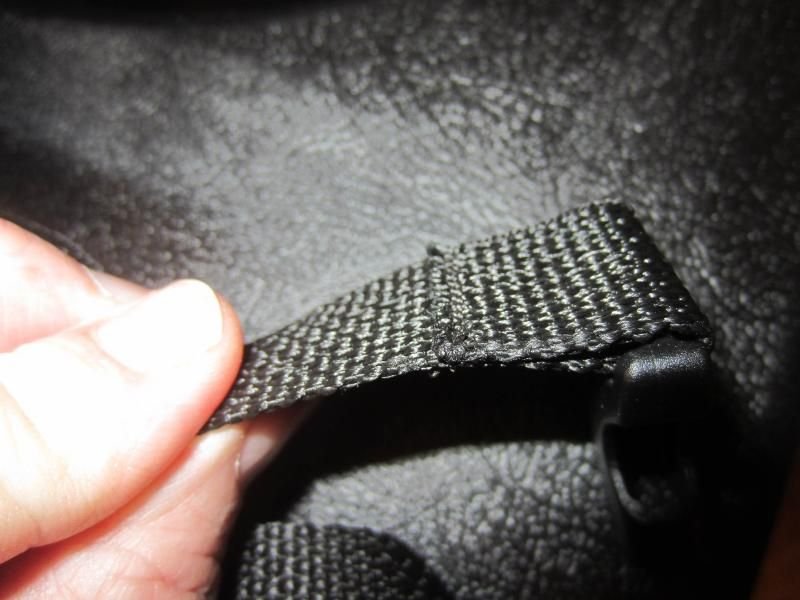
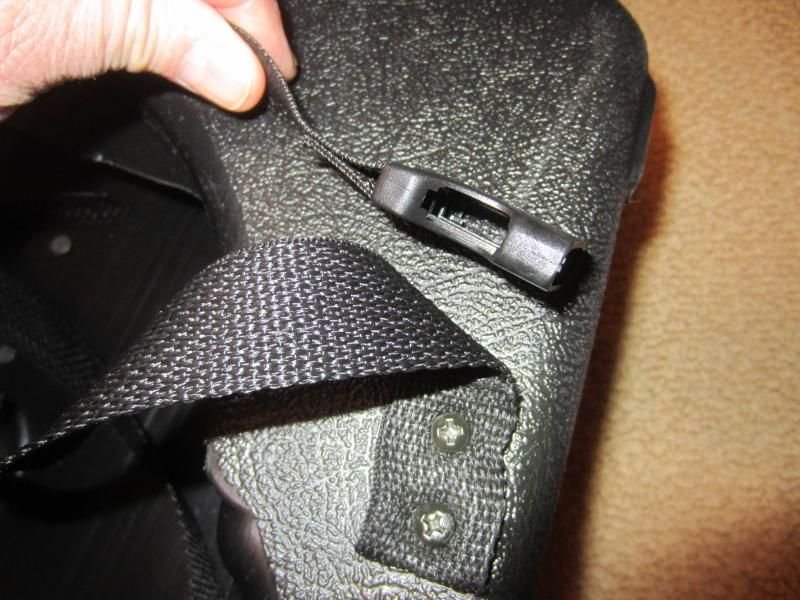
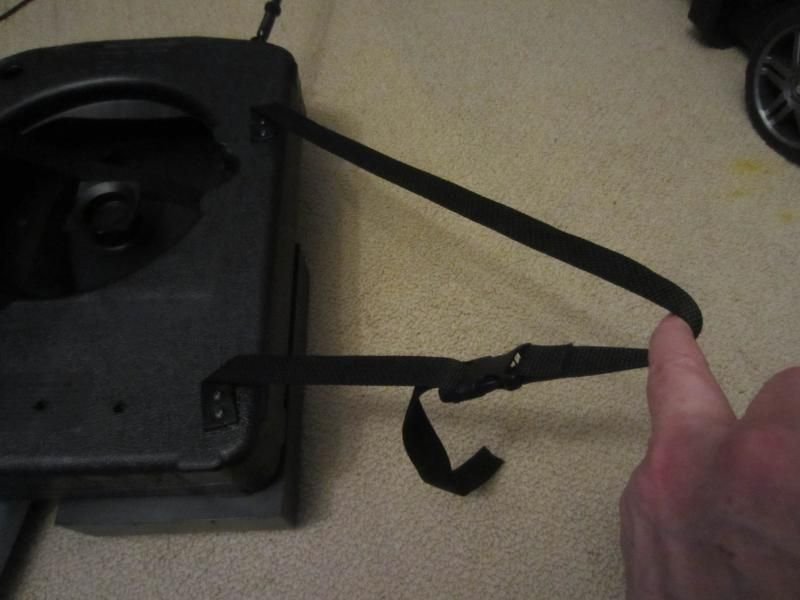
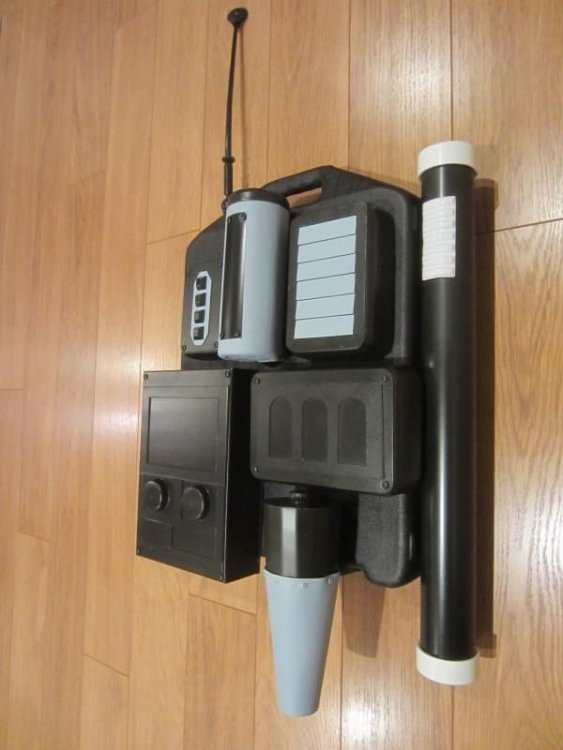
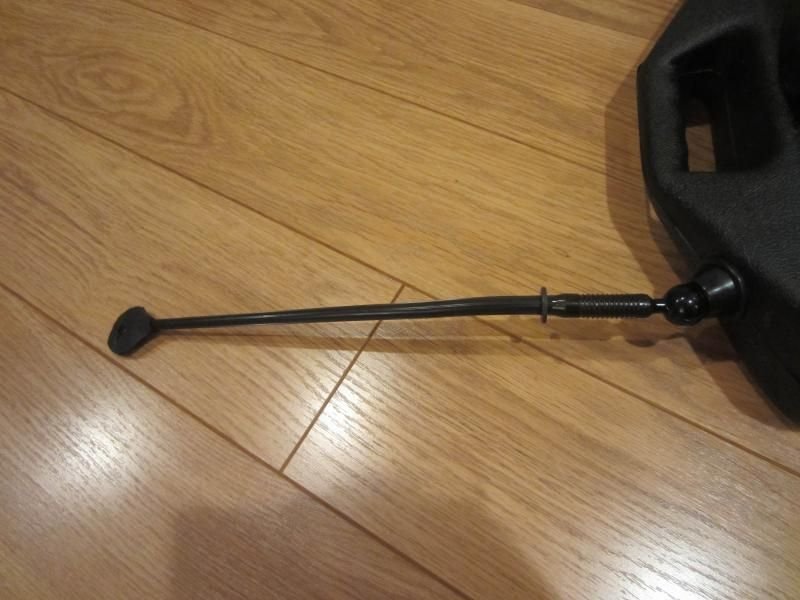
This will be the final installment to the HWT back pack build. Part 3 Part 1 http://www.whitearmor.net/forum/topic/30034-hwt-backpack-build-part-1/ Part 2 http://www.whitearmor.net/forum/topic/30036-heavy-weapons-backpack-build-part-2/ 7) Backpack Base: Once I figured out the size I needed for a base, I found and purchased 12.5 quart drain bucket from Amazon. 7a) Remove the drain funnel, fill & pour caps and cut off the threaded spouts. 7b) Scuff up the plastic to take off some of the new plastic shine 7) Installed the rubber radio antenna in the top hole (pour spout) DO NOT install antenna. 7) I slid a flat washer down onto the antenna (seen above) 7d) Took a section of Velcro (hook and loop sides), cut out a antenna top and glued it to the antenna (seen above) 7e) Assemble and install upper and lower mounting straps using 1" nylon webbing and 1" buckles. 7f) After determining how all the pieces we going to paced I drilled holes from the front panel side. Using drywall screws and glue attached each piece until completed. Final pictures. I do apologies for this being in 3 parts. Part 1 http://www.whitearmor.net/forum/topic/30034-hwt-backpack-build-part-1/ Part 2 http://www.whitearmor.net/forum/topic/30036-heavy-weapons-backpack-build-part-2/ If you have any questions or comment please don't hesitate to leave them here or PM me.


-
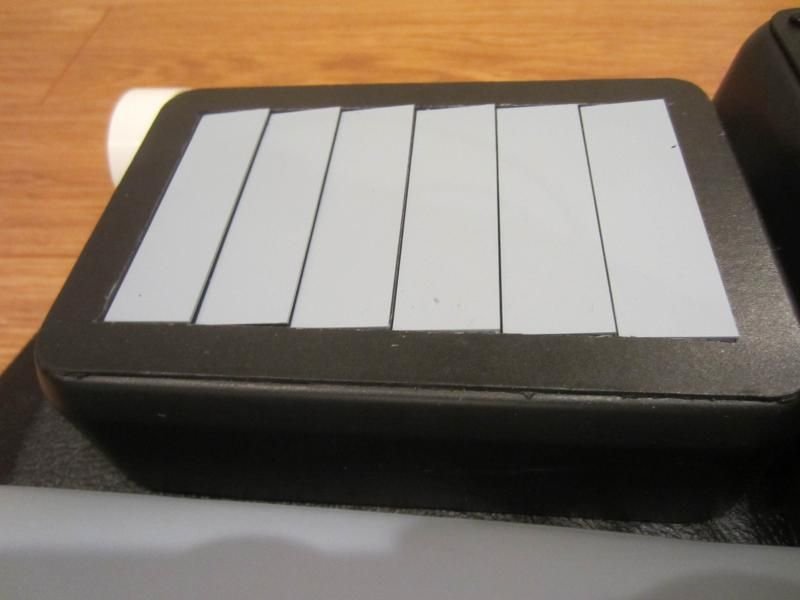
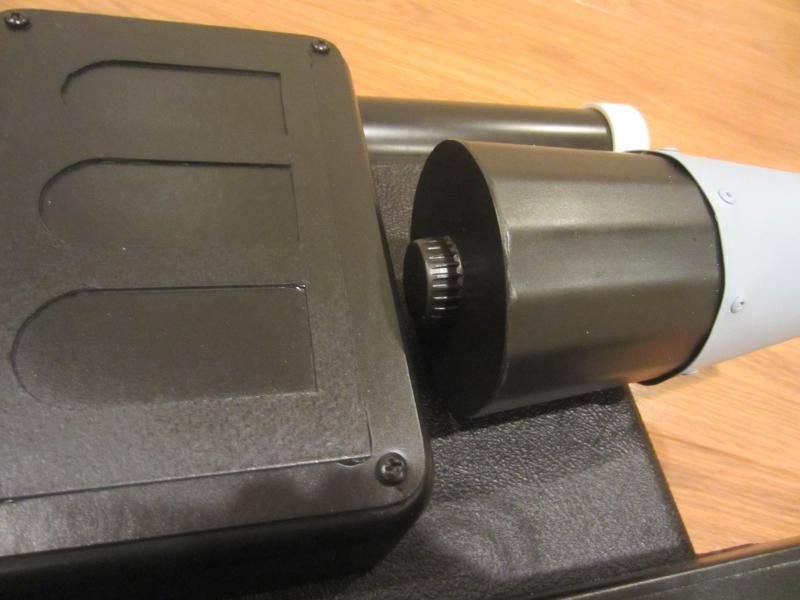
PART 2 Continuing on from HWT backpack build Part 1 > http://www.whitearmor.net/forum/topic/30034-hwt-backpack-build-part-1/ Part 1: http://www.whitearmo...k-build-part-1/ Part 3: http://www.whitearmo...d-part-3-final/ 4) Button Panel, Vent panel and lower right Panel CRL Images 4a) From Popit! storage set Button Panel - Xe 041 container 6.6" x 4.75", Vent Panel - Xe 051 container 8" x 5.6" Right Panel - Xe 061 container 9.1" x 6.6" Using large Exacto knife carefully remove sealing edges from all three containers. 4b) Sand all edges top and bottom for a level finish 4c) Place all 3 containers on the thick plastic Parking sign material, stencil and cut out material for container backs. 4d) Once cut, glue plastic covers to containers at removed sealing lip side. 4e) Once dry flip containers over. Place on black Art paper, draw and cut out. These will be the base for the front panels. Glue black paper to bottom side of containers. Once the glue has dried, at the corner edges drill and install 4 screws on the Xe 041 Button and Xe 061 lower right containers ONLY!, the Xe 051 Vent container does not require screws. 4f) Lower right panel Face plate: Cut a 6-3/4" x 4" section for the black art paper. Draw and cut out 3 arches inside this section as shown. Once finished it should look similar to this but unpainted. 4g) Trim, sand, prime and paint all 3 containers on all sides (not shown) 4h) Button Panel face plate: Using the thick parking sign material cut a 4" x 1-1/4" section. Angle cut the edges. Primer and paint using Valspar Silver Fox spray paint. 4i) Primer and paint buttons matte black. NOTE: These are now available in black, no need to paint. (Thanks Shawn) https://www.amazon.com/gp/product/B01M8I6YLH/ref=oh_aui_detailpage_o00_s01?ie=UTF8&psc=1 4j) Equally space and glue buttons to newly cut plate. Glue plate to button box. When finished the Button box should look similar to this. 4k) Vent Panel: Using the thick parking sign material cut 6 rectangles, 3-1/8" x 7/8". Prime and paint Valspar Silver Fox 4l) Mark and cut out center section 3-1/8" x 5-7/8". 4m) Begin installing vent sections starting with the bottom placing it as shown. 4n) Before laying down the next vent place a small 1/8" piece of scrap material to support the next vent. Once finished the vent panel should look similar to this 5) Drop Siphon Funnel: CRL Image 5a) Cup assembly. Take your cup and cut the bottom making it 3 to 3-1/2" in length unless you have a cup that length already (no image) 5b) Draw and cut a section for the thick or thin sign material, doesn't matter here. Glue it to the top of the cup. Glue the soda cap to the plastic. 5c) Trip, sand, primer and paint matte black 5d) Cone section: Take the thin sale sign material and roll in into a cone like this. 5e) Apply glue, clamp and tape. Let sit min 12 hours. 5f) Cut the upper section so the it overlaps the lower section of the cup by 1/2". Cut the lower section the that the overall length is around 6" 5g) Trim, sand and prime. Once dry attach it to the cup by drilling 8 holes equally around the circumference of the cup and cone. Rivet the cone to the cup. Mask off the cup area and paint the cone Valspar Silver Fox. When finished it should look similar to this. 6) Confirm all components are ready to attach to backpack base. End of Part 2 Part 1: http://www.whitearmo...k-build-part-1/ Part 3: http://www.whitearmo...d-part-3-final/
-
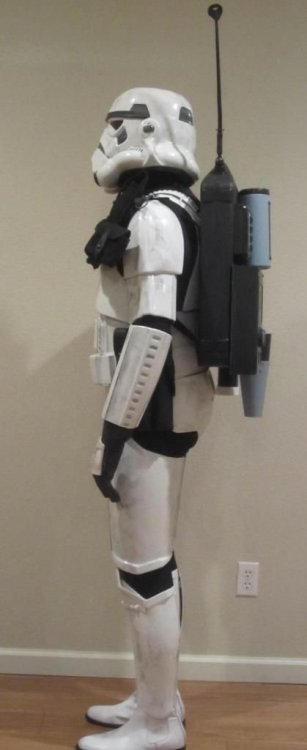
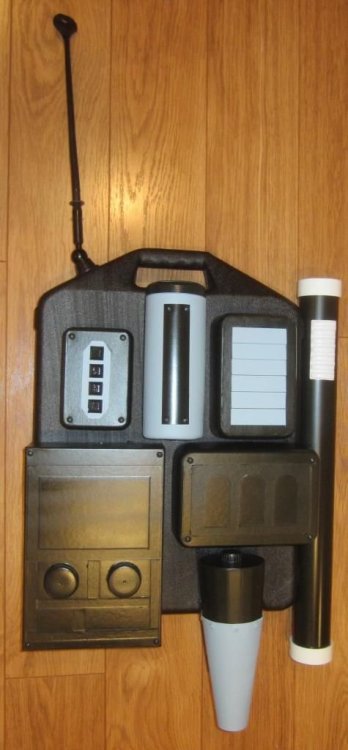
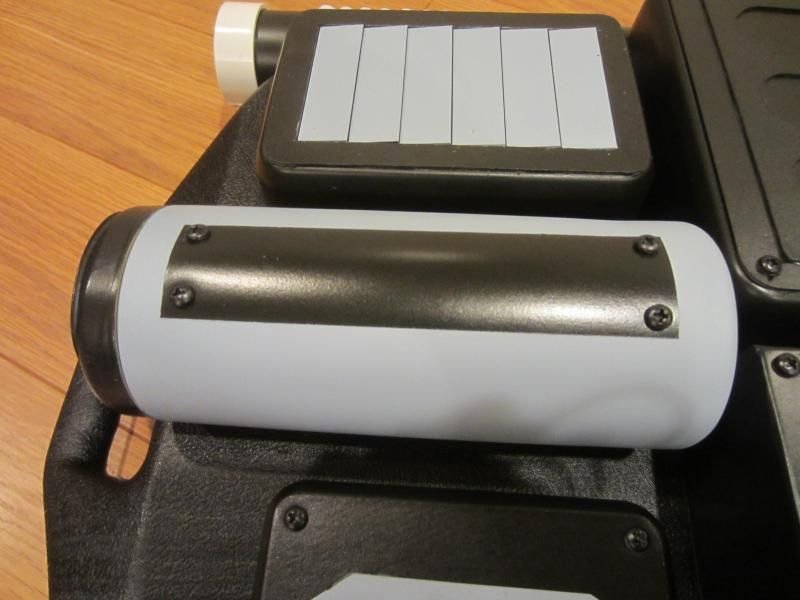
Heavy Weapons Troopers, The following is a tutorial on how to build an approved Heavy Weapons Trooper backpack for around $140 US. I wanted to provide nice illustration pictures and giving file size constraints I will have to break this up into a couple few parts. PART 1 Part 2: http://www.whitearmo...k-build-part-2/ Part 3: http://www.whitearmo...d-part-3-final/ Items needed: Any armor builder: TK shoulder strap cover or similar, $8+ Amazon.com: Oil Drain (22"x 15"x 4") or similar $17, Amazon > https://www.amazon.com/dp/B01FSYZ764/ref=cm_sw_r_cp_apa_NAVAyb6BKM6QB Plastic Container kit $23, Amazon > http://www.amazon.com/NEW----Stackit-Plastic-Container/dp/B00IOSF14A/ref=sr_1_1?ie=UTF8&qid=1423410792&sr=8-1&keywords=NEW%21+--+Stackit%21+-+By+Popit%21+%286+Plastic+Container+Set+%2F+Food+Saver+Set%29 Hardware store or other: 2' x 2" PVC $4, Lowe's 2" PVC Caps (x2), $3, Lowe's 15"x19" No Parking sign (thick plastic) $6 15"x19" For Sale sign (thin plastic), $5 3-1/2" x 8-1/2" wipes container, $3 #8 x .375" Philips head screws, (x16-20), $2 Bumpers, $3, https://www.amazon.com/gp/product/B01M8I6YLH/ref=oh_aui_detailpage_o00_s01?ie=UTF8&psc=1 12oz Valspar Silver Fox spray paint (looks like Slate Blue), or flat light grey should work as well. $5 12oz Rust-Oleum Flat Light Gray Primer spray paint, $4 12oz Rust-Oleum Black Matte spray paint, $6 Rivets 1/6"x1/8" (x8) & Rivet Gun, $20 Hobby or craft store: E6000 clear or white, $4 Art paper, heavy (1/16" thick), black 12"x12", $4 Photo storage box or similar 7-1/2" x 11" x 4-1/4", $4 1-1/2" W x 1-1/2"L Velcro (hook and loop), or similar 8' x 1" black nylon webbing 1" black adjustable buckle Automotive store or other: Antenna option discontinued. If you're following this build thread DO NOT install an antenna as seen the following illustrations. Other items: 4" x 4" tapered drinking cup $2 1" soda bottle cap 2-1/4" juice dispenser caps x2 Tools Needed: Drill Hacksaw or similar Sander with heavy and fine sandpaper, or just sandpaper Scotch-Brite pad Rivet gun Steel ruler Pencil Sharpie Small and Large Exacto knives Cut resistant, leather and latex gloves Safety glasses Philips screw driver I think I have everything, so let's begin. Next are a couple pics of my recently completed and approved HWT backpack 1) Antenna Tube: CRL Image 1a) Modify Face plate: In this section we'll take and modify a TK shoulder cover. Before 1b) Using a heat gun or hot water heat up material until it is pliable. Once pliable place a flat heavy object on material until cooled and flat, 30-60 seconds. After 1c) Cut out a 7 rib section. Reheat new section. Once pliable, using a towel and gloves place on the 2" PVC to shape it. Once completed it should look like this. Reheat if necessary. Place off to the side for later installation. 1d) Install and cut end caps: Mark PCV pipe and caps 1" from edges. 1e) Install caps on pipe up to marked areas. If the caps are firmly attached proceed to 1f. If not,remove, glue, let dry and then proceed. 1f) Cut of outer edge of caps where marked and sand down rough edges. 1g) Glue face plate: Glue 2" away from either edge. Wrap with rubber bands or tape and let glue dry. Once dried, tape off face plate and end caps. Lightly scuff up pipe with Scotch-Brite pad, wipe down with cloth and spray paint Matte black. Let dry then remove tape. It should look similar to this when finished. 2) Radio CRL Image 2a) Remove photo storage box lid and outside metal ID label holder. (no photo) 2b) Cut and remove lid edge. This will be used for the back of the radio (no photo) 2c) Mark and cut main box side edge to 2-1/2" in depth. 2d) Glue the the lid section to the main box, let dry then sand edges. 2e) Radio Face assembly Before gluing and paint 2f) Place 1 screw in each corner. (shown) 2g) Using 1/16" heavy, black art paper, cut upper face (square) section is 5" x 7" x 5/8" wide 2h) The lower, outer sections are 1/2" wide (shown) 2i) The lower inner sections are 5/8" wide (shown) 2j) Once all edges have been cut out, glue to box (without knobs). I suggest using a book or something flat with weight and wider than the box to evenly hold all pieces until dry. 2k) Once glue is dry, glue on knobs as shown. 2l) Once dry, using Scotch-Brite scuff up all radio surfaces. Primer spray paint all sides of radio, let dry. Scuff again then spray paint with Matte Black, let dry. Once finished your radio should look similar to this. 3) Upper Round Tube (wipes container) CRL Image 3a) Remove contents and outer label from container. Remove lid. Using Scotch-Brite scuff up all areas. Wipe down with towel. Primer spray paint and let dry. 3b) Scuff up primer and wipe with towel. Main body spray paint using Valspar Silver Fox. Let dry 3c) Once dry, mask off body leaving 6-1/2" x 1-1/2" exposed. 3d) Place 4 screws in a piece of cardboard and scuff up (not shown) 3e) Using Matte black spray paint body, lid and the 4 screws (not shown) 3f) Install screws in each corner of the black body section. When finished the tube assembly should look similar to this. End of Part 1 Part 2: http://www.whitearmo...k-build-part-2/ Part 3: http://www.whitearmo...d-part-3-final/
-
Thank you and you're very welcome. Enjoy
-
Anthony Jobe 10116 Centurion A4